 ALLPCB


In the world of PCB assembly, achieving consistent solder paste deposition is critical for high-quality results. One of the most important factors in this process is maintaining a clean stencil. If you're searching for effective ways to manage the stencil cleaning process, explore stencil cleaning methods, or find the right stencil cleaning equipment, you've come to the right place. This guide will walk you through everything you need to know about stencil cleaning, solder paste residue removal, and stencil maintenance to ensure flawless performance in your production line.
At its core, stencil cleaning is about removing solder paste residue and contaminants to prevent defects in surface mount technology (SMT) assembly. A dirty stencil can lead to uneven paste application, bridging, or insufficient solder, causing costly rework or failures. In this comprehensive blog, we'll dive deep into proven techniques, tools, and best practices to keep your stencils in top condition for consistent results.
Why Stencil Cleaning Matters in PCB Assembly
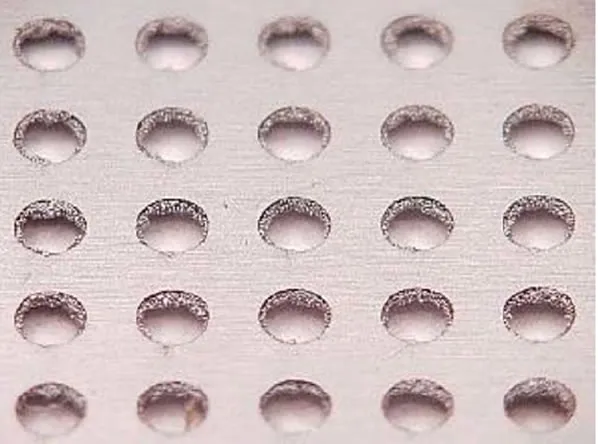
Stencils play a vital role in applying solder paste accurately onto PCBs during the assembly process. These thin metal sheets, often made of stainless steel, have precise apertures that align with the PCB pads to deposit paste for component attachment. However, after each print cycle, solder paste residue and contaminants can build up on the stencil surface and inside the apertures. If not cleaned properly, this buildup can cause defects like smearing, clogging, or misalignment.
Studies in the industry suggest that nearly 70% of SMT defects are linked to poor solder paste deposition, often due to inadequate stencil cleaning. By prioritizing a robust stencil cleaning process, PCB manufacturers can significantly reduce defect rates, improve yield, and save on production costs. Whether you're running a high-volume production line or a small-scale operation, understanding stencil maintenance is key to achieving reliable results.
Common Challenges in Solder Paste Residue Removal
Before diving into stencil cleaning methods, it's important to understand the challenges associated with solder paste residue removal. Solder paste is a sticky mixture of tiny solder particles and flux, which can adhere strongly to stencil surfaces. Over time, this residue hardens, making it even harder to remove. Additionally, modern PCB designs often use fine-pitch components, requiring stencils with smaller apertures that are more prone to clogging.
Another challenge is the risk of damaging the stencil during cleaning. The solder paste stencil is delicate, and using harsh chemicals or abrasive tools can cause scratches or deformations, leading to inaccurate paste deposition. Balancing effective cleaning with stencil preservation is essential for long-term performance.
Effective Stencil Cleaning Methods for Optimal Results
There are several stencil cleaning methods available, each suited to different production environments and budgets. Below, we'll explore the most common techniques to help you choose the best approach for your needs.
1. Manual Cleaning with Solvents
Manual cleaning is a straightforward and cost-effective method often used in low-volume or prototype assembly. This process involves wiping the stencil with lint-free cloths soaked in a solvent like isopropyl alcohol (IPA). The solvent helps dissolve and remove solder paste residue from the stencil surface and apertures.
Steps for Manual Cleaning:
- Wipe both the top and bottom surfaces of the stencil using a lint-free cloth or wipe soaked in IPA.
- Use a soft-bristled brush or compressed air to dislodge residue from small apertures.
- Dry the stencil thoroughly with compressed air or a clean cloth to prevent solvent residue.
While effective for small-scale operations, manual cleaning can be time-consuming and inconsistent for high-volume production. It also carries a risk of incomplete residue removal if not done carefully.
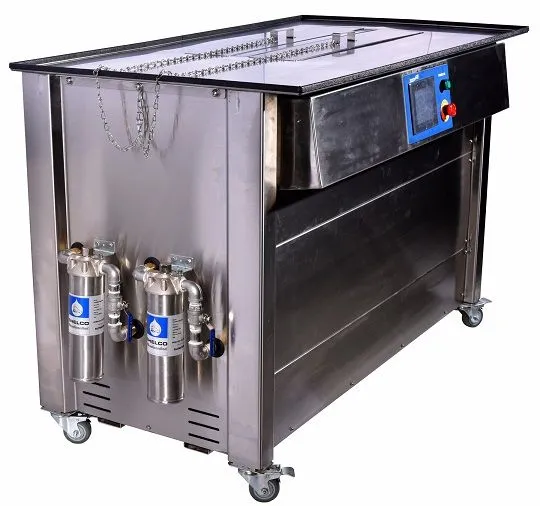
2. Automated Stencil Cleaning Machines
For larger-scale operations, automated stencil cleaning equipment offers a more efficient and consistent solution. These machines use a combination of spray systems, ultrasonic waves, or high-pressure jets to clean stencils thoroughly. Many systems also include drying mechanisms to ensure the stencil is ready for immediate reuse.
Benefits of Automated Cleaning:
- Consistency: Automated systems deliver uniform cleaning results, reducing human error.
- Speed: Cleaning cycles are much faster than manual methods, improving throughput.
- Safety: Enclosed systems minimize exposure to harmful chemicals.
Automated equipment can be a significant investment, but the long-term benefits in terms of reduced defects and labor costs often outweigh the initial expense. When selecting a machine, consider factors like stencil size compatibility, cleaning solution type, and cycle time.

3. Ultrasonic Cleaning for Precision
Ultrasonic cleaning is a specialized method that uses high-frequency sound waves to create tiny bubbles in a liquid cleaning solution. These bubbles implode near the stencil surface, dislodging solder paste residue even from the smallest apertures. This method is particularly effective for fine-pitch stencils used in advanced PCB design.
Key Considerations:
- Use a compatible cleaning solution to avoid damaging the stencil material.
- Monitor cleaning time to prevent overexposure, which could cause wear on the stencil.
Ultrasonic cleaning is highly effective but requires careful control to avoid potential damage. It's often used in conjunction with automated systems for optimal results.
Choosing the Right Stencil Cleaning Equipment
Selecting the appropriate stencil cleaning equipment depends on your production volume, budget, and specific requirements. Here are some factors to consider when making your choice:
- Production Volume: High-volume manufacturers should invest in automated systems to handle frequent cleaning cycles, while smaller operations may find manual tools sufficient.
- Stencil Size and Type: Ensure the equipment can accommodate your stencil dimensions and material, whether it's framed, frameless, or made of stainless steel or nickel.
- Cleaning Solution Compatibility: Some machines require specific cleaning fluids, so check if they align with your environmental and safety standards.
- Maintenance Needs: Look for equipment with easy-to-replace parts and minimal downtime for maintenance to keep your production line running smoothly.
Investing in the right equipment can streamline your stencil cleaning process and improve overall efficiency. Regular calibration and upkeep of the equipment are also crucial to ensure consistent performance.
Best Practices for Stencil Maintenance
Beyond cleaning, proper stencil maintenance is essential to extend the lifespan of your stencils and maintain print quality. Here are some actionable tips for effective stencil care:
1. Regular Cleaning Schedules
Establish a cleaning schedule based on your production volume and the type of solder paste used. For high-volume runs, clean stencils every 4-6 hours or after a set number of prints (e.g., 5-10 cycles) to prevent residue buildup. For less frequent use, cleaning after each session may suffice.
2. Proper Storage
Store stencils in a clean, dry environment to avoid contamination or corrosion. Use protective covers or dedicated storage racks to prevent physical damage. Avoid stacking stencils directly on top of each other, as this can cause scratches or bending.
3. Inspection for Wear and Damage
Regularly inspect stencils for signs of wear, such as scratches, dents, or deformed apertures. Even minor damage can affect paste deposition, so address issues promptly. Use a magnifying tool or microscope to check fine-pitch apertures for blockages or irregularities.
4. Use Compatible Cleaning Solutions
Avoid using harsh chemicals or abrasive materials that could damage the stencil surface. Opt for industry-approved solvents or cleaning solutions designed specifically for solder paste residue removal. Always follow the manufacturer's recommendations for cleaning agents and methods.
The Impact of Stencil Cleaning on Solder Paste Deposition
A clean stencil directly impacts the quality of solder paste deposition. When apertures are free of residue, solder paste transfers smoothly and evenly onto the PCB pads, ensuring proper component placement and strong solder joints. On the other hand, a dirty stencil can lead to issues like:
- Bridging: Excess paste can cause short circuits between adjacent pads.
- Insufficient Solder: Blocked apertures result in incomplete paste deposition, leading to weak joints.
- Misalignment: Residue buildup can distort paste application, affecting component alignment.
By maintaining a rigorous stencil cleaning process, you can minimize these risks and achieve consistent, high-quality results. For instance, manufacturers who implement automated cleaning systems often report defect rates dropping by as much as 30-40%, highlighting the tangible benefits of proper stencil care.
Environmental and Safety Considerations in Stencil Cleaning
Stencil cleaning often involves the use of chemicals and solvents, which can pose environmental and safety concerns. To address these issues, consider the following:
- Eco-Friendly Solutions: Opt for biodegradable or low-VOC (volatile organic compound) cleaning fluids to reduce environmental impact.
- Proper Disposal: Dispose of used solvents and contaminated wipes according to local regulations to prevent pollution.
- Safety Protocols: Provide training for staff on handling chemicals and operating cleaning equipment. Use personal protective equipment (PPE) like gloves and goggles to minimize exposure.
Balancing effective cleaning with environmental responsibility is not only good practice but also aligns with industry standards and regulations.
Troubleshooting Common Stencil Cleaning Issues
Even with the best practices in place, challenges can arise during the stencil cleaning process. Here are some common issues and how to address them:
- Stubborn Residue: If solder paste residue won't come off, try a stronger solvent or extend the cleaning cycle in an automated machine. Avoid excessive scrubbing, which can damage the stencil.
- Streaks or Smears: This may indicate incomplete drying or solvent residue. Ensure the stencil is thoroughly dried after cleaning using compressed air or a drying system.
- Damaged Apertures: If cleaning methods cause wear or deformation, review your process and switch to gentler techniques or compatible solutions.
Regular monitoring and adjustment of your cleaning approach can help resolve these issues and maintain stencil performance.
Conclusion: Mastering Stencil Cleaning for Better PCB Assembly
Stencil cleaning is a cornerstone of successful PCB assembly, directly influencing the quality of solder paste deposition and the reliability of your final product. By understanding the stencil cleaning process, exploring various stencil cleaning methods, and investing in the right stencil cleaning equipment, you can achieve consistent results and minimize defects. Proper stencil maintenance, from regular cleaning schedules to careful storage, further ensures long-term performance and cost savings.
Whether you're manually wiping down stencils in a small workshop or using advanced automated systems in a high-volume facility, the principles of effective solder paste residue removal remain the same: consistency, precision, and care. Implement the tips and techniques shared in this guide to elevate your production process and deliver top-notch PCB assemblies every time.
With a clean stencil, you're one step closer to flawless solder paste application and superior manufacturing outcomes. Keep refining your approach, stay updated on industry best practices, and watch your production quality soar.


