ALLPCB


In the world of electronics manufacturing, Surface Mount Technology (SMT) assembly demands precision and efficiency. At the heart of this process lies a critical tool: the SMT stencil. But what role do stencils play in achieving high-precision SMT assembly? Simply put, SMT stencils ensure accurate solder paste application on printed circuit boards (PCBs), which is essential for flawless component placement and reliable connections. In this comprehensive guide, we’ll dive deep into the importance of stencils, covering key aspects like SMT stencil design, materials, manufacturing, cleaning, and alignment. Whether you're an engineer or a manufacturer, this post will help you understand how to optimize your SMT processes for better results.
Why Stencils Matter in SMT Assembly
SMT assembly is all about placing tiny components onto PCBs with pinpoint accuracy. A single misalignment or uneven solder paste application can lead to defects like bridging, insufficient solder, or component misalignment. This is where SMT stencils come in. These thin metal sheets, etched with precise openings, act as a template for depositing solder paste onto the PCB. By controlling the amount and location of the paste, stencils directly impact the quality of the final assembly.
High-precision SMT assembly, often used in industries like aerospace, medical devices, and consumer electronics, requires even tighter control. With component sizes shrinking to 0201 (0.6mm x 0.3mm) or smaller, and pitch distances as tight as 0.4mm, there’s no room for error. A well-designed stencil ensures that solder paste is applied uniformly, reducing defects and improving yield rates by up to 30% in some high-volume production lines.

Key Elements of SMT Stencil Design
The design of an SMT stencil is the foundation of its performance. A poorly designed stencil can lead to uneven paste deposits or misalignment, causing assembly failures. When focusing on SMT stencil design, several factors must be considered to achieve optimal results.
- Aperture Size and Shape: The openings, or apertures, in the stencil must match the pads on the PCB. For fine-pitch components, apertures are often reduced by 10-20% compared to the pad size to prevent excess paste, which can cause bridging. For example, a 0.5mm pitch component might have an aperture width of 0.4mm to ensure clean separation.
- Stencil Thickness: The thickness of the stencil, typically ranging from 0.08mm to 0.15mm, determines the volume of solder paste deposited. Thinner stencils (around 0.1mm) are ideal for smaller components, while thicker ones (0.12-0.15mm) suit larger components requiring more paste.
- Aspect Ratio: This is the ratio of aperture width to stencil thickness. A minimum aspect ratio of 1.5 is often recommended to ensure proper paste release. For instance, a 0.15mm thick stencil should have apertures at least 0.225mm wide.
By fine-tuning these design elements, manufacturers can achieve consistent solder paste deposits, even for complex PCB layouts with mixed component sizes.
Choosing the Right SMT Stencil Materials
The material used for an SMT stencil affects its durability, precision, and cost. Selecting the right SMT stencil materials is crucial for high-precision assembly, especially in high-volume production environments.
- Stainless Steel: The most common material, stainless steel offers excellent durability and resistance to wear. It can withstand thousands of print cycles without deforming, making it ideal for long-term use. Most stencils are made from 300-series stainless steel due to its corrosion resistance.
- Nickel: Nickel stencils are sometimes used for their smoother aperture walls, which improve solder paste release. They are often electroformed, a process that creates ultra-fine openings for micro-components. However, nickel stencils are more expensive and less durable than stainless steel.
- Polymer: For low-volume or prototype runs, polymer stencils are a cost-effective option. They are less durable and not suited for high-precision work but can be useful for quick testing.
For high-precision SMT assembly, stainless steel remains the go-to choice due to its balance of precision and longevity. Some manufacturers also apply nano-coatings to stencil surfaces to reduce paste adhesion and improve cleaning efficiency.
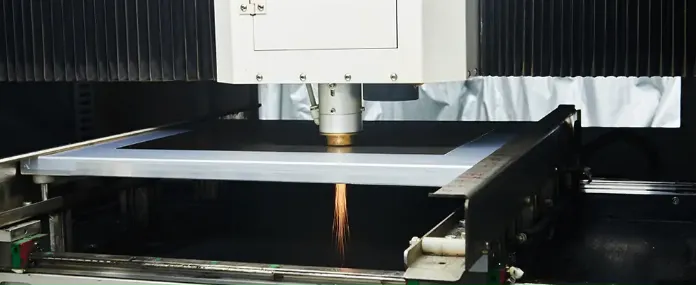
The Process of SMT Stencil Manufacturing
The way a stencil is made directly impacts its accuracy and performance. SMT stencil manufacturing has evolved with technology, and today’s methods ensure incredibly tight tolerances for high-precision needs.
- Laser Cutting: The most widely used method, laser cutting creates precise apertures with smooth edges. Modern laser systems can achieve tolerances as tight as ±0.005mm, ensuring exact alignment with PCB pads. This method is ideal for fine-pitch and micro-BGA components.
- Chemical Etching: An older method, chemical etching uses acids to remove material and create apertures. While cost-effective for simpler designs, it lacks the precision of laser cutting, with tolerances often exceeding ±0.02mm, making it unsuitable for ultra-fine pitch applications.
- Electroforming: This process builds up material (usually nickel) layer by layer to form the stencil. It’s used for applications requiring extremely small apertures (below 0.2mm) and offers superior paste release due to smoother walls.
Laser-cut stainless steel stencils are the industry standard for most high-precision SMT assembly projects due to their accuracy and scalability. The manufacturing process also includes rigorous quality checks, such as optical inspections, to ensure every aperture meets design specifications.
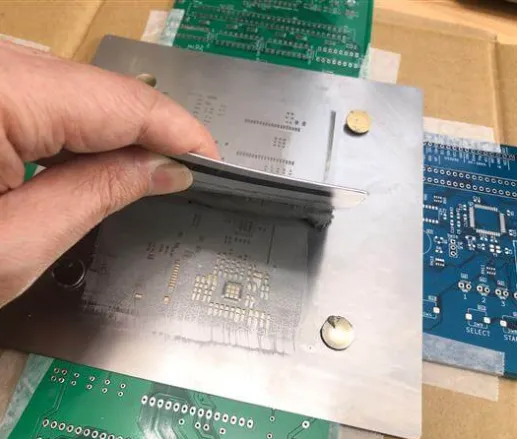
Importance of SMT Stencil Cleaning
Over time, solder paste residues build up on stencils, especially in the tiny apertures used for fine-pitch components. If not addressed, this can lead to inconsistent paste deposits and defects. Proper SMT stencil cleaning is essential to maintain quality in high-precision assembly.
- Manual Cleaning: For low-volume production, wiping the stencil with lint-free cloths and isopropyl alcohol can suffice. However, this method is time-consuming and may miss residues in small apertures.
- Automated Cleaning: High-volume manufacturers often use ultrasonic or spray-in-air cleaning systems. These machines use specialized solvents to remove paste residues without damaging the stencil. Ultrasonic cleaning, for instance, can reduce cleaning time by 50% compared to manual methods.
- Frequency: Cleaning frequency depends on production volume and paste type. As a rule of thumb, stencils should be cleaned after every 5-10 print cycles in high-precision environments to prevent buildup.
Regular cleaning not only extends the life of the stencil but also ensures consistent paste application. Some advanced cleaning systems even use deionized water to prevent static buildup, which can attract dust and contaminate the stencil.
Achieving Perfect SMT Stencil Alignment
Even the best-designed stencil is useless if it’s not aligned correctly with the PCB. SMT stencil alignment is a critical step in ensuring that solder paste lands exactly where it’s needed.
- Fiducial Marks: Many PCBs and stencils include fiducial marks—small reference points that help align the stencil with the board. Vision systems in modern SMT printers use these marks to achieve alignment accuracy within 0.01mm.
- Printer Calibration: The stencil printer must be calibrated regularly to maintain alignment. Misalignment by even 0.05mm can cause paste to shift, leading to soldering defects, especially for components with a pitch below 0.5mm.
- Frame Types: Stencils can be frameless (loose sheets) or framed (mounted in a rigid frame). Framed stencils offer better stability and alignment during printing, making them the preferred choice for high-precision work.
Advanced SMT printers often feature automatic alignment systems that use cameras to detect fiducials and adjust the stencil position in real time. This technology can reduce alignment errors by up to 90%, ensuring consistent results even in high-speed production lines.
Best Practices for Using Stencils in High-Precision SMT Assembly
To maximize the benefits of stencils in SMT assembly, manufacturers should follow these best practices:
- Customize Stencil Design: Work closely with your design team to tailor stencil apertures and thickness to your specific PCB layout and component mix.
- Invest in Quality Materials: Opt for high-grade stainless steel stencils for durability and precision, especially for long production runs.
- Use Advanced Manufacturing Techniques: Choose laser-cut stencils for tight tolerances and consistent performance.
- Maintain a Cleaning Schedule: Implement regular cleaning protocols to prevent paste buildup and ensure consistent deposits.
- Verify Alignment: Use vision systems and fiducial marks to confirm stencil-to-PCB alignment before every print cycle.
By adhering to these practices, manufacturers can reduce defect rates, improve assembly yields, and maintain the high standards required for industries like automotive and medical electronics.
Challenges and Solutions in SMT Stencil Use
While stencils are indispensable, they come with challenges, especially in high-precision SMT assembly. One common issue is paste release for ultra-fine apertures (below 0.3mm), where paste can stick to the stencil walls. Solutions include using nano-coated stencils or adjusting the stencil thickness to improve the aspect ratio.
Another challenge is stencil wear over time, particularly in high-volume production. After 50,000-100,000 print cycles, even stainless steel stencils may show signs of deformation or aperture damage. Regular inspections and timely replacement can prevent quality issues. For smaller runs, reusable polymer stencils might be a cost-effective alternative, though they lack the precision of metal stencils.
Conclusion: Elevating SMT Assembly with Stencils
Stencils play a pivotal role in high-precision SMT assembly, acting as the gateway to accurate solder paste application. From SMT stencil design and materials to manufacturing, cleaning, and alignment, every aspect contributes to the quality of the final product. By understanding and optimizing these elements, manufacturers can achieve consistent results, reduce defects, and meet the stringent demands of modern electronics.
Whether you’re working on a prototype or a high-volume production line, investing in well-designed, high-quality stencils is a step toward success. With the right approach, you can ensure that your SMT assembly process is efficient, reliable, and ready for the challenges of tomorrow’s technology.