 ALLPCB


Are you struggling with unreliable connections on your PCB projects? Cold solder joints could be the culprit. These defective connections happen when solder doesn’t properly melt or bond with the components, leading to weak or failed electrical connections. In this comprehensive guide, we’ll dive into preventing cold solder joints by focusing on the right soldering iron temperature, effective techniques, and essential tools. Whether you're troubleshooting cold solder joint symptoms or learning how to avoid lead-free solder cold joint problems, this post will equip you with actionable tips to ensure strong, reliable solder joints every time.
What Are Cold Solder Joints and Why Do They Matter?
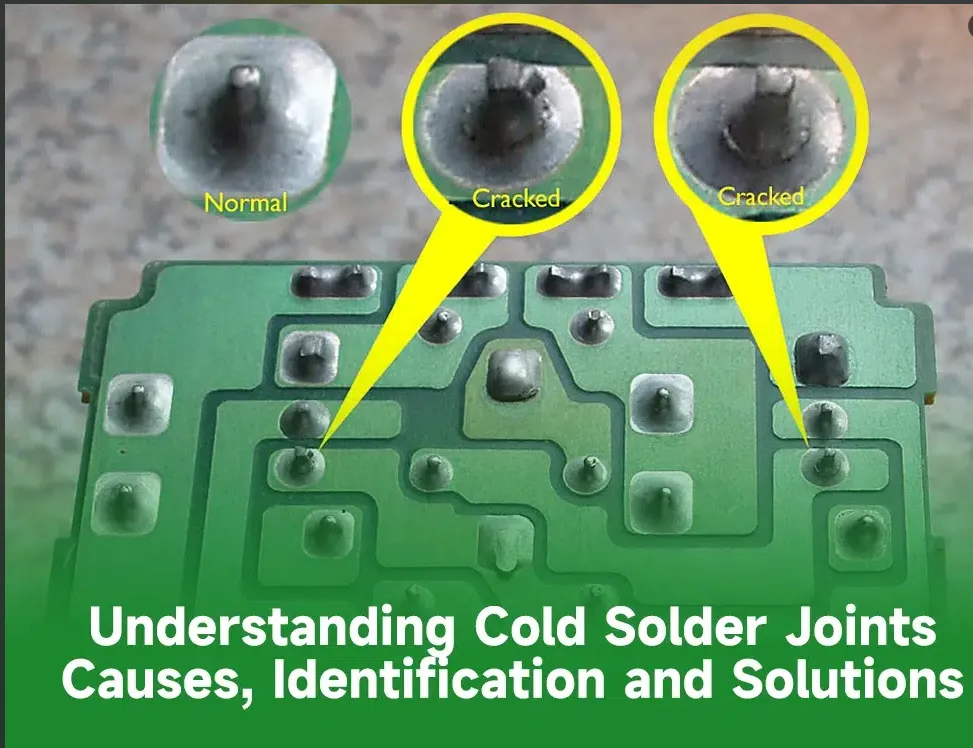
A cold solder joint occurs when the solder fails to melt completely or bond properly with the metal surfaces of a PCB component and pad. This results in a connection that looks dull, grainy, or cracked, and it often lacks the mechanical strength and electrical conductivity needed for a reliable circuit. Cold solder joints can cause intermittent failures, poor performance, or complete circuit breakdowns, making them a critical issue in electronics manufacturing and repair.
The impact of cold solder joints can be significant. For hobbyists, they might mean a project that doesn’t work as expected. For professionals, they can lead to costly repairs, product recalls, or safety hazards. Understanding cold solder joint symptoms—like visible cracks, dull appearances, or intermittent electrical issues—is the first step to addressing and preventing them.
Common Causes of Cold Solder Joints
Before diving into prevention, let’s explore why cold solder joints happen. Identifying the root causes will help you avoid them during your soldering process.
- Insufficient Heat: If the soldering iron isn’t hot enough, the solder won’t melt fully, leading to poor bonding. This is a common issue when dealing with soldering iron temperature for cold joints.
- Poor Surface Preparation: Dirt, oxidation, or grease on the PCB pads or component leads can prevent proper solder flow and adhesion.
- Inadequate Flux: Flux cleans the surfaces and promotes wetting, so using the wrong type or too little can contribute to cold joints.
- Movement During Cooling: If the joint is disturbed while the solder is solidifying, it can result in a cracked or weak connection.
- Lead-Free Solder Challenges: Lead-free solder cold joint problems often arise because it requires higher temperatures and has different flow characteristics compared to traditional lead-based solder.
By addressing these issues, you can significantly reduce the risk of cold solder joints in your projects.
Optimal Soldering Iron Temperature for Preventing Cold Joints
One of the most critical factors in preventing cold solder joints is setting the correct soldering iron temperature for cold joints. If the temperature is too low, the solder won’t melt properly. If it’s too high, you risk damaging components or the PCB itself.
For most electronics work with lead-based solder, a temperature range of 260°C to 315°C (500°F to 600°F) is ideal. However, lead-free solder typically requires a higher range of 300°C to 350°C (570°F to 660°F) due to its higher melting point. Here are some specific guidelines:
- Small Components (e.g., resistors, capacitors): Use 260°C to 280°C (500°F to 535°F) for lead-based solder to avoid overheating delicate parts.
- Larger Components or Ground Planes: Increase to 300°C to 315°C (570°F to 600°F) as these areas dissipate heat quickly, requiring more energy to melt the solder.
- Lead-Free Solder: Start at 320°C (610°F) and adjust up to 350°C (660°F) if needed, as it demands more heat for proper flow.
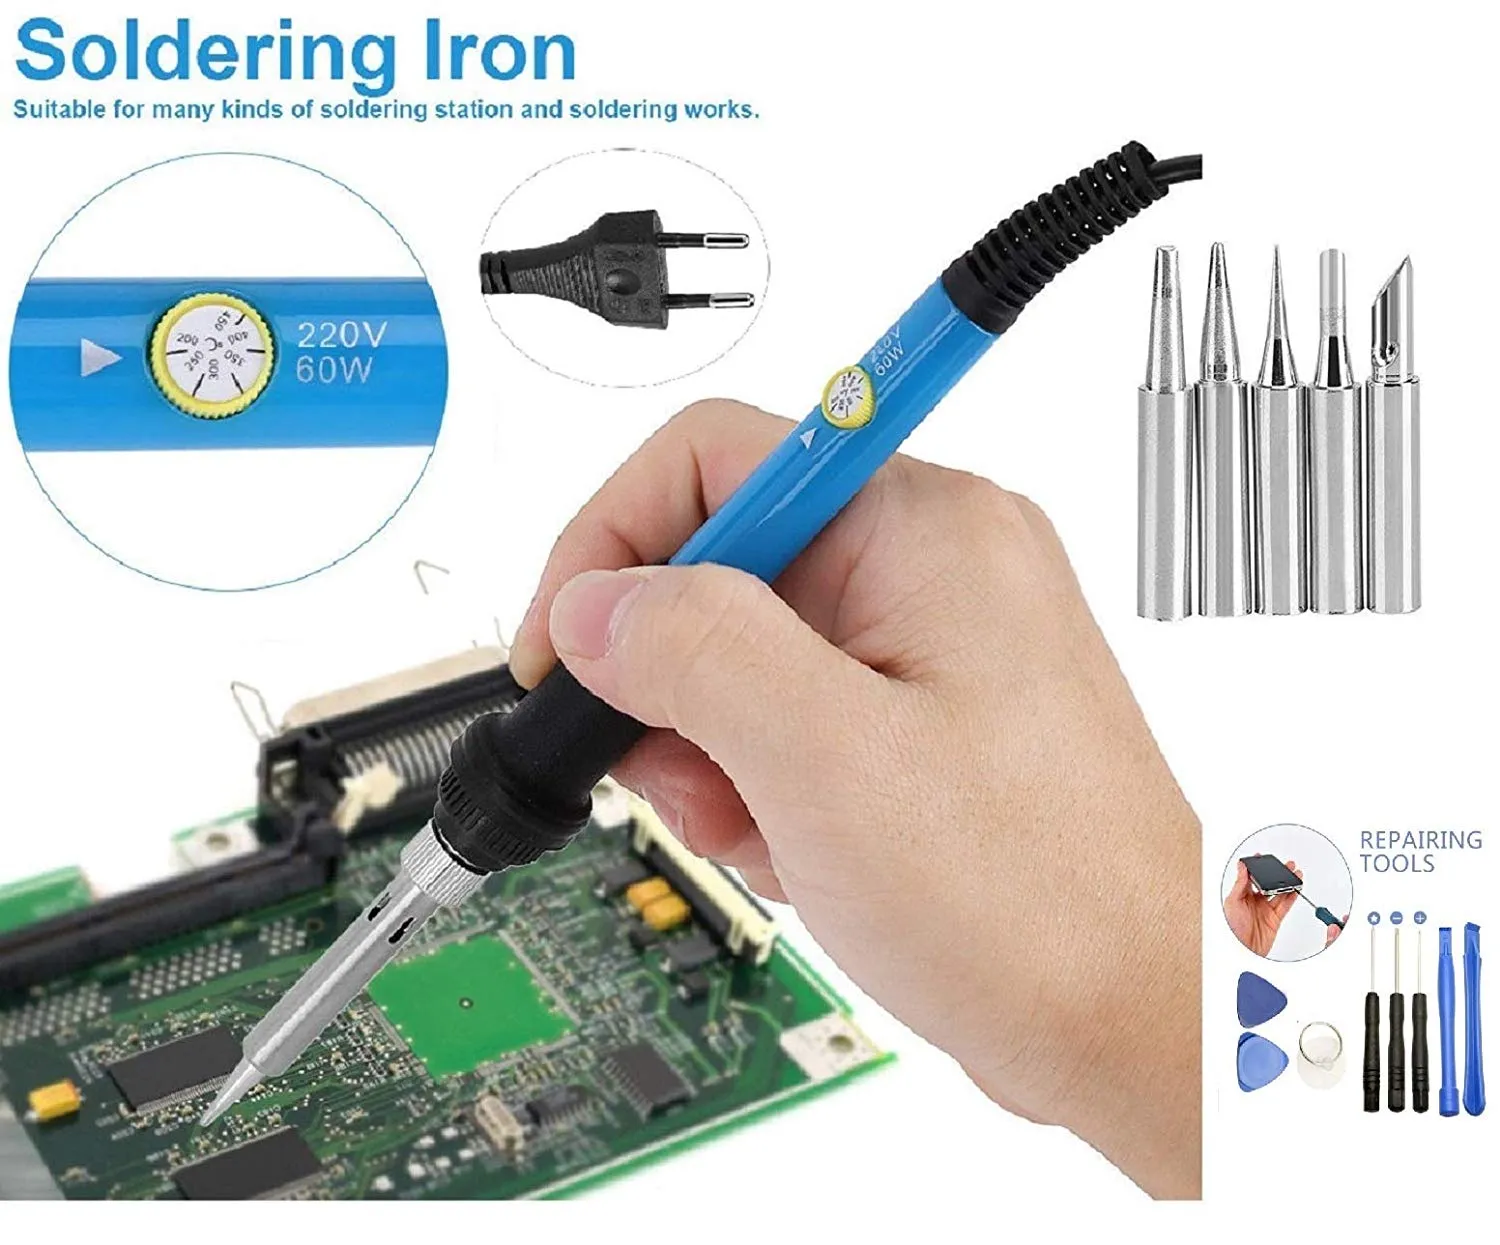
Always use a soldering iron with adjustable temperature control to fine-tune the heat based on your specific application. Additionally, ensure the tip is clean and tinned (coated with a thin layer of solder) to maximize heat transfer and prevent cold joints.
Choosing the Right Flux Types for Preventing Cold Solder
Flux is a crucial ally in achieving strong solder joints. It cleans the metal surfaces by removing oxides and contaminants, allowing the solder to “wet” the surfaces and form a proper bond. Using the appropriate flux types for preventing cold solder can make a significant difference in your results.
- Rosin Flux: Commonly used for electronics, rosin flux is available in paste or liquid form and is ideal for general-purpose soldering. It’s mildly active and leaves a residue that’s non-corrosive, making it safe for most PCB applications.
- No-Clean Flux: This type is designed to leave minimal residue that doesn’t need cleaning after soldering. It’s convenient for fast-paced assembly but may not be as effective for heavily oxidized surfaces.
- Water-Soluble Flux: More aggressive than rosin flux, this type is great for challenging surfaces but requires thorough cleaning to prevent corrosion from residue.
For beginners or those prone to cold solder joints, rosin flux is often the best choice due to its balance of effectiveness and ease of use. Apply a small amount to the joint area before soldering to ensure proper wetting and heat transfer. Remember, insufficient flux can lead to poor adhesion and increase the likelihood of cold joints.

Mastering Soldering Techniques to Avoid Cold Joints
Beyond tools and materials, your soldering technique plays a huge role in preventing cold solder joints. Here are some proven methods to ensure strong, reliable connections:
- Prepare the Surfaces: Clean the PCB pads and component leads with isopropyl alcohol and a brush to remove dirt or oxidation. This ensures better solder adhesion.
- Tin the Iron Tip: Before soldering, coat the tip of your iron with a thin layer of fresh solder. This improves heat transfer and prevents oxidation of the tip.
- Heat Both Surfaces: Place the soldering iron tip so it contacts both the component lead and the PCB pad simultaneously. Apply heat for 1-2 seconds before adding solder to ensure both surfaces are hot enough for proper bonding.
- Add Solder Sparingly: Feed a small amount of solder into the joint, allowing it to flow naturally over the heated surfaces. Avoid adding too much, as excess solder can create blobs or bridges.
- Avoid Movement: Hold the component steady until the solder cools and solidifies (usually 3-5 seconds). Any movement during this time can disrupt the joint and cause cracks.
Practice these steps on a scrap PCB to build confidence and refine your technique. Consistency and patience are key to avoiding cold solder joints.
Related Reading: The Ultimate Guide to Preventing Cold Solder Joints: Temperature, Technique, and Tools
Essential Tools for Preventing Cold Solder Joints
Having the right tools can make all the difference in achieving high-quality solder joints. Here’s a list of must-have equipment for any soldering setup:
- Temperature-Controlled Soldering Iron: A soldering iron with adjustable temperature settings (30W to 60W for most electronics work) allows you to match the heat to the task, preventing both cold joints and component damage.
- Solder Wire: Choose a high-quality solder wire with a rosin core for electronics. For lead-free options, look for alloys like SAC305 (96.5% tin, 3% silver, 0.5% copper) to address lead-free solder cold joint problems.
- Flux Pen or Paste: Keep extra flux on hand to apply directly to joints for improved wetting and cleaner connections.
- Desoldering Tools: A desoldering pump or braid is essential for fixing mistakes or reheating cold solder joints to rework them properly.
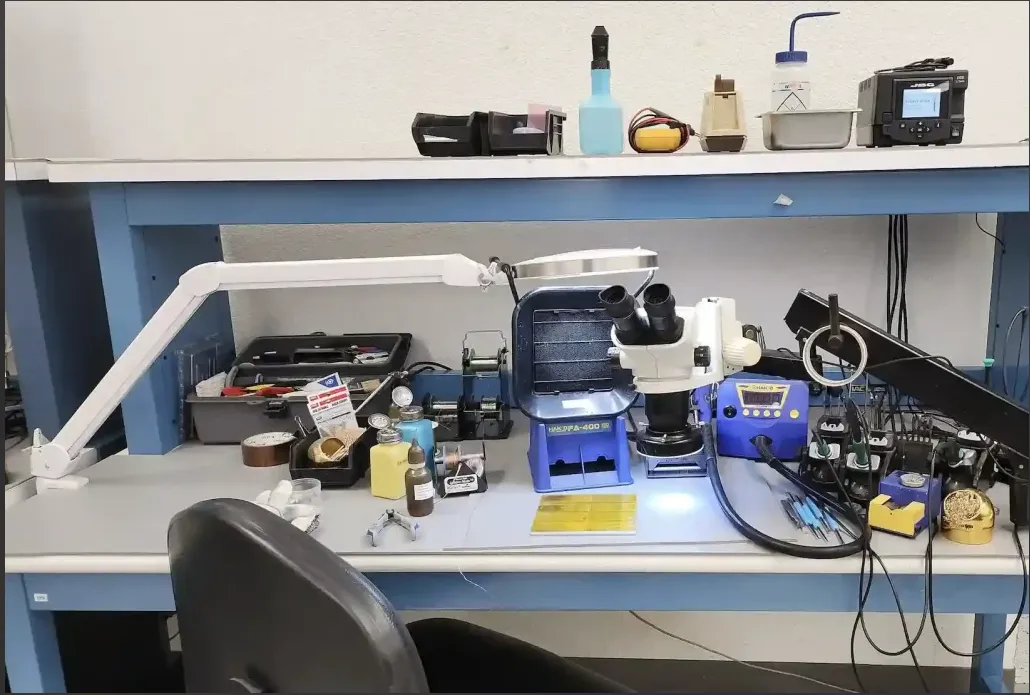
- Magnifying Glass or Microscope: Use these to inspect joints for cold solder joint symptoms like dullness or cracks that might not be visible to the naked eye.
Investing in quality tools will save you time and frustration by making it easier to create strong, reliable solder joints.
Related Reading: Troubleshooting Cold Solder Joints? Hot Air Rework to the Rescue!
How to Identify and Fix Cold Solder Joints
Even with the best prevention methods, cold solder joints can still occur. Knowing how to spot and fix them is crucial. Look for these cold solder joint symptoms:
- Appearance: The joint looks dull, rough, or grainy instead of shiny and smooth.
- Cracks: Visible fractures or separation between the solder and the component lead or pad.
- Electrical Issues: Intermittent connections, high resistance (measurable with a multimeter, often above 1 ohm for a bad joint), or complete circuit failure.
For reheating cold solder joints, follow these steps:
- Apply fresh flux to the joint to aid in wetting and cleaning.
- Heat the joint with your soldering iron for 2-3 seconds, ensuring the tip contacts both the lead and pad.
- Add a small amount of fresh solder to the joint to encourage proper flow and bonding.
- Allow the joint to cool without disturbance, then inspect it for a shiny, smooth appearance.
If the joint still looks defective, use a desoldering tool to remove the old solder completely and start fresh. This method ensures a clean slate for a stronger connection.
Special Considerations for Lead-Free Solder
Lead-free solder is widely used due to environmental regulations, but it presents unique challenges. Lead-free solder cold joint problems are common because of its higher melting point and different wetting behavior. Here’s how to handle it:
- Higher Temperatures: As mentioned earlier, set your iron to 300°C to 350°C (570°F to 660°F) to ensure proper melting.
- Quality Flux: Use a robust flux like rosin or water-soluble to improve wetting on challenging surfaces.
- Faster Work: Lead-free solder cools quickly, so work efficiently to avoid cold joints caused by premature solidification.
With practice and the right settings, you can overcome the hurdles of lead-free solder and achieve reliable results.
Final Tips for Consistent Soldering Success
Preventing cold solder joints comes down to preparation, precision, and practice. Keep these final tips in mind:
- Always work in a well-ventilated area with proper safety gear to avoid inhaling fumes from solder or flux.
- Regularly clean your soldering iron tip with a wet sponge or brass wire cleaner to maintain efficient heat transfer.
- Test your connections with a multimeter after soldering to confirm low resistance (ideally below 0.1 ohms for a good joint).
- Stay patient—rushing through soldering often leads to mistakes like cold joints.
By focusing on the right soldering iron temperature for cold joints, using appropriate flux types for preventing cold solder, and mastering your technique, you’ll minimize the risk of defective connections and ensure your PCB projects are built to last.
Conclusion
Cold solder joints are a common challenge in PCB assembly, but they’re entirely preventable with the right knowledge and tools. From setting the optimal temperature to choosing the best flux and refining your technique, this guide has covered everything you need to avoid cold solder joint symptoms and tackle issues like lead-free solder cold joint problems. Whether you’re a hobbyist or a professional, applying these strategies will help you create strong, reliable connections every time. Start implementing these tips in your next project and experience the difference in quality and performance.


