 ALLPCB


If you're new to electronics and wondering how to securely mount a printed circuit board (PCB) without damaging it, PCB clips are a fantastic and easy solution. These small hardware pieces help hold your circuit board in place, making assembly straightforward even for hobbyists. In this guide, we'll walk you through everything you need to know about using PCB clips for beginners, from what they are to step-by-step mounting tips for your first project. Whether you're looking for simple PCB mounting or easy circuit board assembly, we've got you covered.
At ALLPCB, we understand the challenges beginners face when starting with electronics. That's why we've created this detailed resource to help you master basic PCB assembly with confidence. Let’s dive into the world of PCB clips for hobbyists and explore how they can make your projects easier and more professional.
What Are PCB Clips and Why Use Them?
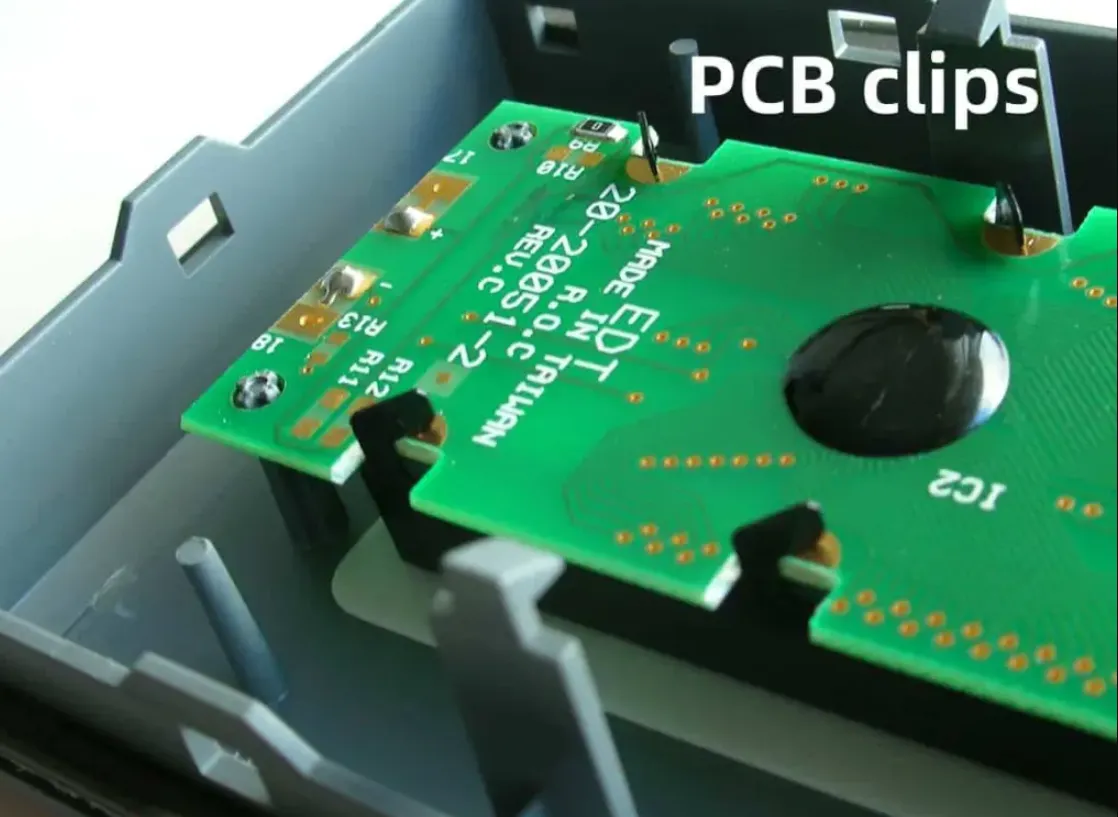
PCB clips are small, often plastic or metal, components designed to hold a circuit board securely in place without the need for screws or adhesives. They come in various shapes and sizes, such as snap-in clips or push-fit designs, and are especially useful for temporary or quick assemblies. For beginners, PCB clips offer a hassle-free way to mount a board inside an enclosure or onto a surface without worrying about damaging the board with improper tools or methods.
Using PCB clips has several advantages, especially for those just starting with electronics:
- Ease of Use: No need for advanced tools or skills—just snap or push the clip into place.
- Reusability: Many clips can be removed and reused, making them ideal for prototyping.
- Protection: They prevent the board from moving around, reducing the risk of short circuits or physical damage.
- Cost-Effective: PCB clips are inexpensive and widely available, perfect for hobbyist budgets.
Types of PCB Clips for Beginners
Before you start mounting your first circuit board, it’s helpful to know the different types of PCB clips available. Each type serves a specific purpose, and choosing the right one depends on your project needs. Here are some common options for hobbyists:
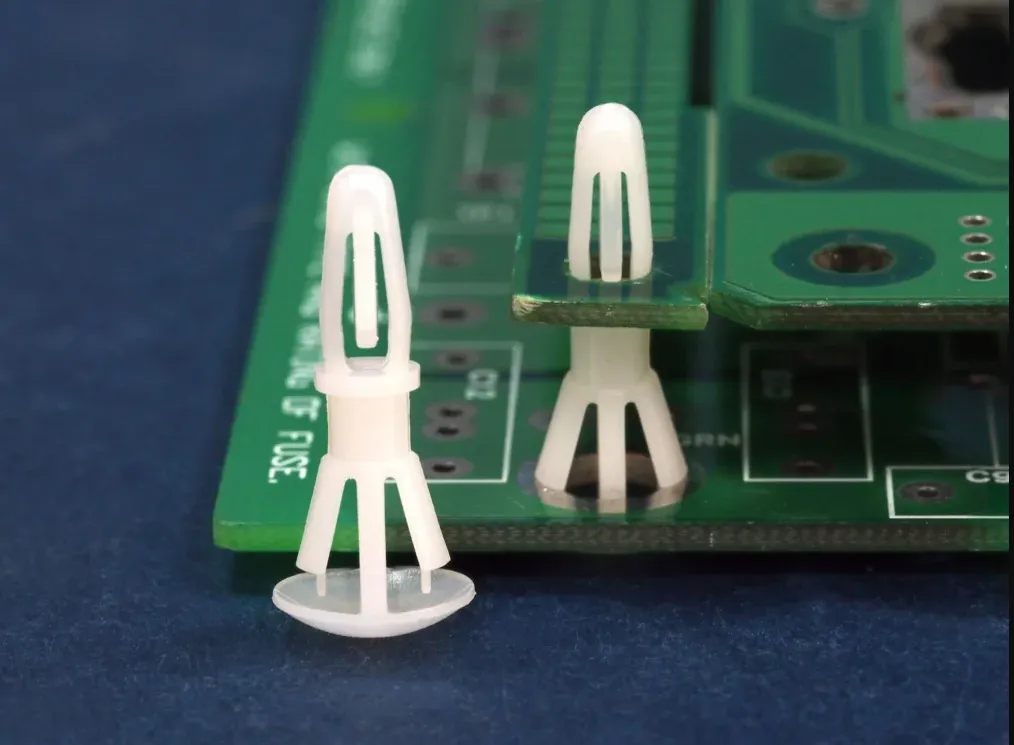
1. Snap-In Plastic Clips
These are the most beginner-friendly PCB clips. Made of durable plastic, they snap into pre-drilled holes on the board or enclosure. They’re lightweight, easy to install, and ideal for small projects like Arduino-based builds.
2. Metal Push-Fit Clips
Metal clips are sturdier and often used for heavier boards or industrial applications. They push into place and provide a stronger hold but may require a bit more force to install. For hobbyists, these are great for projects needing extra stability.
3. Adhesive-Backed Clips
Some PCB clips come with an adhesive base, allowing you to stick them onto a surface without drilling holes. These are perfect for temporary setups or when you can’t modify your enclosure. However, they may not be as secure for long-term use.
4. Rail-Mount Clips
Designed for mounting PCBs onto standard rails (like DIN rails), these clips are less common for hobbyists but useful if you're working on a larger system or enclosure with rail setups.
Why Simple PCB Mounting Matters for Beginners
When you're new to electronics, every step of the assembly process can feel daunting. Simple PCB mounting with clips reduces the complexity and helps you focus on learning the basics of circuit design and soldering. Improper mounting can lead to issues like:
- Component Damage: A loose board can shift, causing soldered components to break or wires to disconnect.
- Short Circuits: Movement might bring conductive parts into contact, risking a short circuit that could fry your board.
- Poor Performance: Vibrations or instability can interfere with signal integrity, especially in high-frequency circuits where impedance mismatches (e.g., above 50 ohms) can degrade performance by 20% or more.
By using PCB clips, you ensure your board stays secure, letting you focus on testing and troubleshooting your circuit without worrying about physical stability.
Step-by-Step Guide to Mounting Your First Circuit Board with PCB Clips
Now that you understand the basics, let’s walk through the process of mounting a circuit board using PCB clips. This guide is tailored for beginners and focuses on easy circuit board assembly with minimal tools.
Step 1: Gather Your Materials
Before you start, make sure you have everything you need:
- Your printed circuit board (ensure it has mounting holes if using snap-in or push-fit clips).
- PCB clips suitable for your board and enclosure (check the size and type).
- An enclosure or surface to mount the board on.
- Optional: A small screwdriver or pliers for metal clips, if needed.
Step 2: Plan Your Mounting Points
Look at your PCB and identify the mounting holes or areas where clips can attach. Most boards have holes at the corners for this purpose. Make sure the clips you’ve chosen match the hole diameter (commonly 3-4 mm for hobbyist boards). Also, check your enclosure for compatible slots or spaces for the clips.
Step 3: Attach the Clips to the Enclosure or Surface
If your clips are snap-in or push-fit, align them with the slots or holes in your enclosure and press them into place. For adhesive clips, peel off the backing and stick them firmly onto the surface. Ensure they’re positioned to match the PCB’s mounting holes.
Step 4: Mount the PCB onto the Clips
Carefully place your circuit board over the clips, aligning the holes with the clip heads. Press down gently until the board snaps or locks into place. Avoid using excessive force, as this could crack the board or damage traces. If using metal clips, you might need to squeeze the clip slightly with pliers to secure it.
Step 5: Test for Stability
Once mounted, give the board a gentle shake to ensure it’s secure. If it wobbles, double-check the clips and reposition them if necessary. A stable board should not move more than 1-2 mm in any direction.
Tips for Basic PCB Assembly with Clips
Beyond the basic steps, here are some practical tips to make your PCB mounting experience even smoother. These are especially useful for hobbyists tackling their first projects.
1. Double-Check Compatibility
Ensure the clips match your board’s thickness and hole size. Most hobbyist boards are 1.6 mm thick, so look for clips rated for that range. Mismatched clips can either be too loose or too tight, risking damage.
2. Avoid Overloading the Board
If your project involves heavy components (like large capacitors or heat sinks), consider using additional clips or combining them with standoffs for extra support. A single clip might not handle weights above 50-100 grams per mounting point.
3. Keep Clips Away from Sensitive Areas
Position clips away from delicate components or high-frequency traces. Physical stress from clips can alter impedance (e.g., shifting from 50 ohms to 60 ohms), affecting signal speeds by up to 10% in some circuits.
4. Use Spacers if Needed
For boards that need elevation (to avoid contact with the enclosure base), pair clips with small spacers. This also improves airflow, reducing heat buildup by up to 15% in compact setups.
5. Label Your Setup
If you’re working on multiple boards, label where each one mounts to avoid confusion. A simple sticker or marker note on the enclosure can save time during reassembly.
Common Mistakes to Avoid When Using PCB Clips
As a beginner, it’s easy to make small errors that can affect your project. Here are some pitfalls to watch out for during basic PCB assembly with clips:
- Forcing Clips into Place: If a clip doesn’t fit easily, don’t push too hard. This can crack the board or strip the clip, making it unusable.
- Ignoring Board Orientation: Mount the board with components facing the right direction for access and ventilation. A upside-down board might overheat or be hard to debug.
- Using Damaged Clips: Inspect clips for cracks or bends before use. A faulty clip might fail under stress, letting the board slip.
- Skipping Stability Checks: Always test the mounted board for movement. Even a small shift can cause intermittent connections, leading to frustrating errors.
Where to Find PCB Clips for Hobbyists
Finding the right PCB clips for your project is easier than you might think. Many online stores and local hardware shops carry a variety of clips suitable for hobbyists. Look for suppliers that offer detailed specifications, like clip dimensions and material (plastic or metal), to ensure compatibility with your board. You can also explore electronics kits that include mounting hardware as part of the package, saving you the hassle of sourcing separately.
At ALLPCB, we’re committed to supporting your journey in electronics. While we focus on providing high-quality circuit boards, we encourage you to explore trusted hardware suppliers for accessories like PCB clips to complete your setup.
Alternative Mounting Methods for Beginners
While PCB clips are great for simple PCB mounting, they’re not the only option. If clips don’t suit your project, consider these alternatives:
- Standoffs and Screws: These provide a secure, permanent hold but require drilling and tools. Ideal for heavier boards or long-term setups.
- Adhesive Pads: Double-sided tape or foam pads work for lightweight boards in temporary projects, though they’re less reliable over time.
- Enclosure Slots: Some enclosures have built-in slots or grooves to hold the PCB without additional hardware—check your enclosure design.
Each method has its pros and cons, so choose based on your project’s needs, weight, and duration of use.
Final Thoughts on PCB Clips for Beginners
Mounting your first circuit board doesn’t have to be intimidating. With PCB clips for beginners, you have a simple, effective tool to secure your board and protect your project. From snap-in plastic clips to sturdy metal options, there’s a solution for every hobbyist looking to achieve easy circuit board assembly. By following the steps and tips in this guide, you’ll master basic PCB assembly and build confidence in your electronics skills.
Remember, the key to success is preparation—choose the right clips, plan your mounting points, and test for stability. As you grow more comfortable with simple PCB mounting, you’ll find that small details like secure assembly make a big difference in the performance and longevity of your projects. At ALLPCB, we’re here to support your journey with resources and inspiration for every step of your electronics adventure.


