 ALLPCB


For hobbyists diving into the world of electronics, one of the biggest challenges is keeping track of components on a printed circuit board (PCB). This is where PCB legend printing, often called silkscreen, comes into play. If you're searching for ways to master beginner PCB legend techniques or looking for simple circuit board ID solutions, you're in the right place. In this guide, we'll walk you through the essentials of effective PCB marking for easy assembly, share DIY component label tips, and explore hobby electronics silkscreen methods to make your projects smoother and more professional.
Whether you're assembling a small circuit for a personal project or debugging a complex design, clear PCB legends can save you time and prevent costly mistakes. Let's dive into the details of how to simplify component identification with practical, actionable advice tailored for hobbyists like you.
What Is PCB Legend Printing and Why Does It Matter?
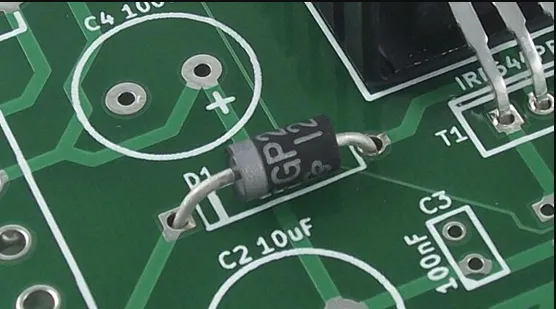
PCB legend printing, also known as silkscreen, refers to the text, symbols, and markings printed on the surface of a PCB. These markings typically include component designators (like R1 for a resistor or C3 for a capacitor), polarity indicators, and other helpful information. For hobbyists, a well-designed legend acts as a roadmap during assembly, testing, and troubleshooting.
Without clear markings, you might struggle to identify where each component goes, especially on densely populated boards. Imagine trying to place a tiny surface-mount capacitor without knowing its orientation or value. A good silkscreen can prevent errors, reduce assembly time, and make your DIY projects look polished and professional. For beginners, focusing on effective PCB marking for easy assembly is a game-changer.
Key Benefits of PCB Legend Printing for Hobbyists
Before we get into the how-to, let's explore why investing time in PCB legend printing is worth it for hobby electronics enthusiasts:
- Simplifies Assembly: Clear labels like "R1" or "D2" help you place components accurately, even if you're new to soldering.
- Reduces Errors: Polarity markings for diodes or capacitors prevent reverse installations that could damage your circuit.
- Speeds Up Debugging: When troubleshooting, legends help you quickly locate specific components without referring to schematics constantly.
- Enhances Professionalism: A neat silkscreen makes your DIY project look like a factory-made board, impressing peers or clients.
For hobbyists working on small batches or one-off designs, these benefits can transform a frustrating process into a rewarding one. Now, let's look at how to create effective legends for your boards.
Essential Tips for Beginner PCB Legend Design
Designing a PCB legend as a beginner doesn't have to be complicated. By following a few best practices, you can create markings that are both functional and easy to read. Here are some tips tailored for those just starting with hobby electronics silkscreen techniques:
1. Keep It Simple and Clear
Avoid cluttering your PCB with too much information. Focus on the essentials: component designators (e.g., R1, C2), polarity indicators (like a "+" for capacitors), and pin numbers for integrated circuits. Use a font size that's legible—typically 6-point or larger—and ensure there's enough spacing between markings to avoid confusion.
2. Prioritize Component Placement
Place legends close to the components they refer to, but not so close that they overlap with pads or vias. For example, if you're labeling a resistor, position "R1" just above or beside it, ensuring the text doesn't interfere with soldering areas. This makes PCB marking for easy assembly a breeze.
3. Use Consistent Orientation
Ensure all text is oriented in the same direction, ideally readable from one angle (like top-to-bottom or left-to-right). This consistency prevents you from having to rotate the board repeatedly during assembly.
4. Include Polarity and Direction Indicators
For components like diodes, LEDs, and electrolytic capacitors, always include polarity markers. A small arrow or "+" sign can prevent costly mistakes. For ICs, mark pin 1 with a dot or small triangle to ensure correct orientation.
DIY Component Labels: Tools and Techniques for Hobbyists
As a hobbyist, you might not have access to professional PCB manufacturing equipment, but that doesn't mean you can't create effective legends. Here are some DIY component label methods and simple circuit board ID techniques you can try at home:
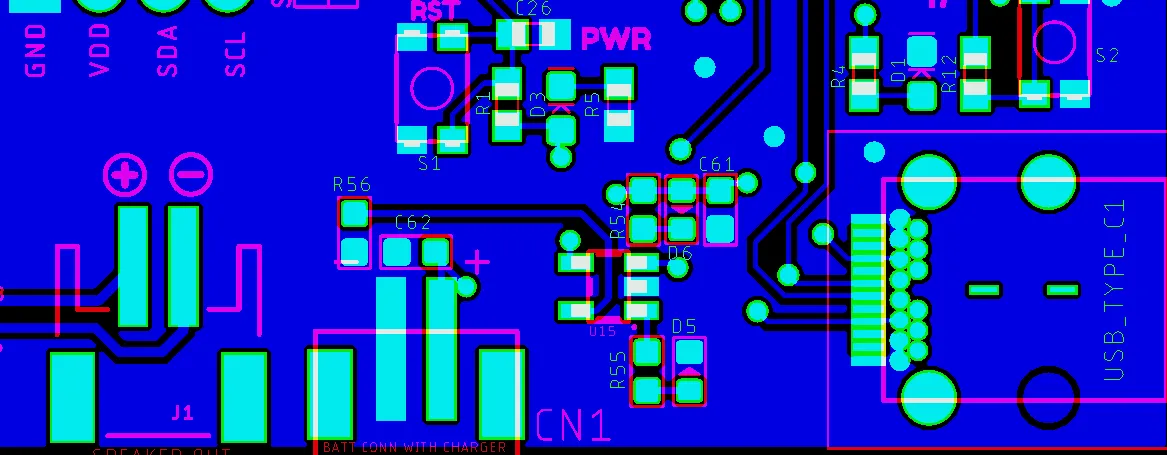
1. Use PCB Design Software for Silkscreen Layers
Most free or affordable PCB design tools include a silkscreen layer where you can add text and symbols. Software options allow you to customize legends before sending your design for fabrication. Place your designators and symbols on this layer, ensuring they meet the minimum size and clearance requirements (often around 0.2 mm line width and 1.5 mm text height for readability).
2. Hand-Drawn Legends for Prototypes
For one-off prototypes or home-etched PCBs, you can create legends manually using a fine-tip permanent marker. After etching your board, carefully write designators near each component. While this method isn't as precise as printed silkscreen, it works well for personal projects. Use a ruler or stencil for neater results.
3. Printable Stickers or Transfers
Another DIY approach is printing labels on sticker paper or using transfer sheets. Design your legends on a computer, print them, and apply them to the PCB surface. Seal the labels with a clear coat of varnish to protect them from wear during handling or soldering. This method is great for hobbyists who want a semi-professional look without specialized tools.
Common Mistakes to Avoid in PCB Legend Printing
Even with the best intentions, beginners often make mistakes when designing PCB legends. Here are some pitfalls to watch out for to ensure your hobby electronics silkscreen is effective:
- Overloading with Information: Including too many details, like full component values (e.g., "10kΩ" instead of just "R1"), can clutter the board. Stick to designators and refer to a separate BOM (Bill of Materials) for values.
- Placing Text Over Pads: Legends printed over soldering pads can become unreadable after assembly. Always check for overlaps in your design software.
- Ignoring Fabrication Limits: Some low-cost manufacturing services have restrictions on silkscreen resolution. Ensure your text and lines meet their minimum requirements (often around 0.15-0.2 mm for line thickness).
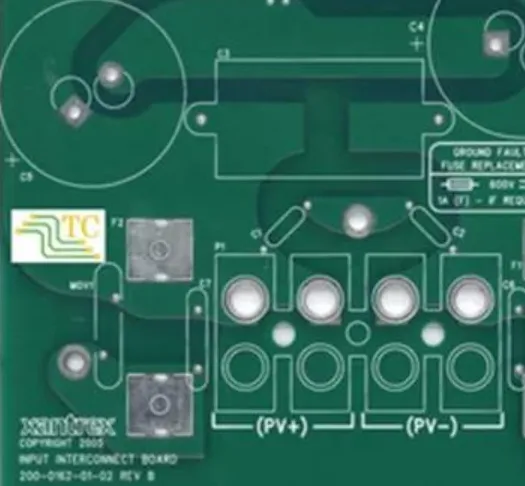
- Forgetting Test Points: Label test points or important nodes (like "GND" or "VCC") to make debugging easier. Skipping these can slow down troubleshooting.
Advanced Tips for Hobby Electronics Silkscreen
Once you're comfortable with the basics of beginner PCB legend design, consider these advanced techniques to take your silkscreen game to the next level:
1. Add Version Numbers and Dates
Include a small section on your PCB for version numbers (e.g., "V1.0") and design dates. This is especially useful if you're iterating on a design or sharing it with others. Place this info in a corner or non-critical area of the board.
2. Use Symbols for Quick Recognition
Beyond text, incorporate simple symbols like arrows for current flow or ground symbols for key nodes. These visual cues can speed up assembly and reduce errors, especially for complex circuits.
3. Color Coding for Clarity
While most hobbyist boards use white or yellow silkscreen, some manufacturing options allow for colored legends. If available, use different colors to distinguish between power, signal, and ground components. For DIY methods, colored markers or stickers can achieve a similar effect.
How PCB Legend Printing Improves Assembly Efficiency
Effective PCB marking for easy assembly directly impacts how quickly and accurately you can build your circuit. Let's break down a real-world example to illustrate this. Suppose you're assembling a simple LED driver circuit with 10 resistors, 5 capacitors, 2 diodes, and an IC. Without legends, you'd need to constantly cross-reference your schematic or BOM, which could take 30-40 minutes for a beginner. With clear silkscreen markings, you could cut that time down to 15-20 minutes while minimizing placement errors.
Additionally, during soldering, polarity indicators ensure diodes and capacitors are installed correctly the first time. For surface-mount components, where space is tight, a small "1" near the first pin of an IC can prevent misalignment—a common issue that might require desoldering and rework, costing you an extra 10-15 minutes per mistake.
Final Thoughts on Simplifying Component Identification
As a hobbyist, mastering PCB legend printing is a skill that pays off in every project. By focusing on clear, simple circuit board ID techniques and leveraging DIY component labels, you can streamline assembly, reduce errors, and create boards that look and function like professional designs. Start with the basics—use design software for silkscreen layers, keep markings concise, and prioritize readability. As you gain confidence, experiment with advanced hobby electronics silkscreen methods like symbols and version tracking to further enhance your workflow.
Effective PCB marking for easy assembly isn't just about aesthetics; it's about making your electronics journey smoother and more enjoyable. With these tips and techniques, you're well on your way to creating circuits that are easy to build, debug, and share. Keep experimenting, and watch as your skills—and your projects—reach new heights.


