 ALLPCB


If you're looking to build a simple PCB prototype without diving into complex manufacturing processes, starting with a breadboard is an excellent and cost-effective choice. A breadboard offers a solderless platform to test your circuit designs quickly, making it ideal for hobbyists and beginners in electronics. In this guide, we'll walk you through the process of creating a breadboard PCB prototype, share tips for effective prototyping without etching, and provide actionable advice for hobbyist PCB design. Whether you're new to electronics or refining a project, this post will help you get started with confidence.
Why Use a Breadboard for PCB Prototyping?
Breadboards are a staple in electronics prototyping because they allow for quick, solderless connections. This means you can assemble and test a circuit without committing to a permanent design or dealing with the mess of etching chemicals. For hobbyists and beginners working on a breadboard PCB prototype, this method saves time and money while reducing the risk of errors in early design stages. Breadboards are reusable, easy to modify, and perfect for experimenting with different components and layouts before moving to a more permanent PCB design.
Additionally, breadboards are widely available and inexpensive, often costing less than $10 for a standard size. They come with pre-arranged holes connected by internal metal strips, allowing you to plug in components like resistors, capacitors, and integrated circuits (ICs) with ease. This makes them a go-to tool for anyone exploring PCB prototyping without etching.
Advantages of Solderless PCB Prototyping on a Breadboard
Opting for a solderless PCB prototype on a breadboard comes with several benefits, especially for hobbyists and those new to electronics. Here are some key advantages:
- Cost-Effective: Breadboards eliminate the need for expensive tools or materials like etching kits or soldering equipment. A basic setup, including a breadboard and jumper wires, can cost under $15.
- Flexibility: You can easily swap components or adjust connections without damaging anything. This is ideal for testing different configurations in hobbyist PCB design.
- No Chemicals or Safety Risks: Unlike traditional PCB prototyping with etching, breadboards don't require handling hazardous chemicals like ferric chloride, making them safer for home use.
- Quick Testing: Breadboards allow for rapid assembly and testing, so you can verify if your circuit works before investing in a permanent design.
While breadboards are fantastic for initial testing, they do have limitations, such as supporting only low-frequency circuits (typically under 10 MHz) due to parasitic capacitance and inductance. For high-speed or complex designs, you'll eventually need to transition to a manufactured PCB. However, as a starting point, they are unmatched for simplicity and affordability.
Step-by-Step Guide to Building a Breadboard PCB Prototype
Creating a breadboard PCB prototype is straightforward if you follow a systematic approach. Below, we’ll guide you through the process with clear steps to ensure success in your electronics prototyping journey.
Step 1: Gather Your Materials
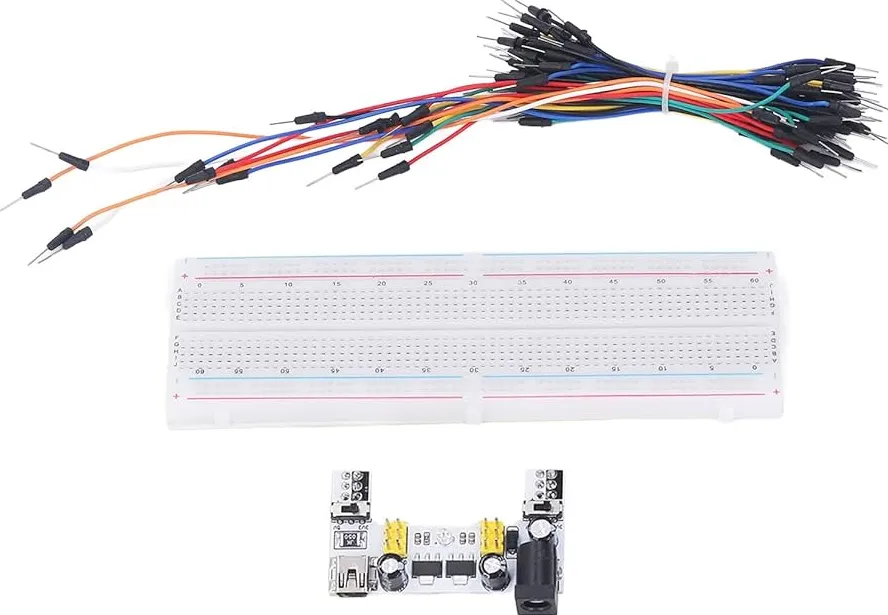
Before you start, make sure you have the necessary tools and components. Here’s a basic list for most simple projects:
- A standard breadboard (830 tie-points is a common size for beginners)
- Jumper wires (male-to-male for connecting components)
- Electronic components (resistors, capacitors, LEDs, ICs, etc., based on your circuit)
- A power source (like a 9V battery or a DC power supply)
- A multimeter for testing connections and voltages
- A circuit diagram or schematic of your design
Having these items ready will streamline the prototyping process and help you avoid interruptions.
Step 2: Understand Your Breadboard Layout
Before placing any components, familiarize yourself with the breadboard’s structure. Most breadboards have two main sections:
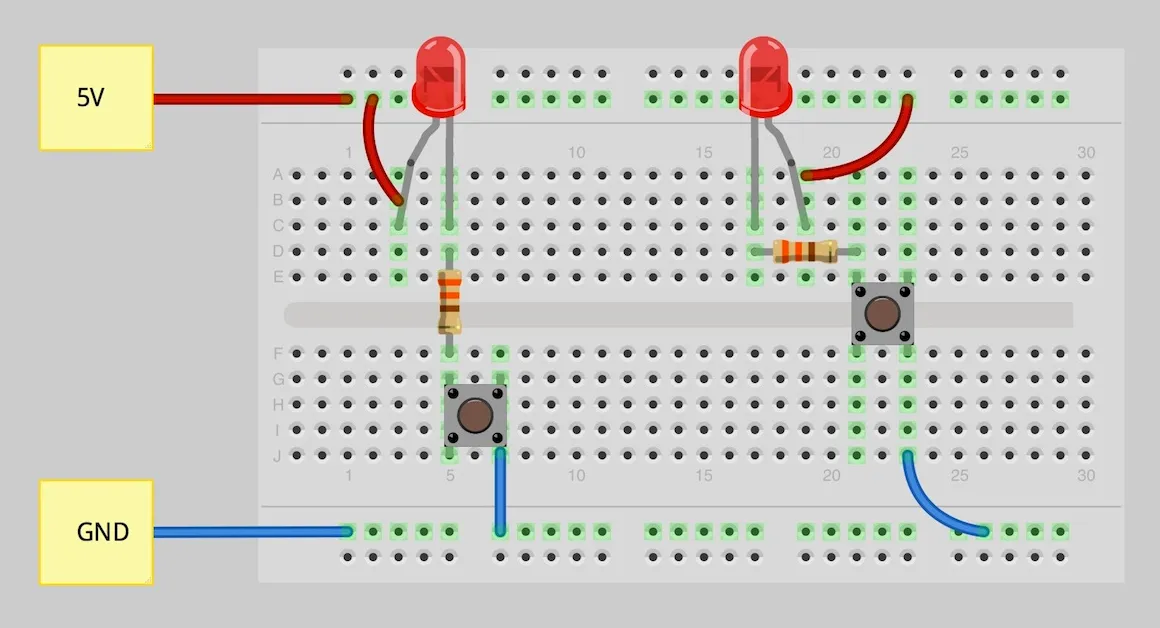
- Power Rails: These are the long rows at the top and bottom, usually marked with red (+) and blue (-) lines. They are used to supply power (like 5V or 3.3V) and ground connections to your circuit.
- Terminal Strips: These are the central rows of holes, typically arranged in groups of five connected holes. Each group is electrically connected horizontally, allowing you to link components together.
Understanding this layout is crucial for accurate connections in your solderless PCB prototype. Misplacing a wire or component can lead to short circuits or non-functional designs.
Step 3: Plan Your Circuit Layout
Start by referring to your circuit schematic. Map out where each component will go on the breadboard to minimize clutter and crossed wires. Keep power and ground connections close to the rails, and group related components together. For example, if you're building a simple LED circuit, place the LED, resistor, and power connections in a logical sequence to avoid confusion.
Planning ahead reduces errors and makes troubleshooting easier, which is a key electronics prototyping tip for beginners.
Step 4: Place and Connect Components
Begin by connecting your power source to the breadboard’s power rails. Then, insert components into the terminal strips according to your plan. Use jumper wires to connect components where needed. For instance, if you're testing a circuit with a 555 timer IC, ensure the pins are inserted correctly (pin 1 to ground, pin 8 to power, etc.), and use wires to connect external resistors or capacitors as per the schematic.
Double-check each connection to avoid mistakes. A common error is forgetting to connect the ground or power to a component, which can prevent the circuit from working.

Step 5: Test Your Circuit
Once everything is connected, power up your circuit and use a multimeter to check voltages at key points. For example, if your design includes a voltage divider with two 1kΩ resistors in series connected to a 5V supply, you should measure approximately 2.5V at the midpoint. If the readings are off, inspect your connections for loose wires or misplaced components.
Testing is a critical step in PCB prototyping without etching, as it ensures your design functions as intended before moving to a more permanent solution.
Electronics Prototyping Tips for Breadboard Success
To make the most of your breadboard PCB prototype, consider these practical tips tailored for hobbyists and beginners in electronics prototyping:
- Keep It Neat: Use different colored jumper wires for power, ground, and signals to avoid confusion. For example, red for power, black for ground, and other colors for signal paths.
- Avoid Overloading: Breadboards are not suited for high current (typically above 1A) or high voltage (above 24V). Stick to low-power projects to prevent damage.
- Use IC Sockets: If working with sensitive ICs, use sockets to avoid damaging the chip during repeated insertions and removals.
- Label Components: For complex designs, label wires or components with small sticky notes to keep track of connections.
- Check Continuity: Use a multimeter to test for unintended short circuits, especially if your circuit isn’t working as expected.
These tips will help streamline your workflow and improve the reliability of your solderless PCB prototype, making the process enjoyable and productive.
Limitations of Breadboard Prototyping and When to Move to a PCB
While breadboards are excellent for initial testing, they aren't a long-term solution for most projects. Here are some limitations to keep in mind during hobbyist PCB design:
- Signal Integrity Issues: Breadboards introduce parasitic capacitance (around 2-5 pF per connection) and inductance, which can distort signals in high-frequency circuits above 10 MHz.
- Durability: Connections on a breadboard can loosen over time, leading to unreliable performance.
- Size Constraints: Large or complex circuits may not fit on a single breadboard, requiring multiple boards or a more compact PCB layout.
When you’ve finalized your design and confirmed it works on a breadboard, consider transitioning to a custom PCB for a more professional and reliable result. Custom boards offer better signal integrity, durability, and the ability to handle higher power and frequencies. Many online services can help you design and manufacture a PCB at a reasonable cost, often starting at just a few dollars for small batches.
Common Mistakes to Avoid in Breadboard PCB Prototyping
Even with a simple setup, mistakes can happen. Here are some common pitfalls in PCB prototyping without etching and how to avoid them:
- Incorrect Power Connections: Always double-check that power and ground are connected to the correct rails. Reversing polarity can damage components.
- Loose Wires: Ensure jumper wires and components are firmly inserted into the breadboard holes. A loose connection can cause intermittent issues.
- Overlooking Component Ratings: Verify that components like resistors and capacitors match the required values in your schematic. Using a 10kΩ resistor instead of a 1kΩ resistor, for example, can drastically alter circuit behavior.
- Ignoring Current Limits: Don’t exceed the breadboard’s current capacity, as it can overheat or fail. Most breadboards handle less than 1A safely.
By being mindful of these issues, you can save time and frustration during your electronics prototyping experiments.
Conclusion: Start Simple, Build with Confidence
Building a breadboard PCB prototype is a fantastic way to dive into electronics without the complexity or cost of traditional PCB manufacturing. This solderless approach allows hobbyists and beginners to test ideas, refine designs, and gain hands-on experience in a low-risk environment. By following the steps and electronics prototyping tips outlined in this guide, you can create effective prototypes and avoid common mistakes in hobbyist PCB design.
Remember that breadboards are just the starting point. Once your design is ready, transitioning to a custom PCB will elevate your project to a professional level. With patience and practice, you'll master the art of prototyping and bring your innovative ideas to life. Start small, experiment often, and enjoy the journey of creating with electronics.


