 ALLPCB


If you're into home PCB assembly or are a DIY PCB maker, you might have struggled with separating individual boards from a larger panel during your projects. This is where mouse bites come in as a game-changer. Mouse bites are small, perforated sections on a PCB panel that make it easy to break apart individual boards by hand, without needing fancy tools. They are a life saver for makers working on hand-assembled PCBs, simplifying the process and saving time. In this blog, we'll dive deep into why mouse bites are so helpful, how they work, and why they are a must-have for anyone tackling DIY PCB projects at home.
What Are Mouse Bites in PCB Design?
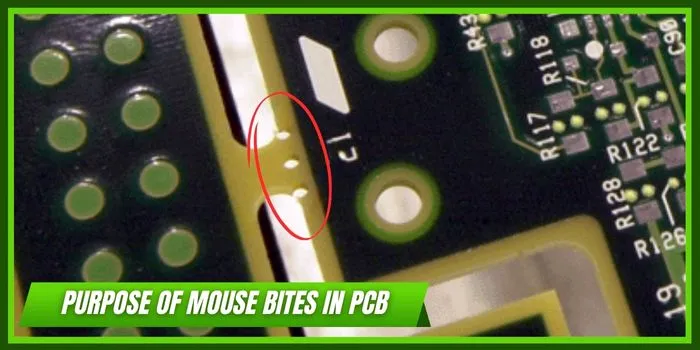
Mouse bites are tiny, pre-drilled holes or perforations placed along the edges of individual PCBs within a larger panel. These perforations create a weak connection between the boards, making it easy to snap them apart by hand. Think of them like the perforated edges on a sheet of stamps—just a little pressure, and the pieces separate cleanly. For DIY PCB makers and those doing PCB assembly at home, mouse bites eliminate the need for specialized cutting tools, which can be expensive or hard to access.
In PCB manufacturing, multiple PCBs are often produced on a single panel to save time and cost. Once the panel is complete, the individual boards need to be separated. Mouse bites provide a practical solution for this, especially for small-scale or prototype runs where precision tools might not be available. They typically consist of a series of small holes, about 0.5mm to 1mm in diameter, spaced closely together (often 0.2mm to 0.5mm apart), creating a breakable tab.
Why Mouse Bites Matter for DIY PCB Makers
For DIY PCB enthusiasts, assembling and finishing boards at home can be challenging. You might not have access to industrial-grade depaneling machines or high-precision cutters. This is where mouse bites shine. Here's why they are so important for makers working on home PCB assembly:
- Easy Separation Without Tools: Mouse bites allow you to snap apart PCBs with just your hands. No need for expensive routers or saws, which can cost hundreds of dollars.
- Cost-Effective for Small Runs: When you're making just a few boards for a personal project, mouse bites save you from investing in or outsourcing complex depaneling processes.
- Reduced Risk of Damage: Using improper tools to cut PCBs can lead to cracks or damage to delicate traces. Mouse bites provide a controlled way to separate boards, minimizing the risk of ruining your hard work.
- Perfect for Prototyping: If you're testing a design and need quick access to individual boards, mouse bites make the process fast and hassle-free.
How Mouse Bites Work in Home PCB Assembly
Mouse bites are strategically placed during the PCB design phase. When you send your design files to a manufacturer, you can specify that the panel should include mouse bites for easy separation. Here's a breakdown of how they work in the context of home PCB assembly:
- Design Stage: In your PCB design software, you or the manufacturer add small perforated tabs at the edges of each board on the panel. These tabs are usually 2mm to 5mm wide, with holes spaced to ensure a clean break.
- Manufacturing: The panel is fabricated with these perforations in place. The holes weaken the connection between boards, but the panel remains intact during production and shipping.
- Separation at Home: Once you receive the panel, you can apply gentle pressure along the mouse bite lines to snap the boards apart. The process is smooth and leaves minimal rough edges.
One key advantage for DIY PCB makers is that mouse bites are customizable. If you’re worried about the strength of the connection during shipping, you can request fewer holes for a stronger tab. If you want an easier break, more holes can be added for a weaker connection. This flexibility makes mouse bites ideal for various project needs.
Suggested Reading: Mouse Bites Panelization for SMT Assembly
Benefits of Mouse Bites for Easier DIY PCB Projects
Mouse bites offer several practical benefits that make life easier for makers. Let’s explore these in detail:
1. Accessibility for Beginners
If you're new to home PCB assembly, the idea of cutting or routing boards can be intimidating. Mouse bites remove that barrier. You don’t need to learn how to use complex tools or worry about damaging your boards. With mouse bites, even a first-timer can separate boards confidently.
2. Time-Saving Solution
For small projects, setting up a cutting tool or sending boards out for professional depaneling can take hours or even days. Mouse bites let you get to work right away. Separating a panel of 10 boards might take just a minute or two by hand.
3. Cleaner Edges with Less Effort
Unlike manual cutting, which can leave jagged edges or require sanding, mouse bites often result in cleaner breaks. While some minor residue might remain, it’s usually easy to smooth out with a file or sandpaper if needed. This saves effort and keeps your boards looking professional.
4. Ideal for Irregular Shapes
If your PCB design isn’t a standard rectangle, cutting it out with basic tools can be tricky. Mouse bites can be placed along any edge, making them perfect for oddly shaped boards. This is a huge plus for creative DIY PCB projects.
Design Considerations for Mouse Bites in DIY PCB Assembly
While mouse bites are incredibly helpful, there are a few things to keep in mind when incorporating them into your PCB design for home assembly. Proper planning ensures they work effectively and don’t interfere with your board’s functionality.
- Placement Away from Components: Make sure mouse bites are positioned far from sensitive components or traces. The snapping process can create stress on the board, potentially damaging nearby elements. A safe distance of at least 3mm from components is recommended.
- Tab Strength: Balance the number of holes in the mouse bite. Too few holes (e.g., 3 holes over a 5mm tab) might make the tab too strong, requiring excessive force to break. Too many holes (e.g., 10 holes over 5mm) can weaken the panel, risking accidental breaks during handling.
- Edge Finish: After snapping, the edges where mouse bites were may have small protrusions or rough spots. If aesthetics or safety are a concern, plan to sand or file these areas. A quick pass with 400-grit sandpaper usually does the trick.
By considering these factors during the design phase, you can ensure that mouse bites enhance your DIY PCB experience without causing issues.
Suggested Reading: The Impact of Mouse Bites on PCB Strength and Reliability
Mouse Bites vs. Other Panelization Methods for Home Assembly
Mouse bites aren’t the only way to separate PCBs from a panel, but they are often the best choice for DIY makers. Let’s compare them to other common methods to see why they stand out for home PCB assembly.
- V-Cut Scoring: V-Cuts are grooves cut into the panel to create a weak line for separation. While effective, they often require a specific tool or more force to break, which can be risky without proper equipment. Mouse bites are easier and safer for hand separation.
- Routing: Routing involves using a CNC machine to cut out individual boards. It’s precise but requires access to specialized equipment, which most DIY makers don’t have at home. Mouse bites eliminate this need.
- Breakaway Rails: Some panels include extra material (rails) with perforations for separation. While similar to mouse bites, rails take up more space and material, increasing costs for small runs. Mouse bites are more compact and cost-efficient.
For DIY PCB projects, mouse bites strike the perfect balance of simplicity, cost, and effectiveness, making them the go-to choice for easier assembly at home.
Tips for Using Mouse Bites in Your Next DIY PCB Project
Ready to incorporate mouse bites into your home PCB assembly workflow? Here are some practical tips to get the most out of them:
- Communicate with Your Manufacturer: When ordering your PCBs, clearly specify that you want mouse bites for panel separation. Provide details on tab placement and strength if you have specific needs.
- Test on a Sample: If it’s your first time using mouse bites, order a small test panel to practice separation. This helps you get a feel for the force needed and ensures the design works for your project.
- Use Protective Gear: While snapping boards is safe, small fragments can sometimes break off. Wear safety glasses to protect your eyes during separation.
- Store Panels Carefully: Until you’re ready to separate the boards, store the panel flat and avoid bending it. This prevents accidental breaks along the mouse bite lines.

Conclusion: Why Mouse Bites Are Essential for Makers
For DIY PCB makers and anyone involved in home PCB assembly, mouse bites are a true life saver. They simplify the process of separating boards, save time and money, and make prototyping accessible to everyone, from beginners to seasoned hobbyists. By incorporating mouse bites into your designs, you can focus on what matters most—bringing your creative ideas to life—without worrying about complicated depaneling processes.
Whether you’re building a small gadget or testing a new circuit, mouse bites make the journey easier. They are a small design feature with a big impact, proving that sometimes the simplest solutions are the most effective. So, for your next project, consider adding mouse bites to your panel design and experience the difference they make in hand-assembled PCBs.


