ALLPCB


If you're an engineer or designer looking to test your electronic designs quickly and without breaking the bank, FR-4 PCB prototyping is the way to go. This popular material, known for its durability and cost-effectiveness, is the backbone of most printed circuit boards. But how can you prototype with FR-4 efficiently? In this guide, we'll explore fast and affordable methods like FR-4 PCB quick turn prototyping, online services, DIY etching, milling, 3D printing, and prototype assembly to help you validate your designs with ease.
Whether you're a hobbyist or a professional, this blog will break down each approach, providing actionable steps and insights to streamline your prototyping process. Let's dive into the world of FR-4 PCB prototyping and discover how to bring your ideas to life.
What is FR-4 and Why Use It for PCB Prototyping?
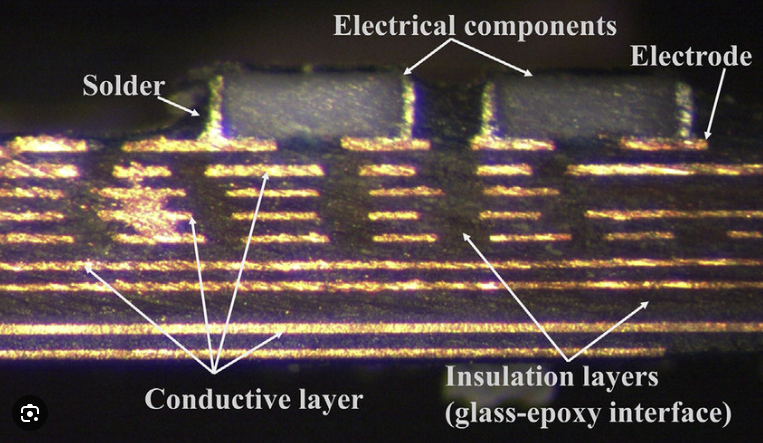
FR-4 is a widely used material in PCB manufacturing, made from woven fiberglass cloth with an epoxy resin binder. The "FR" stands for "flame retardant," making it a safe and reliable choice for electronic applications. Its key benefits include excellent electrical insulation, mechanical strength, and thermal stability, with a typical dielectric constant of around 4.5 at 1 MHz and a thermal conductivity of about 0.25 W/m·K. These properties make FR-4 ideal for prototyping, as it can handle a wide range of operating conditions while remaining affordable.
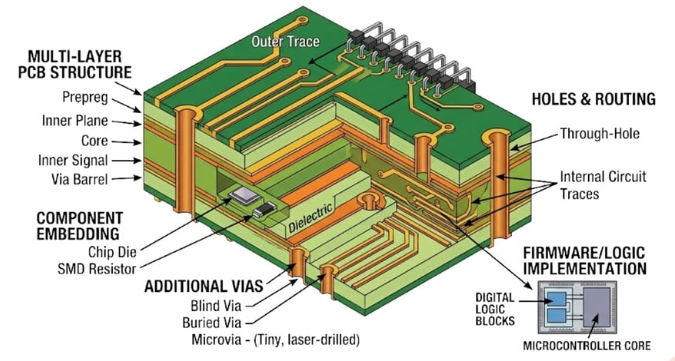
For prototyping, FR-4 strikes a perfect balance between cost and performance. It supports single-layer to multi-layer designs and is compatible with various fabrication techniques. Whether you're testing a simple circuit or a complex design, FR-4 provides the reliability needed to validate your ideas before full-scale production.
Benefits of Fast and Affordable FR-4 PCB Prototyping
Prototyping with FR-4 offers several advantages for engineers and designers who need to test designs quickly. Speed is critical in product development, and affordable prototyping ensures you can iterate without straining your budget. Here are some key benefits:
- Cost-Effectiveness: FR-4 is one of the most economical materials for PCBs, with prototype costs often starting as low as $5 per board for small quantities through online services.
- Speed: Quick turn prototyping services can deliver boards in as little as 24-48 hours, allowing rapid testing and iteration.
- Versatility: FR-4 supports various prototyping methods, from professional fabrication to DIY approaches, catering to different skill levels and needs.
- Reliability: With a typical tensile strength of 310 MPa, FR-4 ensures your prototype can withstand handling and testing without breaking.
By leveraging these benefits, you can focus on refining your design rather than worrying about delays or high costs.
FR-4 PCB Quick Turn Prototyping: Speed Without Compromise
When time is of the essence, FR-4 PCB quick turn prototyping is a game-changer. This service focuses on delivering fully functional boards in a short timeframe, often within 24 to 72 hours for standard designs. It's perfect for engineers who need to meet tight deadlines or test multiple iterations rapidly.
Quick turn services typically involve submitting your design files online, selecting your specifications (like board thickness, usually 1.6mm for FR-4), and receiving the fabricated boards at your doorstep. Many providers offer options for 2-layer to 6-layer boards, with trace widths as small as 6 mils (0.15mm) to support intricate designs. The cost for quick turn services can range from $10 to $50 per board, depending on complexity and turnaround time.
This method ensures you get high-quality FR-4 boards without sacrificing speed, making it ideal for urgent projects or last-minute design validations.
FR-4 PCB Online Prototyping: Convenience at Your Fingertips
For those who prefer a hassle-free experience, FR-4 PCB online prototyping services offer a seamless way to order boards from anywhere in the world. These platforms allow you to upload your Gerber files, specify parameters like board dimensions and layer count, and get an instant quote. Most services support FR-4 as the default material due to its popularity and cost-effectiveness.
Online prototyping is not only convenient but also affordable, with prices often starting at $2 per board for small runs (e.g., 5 pieces of a 10cm x 10cm board). Turnaround times vary from 48 hours to a week, depending on shipping and production options. This method is ideal for engineers who lack the tools or time for in-house fabrication and want professional results.
Additionally, many online platforms provide design rule checks (DRC) to catch errors like improper trace spacing (minimum often 6 mils) before production, saving you from costly mistakes.
FR-4 PCB DIY Etching: A Hands-On Approach
If you enjoy a hands-on process or want to save on costs, FR-4 PCB DIY etching is a practical option for prototyping. This method involves creating your own boards at home using basic materials and tools. Here's a step-by-step guide to get started:
- Design Your Circuit: Use free software to create your PCB layout and print it on transfer paper or transparency film.
- Prepare the Board: Start with a blank FR-4 copper-clad board (available for about $1-2 per piece). Clean the surface with steel wool to remove oxidation.
- Transfer the Design: Use a laser printer and an iron to transfer the design onto the copper layer.
- Etch the Board: Submerge the board in a ferric chloride solution (costing around $10 per liter) for 10-20 minutes to remove excess copper, leaving only your traces.
- Drill Holes: Use a small drill bit (0.8mm-1mm) to create holes for components.
DIY etching is affordable, with total costs under $20 for small projects, but it requires caution due to the chemicals involved. It's best for simple, single-layer designs with trace widths above 10 mils (0.25mm) to avoid errors during etching.
FR-4 PCB Milling: Precision for Small-Scale Production
Another DIY-friendly option is FR-4 PCB milling, a subtractive process that uses a CNC machine to carve out copper traces from an FR-4 board. Unlike etching, milling doesn't involve chemicals, making it safer for home or office use. It’s ideal for creating precise prototypes with trace widths as small as 8 mils (0.2mm).
To mill an FR-4 board, you'll need a desktop CNC machine (starting at $200 for basic models) and a design file. The machine removes copper based on your layout, leaving behind the desired traces and pads. The process takes about 30-60 minutes per board, depending on complexity.
While the upfront cost of equipment is higher than etching, milling offers better precision and repeatability, especially for double-sided boards. It's a great choice for hobbyists or small businesses looking to produce a few high-quality prototypes.
FR-4 PCB 3D Printing: Innovative Prototyping for Complex Designs
While traditional FR-4 boards aren't 3D printed, additive manufacturing techniques are emerging as a complementary tool for PCB prototyping. FR-4 PCB 3D printing typically refers to printing non-conductive substrates or enclosures that integrate with FR-4 boards, or experimental methods to print conductive traces using specialized printers.
For instance, some advanced 3D printers can deposit conductive ink onto an FR-4-like substrate to create simple circuits. However, these are still in early stages and often limited to low-current applications (under 1A). More commonly, 3D printing is used to create custom mounts or casings for FR-4 prototypes, ensuring a perfect fit for testing.
This method is best for engineers who need to test form factor alongside functionality. Costs vary widely, with 3D printing filament starting at $20 per spool and conductive ink kits at $50 or more.
FR-4 PCB Prototype Assembly: From Board to Functional Unit
Once your FR-4 PCB is fabricated, the next step is prototype assembly—soldering components onto the board to create a working circuit. This can be done manually for small projects or through professional services for complex designs.
For manual assembly, you'll need a soldering iron (around $15-30), solder wire, and components. Ensure proper spacing (at least 10 mils between pads) in your design to make soldering easier. For surface-mount components, a steady hand and fine-tip iron are essential, as pad sizes can be as small as 0.5mm x 0.3mm.
Professional FR-4 PCB prototype assembly services are ideal for high-density designs or if you lack the time or tools. Costs start at $10-20 per board for small runs, with turnaround times of 2-5 days. These services often include component sourcing, ensuring all parts match your bill of materials (BOM).
Comparing Costs and Turnaround Times for FR-4 PCB Prototyping Methods
Choosing the right prototyping method depends on your budget, timeline, and project complexity. Here's a quick comparison of the methods discussed:
| Method | Cost (Per Board) | Turnaround Time | Best For |
|---|---|---|---|
| Quick Turn Prototyping | $10-$50 | 24-72 hours | Urgent projects |
| Online Prototyping | $2-$20 | 48 hours-1 week | Convenience, small runs |
| DIY Etching | Under $5 | 1-2 days | Simple designs, low cost |
| Milling | $5-$10 (after equipment) | 1-2 hours per board | Precision, small batches |
| 3D Printing (Complementary) | $20-$50+ | Hours to days | Form factor testing |
| Prototype Assembly | $10-$20 (professional) | 2-5 days | Complex designs |
This table helps you weigh the pros and cons of each method based on your specific needs. For instance, if speed is critical, quick turn prototyping is worth the higher cost. If you're on a tight budget, DIY etching could be the way to go.
Tips for Successful FR-4 PCB Prototyping
To ensure your prototyping process goes smoothly, keep these tips in mind:
- Double-Check Your Design: Use design software to verify trace widths (minimum 6-8 mils) and clearances to avoid fabrication issues.
- Start Small: Test a single board or small batch before scaling up to catch errors early.
- Document Everything: Keep notes on test results, impedance values (FR-4 typically supports 50-100 ohms for controlled impedance), and adjustments for future reference.
- Choose the Right Thickness: Standard FR-4 boards are 1.6mm thick, but thinner options (0.8mm) can save weight for portable designs.
- Prioritize Safety: When doing DIY etching or milling, wear protective gear and work in a well-ventilated area.
Following these practices will help you avoid common pitfalls and achieve reliable results with your FR-4 prototypes.
Conclusion: Bringing Your Designs to Life with FR-4 PCB Prototyping
FR-4 PCB prototyping offers a range of fast and affordable ways to test your electronic designs, from quick turn services and online ordering to hands-on methods like DIY etching and milling. Whether you're leveraging professional FR-4 PCB prototype assembly or experimenting with 3D printing for custom enclosures, there's a solution tailored to your needs.
By understanding the strengths of each method—be it the speed of quick turn prototyping or the precision of milling—you can choose the best approach for your project. With costs as low as $2 per board and turnaround times as fast as 24 hours, FR-4 makes prototyping accessible to everyone, from hobbyists to seasoned engineers.
Start exploring these options today and take the first step toward turning your concepts into functional, tested designs. With FR-4, you're equipped to iterate, innovate, and succeed in your electronic projects.