ALLPCB


Are you looking to keep tabs on your wind turbine’s performance from afar? With remote wind turbine monitoring, a DIY PCB, and some sensor integration, you can create an IoT project that brings data straight to your device. This blog will guide you through building a custom monitoring system for your wind turbine using a do-it-yourself printed circuit board (PCB). Whether you're into home automation or renewable energy projects, you'll find step-by-step instructions, practical tips, and technical insights to make this project a success.
Why Remote Wind Turbine Monitoring Matters
Wind turbines, whether for personal use or small-scale energy production, need regular oversight to ensure they’re running efficiently and safely. Remote monitoring allows you to track critical metrics like power output, wind speed, and equipment health without being on-site. By integrating IoT (Internet of Things) technology, you can access real-time data on your phone or computer, helping you spot issues before they become costly problems.
For hobbyists and engineers, combining remote wind turbine monitoring with a DIY PCB offers a cost-effective and customizable solution. You get to design the system to your exact needs, from sensor integration to data transmission. Plus, it’s a fantastic way to dive into IoT projects and home automation, blending renewable energy with smart technology.
Understanding the Basics of a Remote Monitoring System
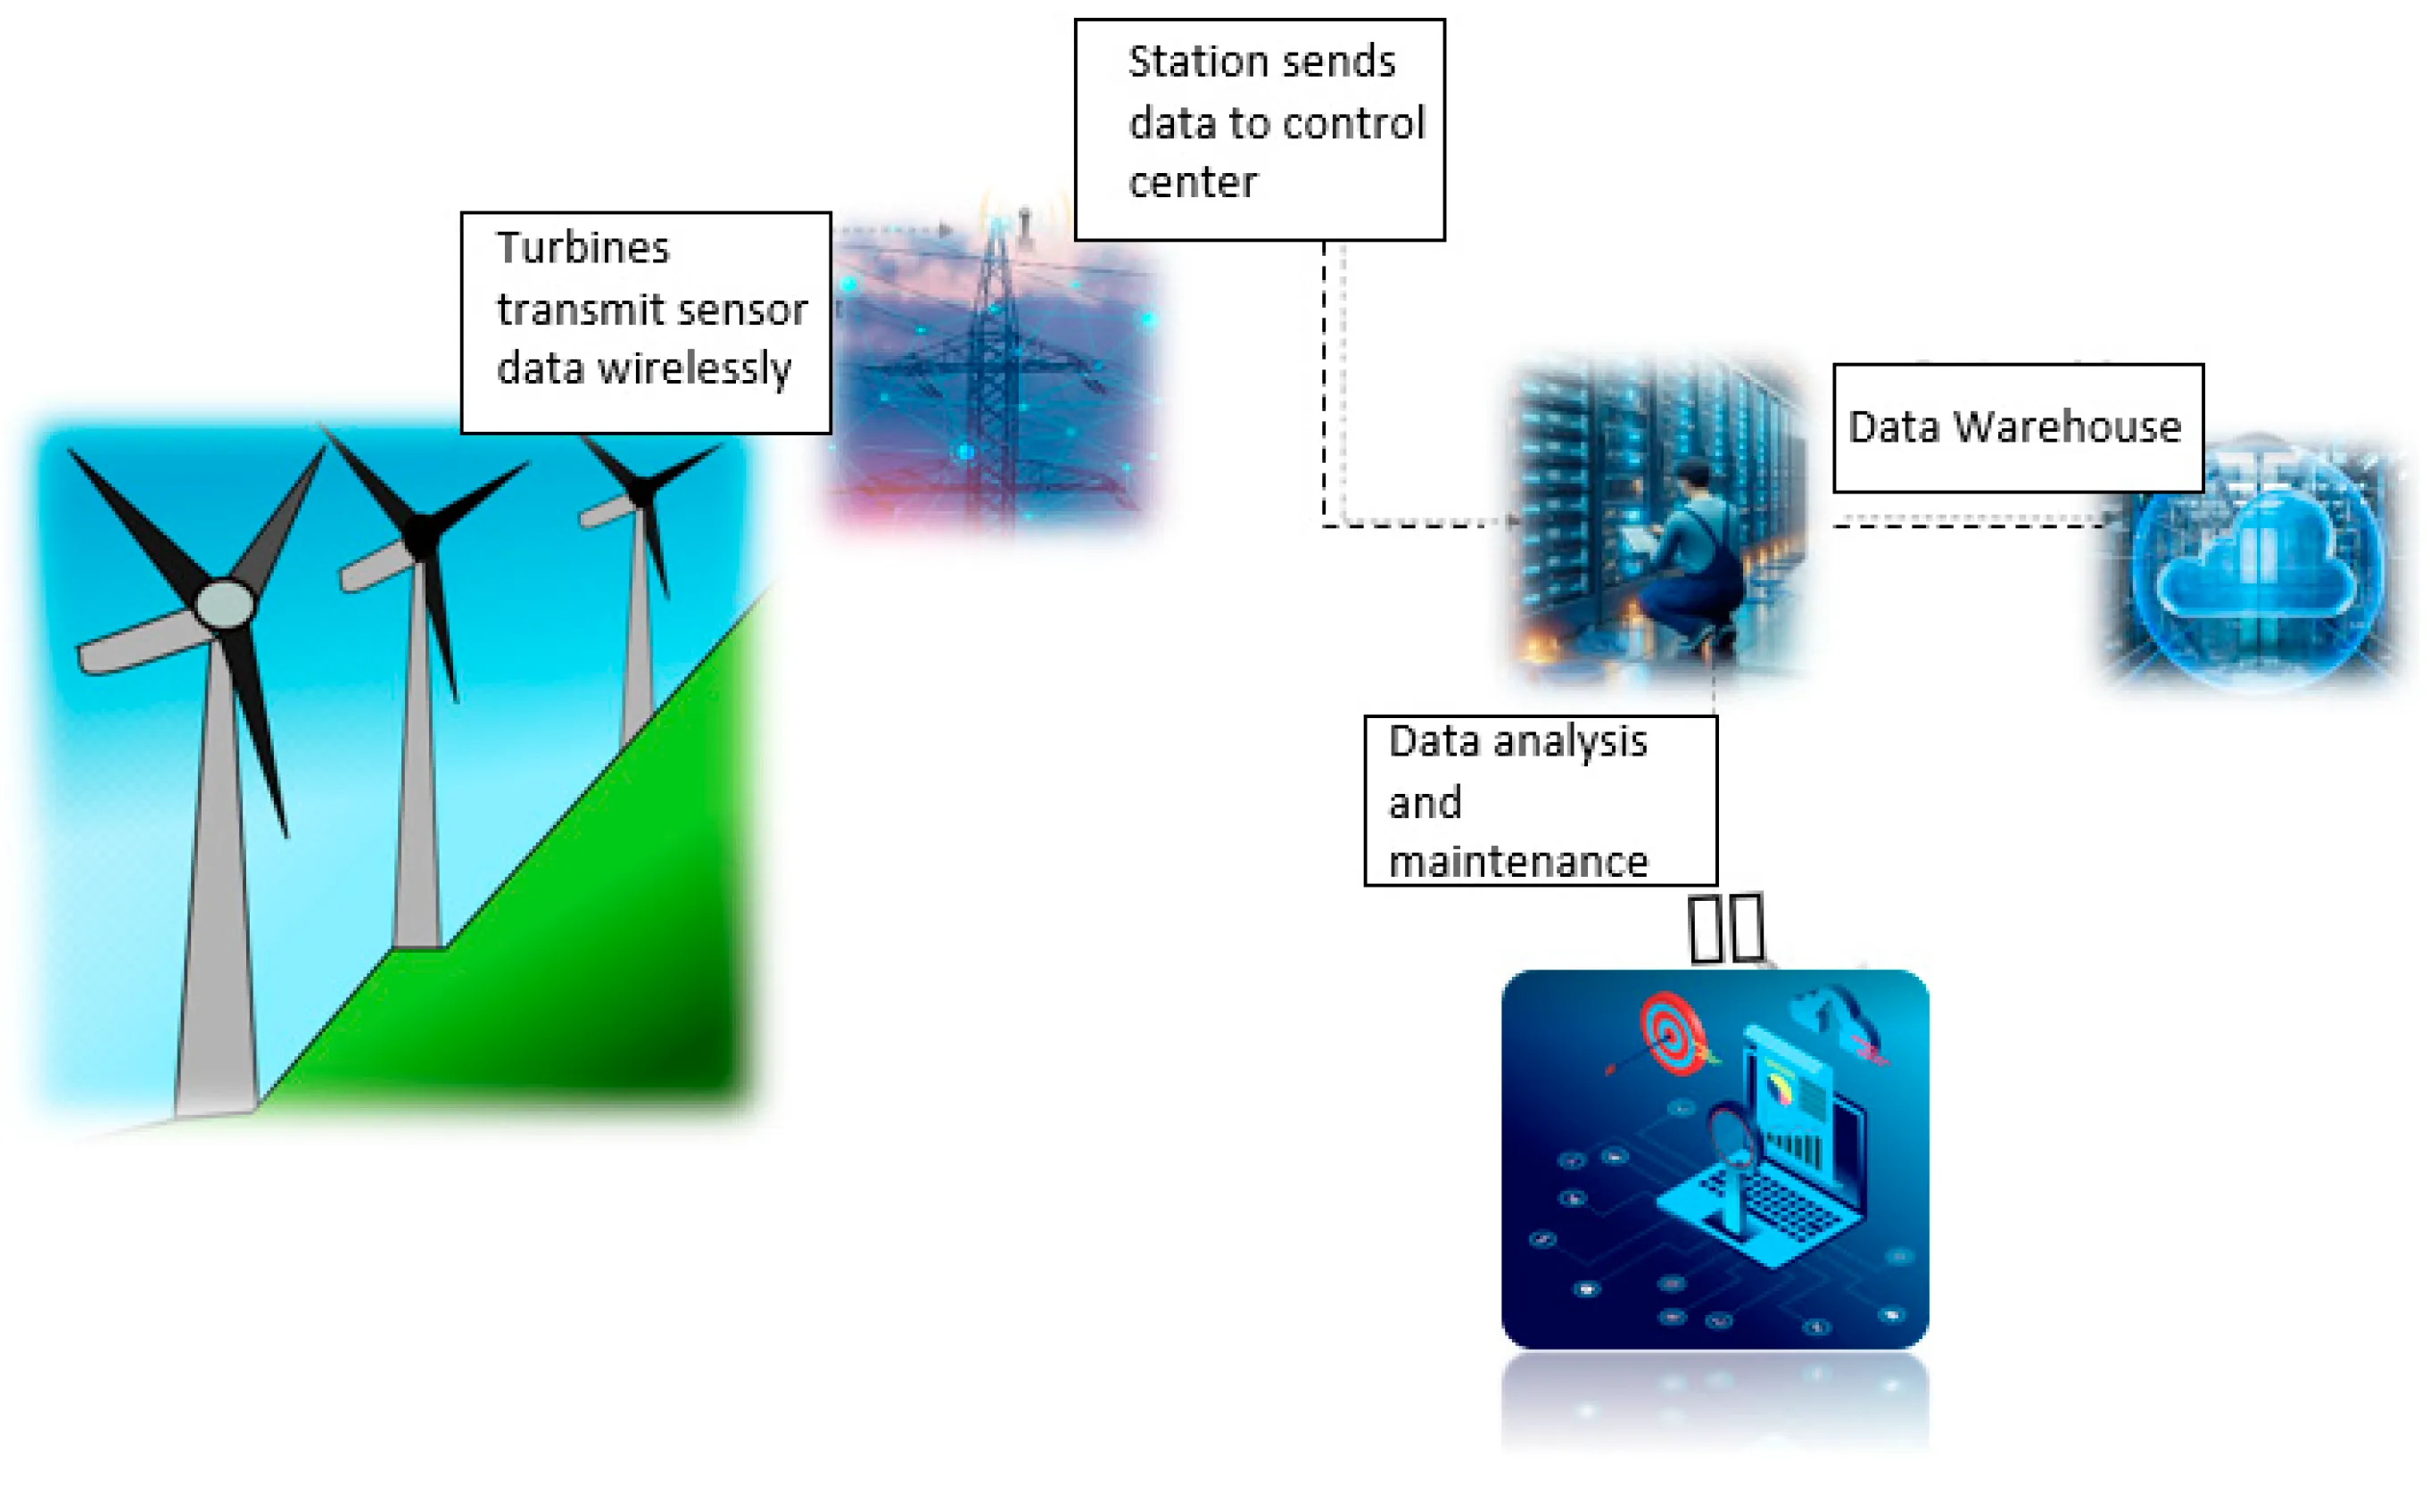
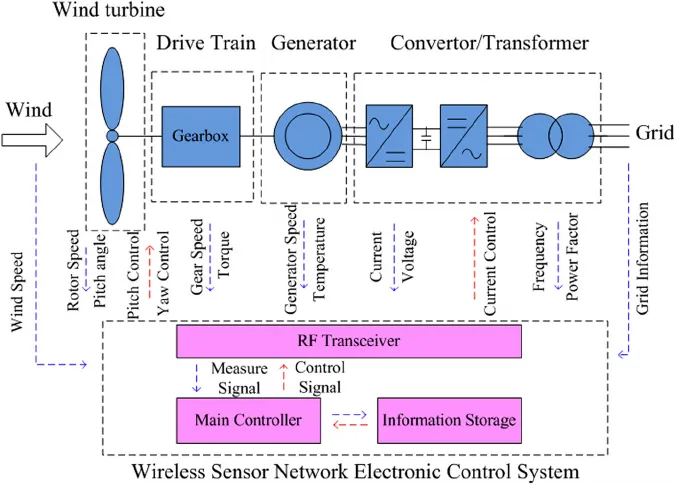
Before we get into the nitty-gritty, let’s break down what a remote monitoring system for a wind turbine involves. At its core, the system collects data from sensors attached to the turbine, processes it through a microcontroller on a custom PCB, and sends it to a cloud server or app via the internet. This setup lets you monitor variables like:
- Wind speed (measured in meters per second, typically 0-30 m/s for small turbines)
- Power output (in watts, often 100-500W for home turbines)
- Rotor speed (in RPM, varying between 100-500 RPM depending on design)
- Temperature of critical components (in Celsius, ideally under 80°C)
- Vibration levels (to detect mechanical issues, often measured in mm/s)
The DIY PCB serves as the brain of the operation, connecting sensors, processing data, and handling communication. With IoT integration, you can use Wi-Fi or cellular modules to transmit data, making this an excellent project for home automation enthusiasts.
Step 1: Planning Your DIY PCB for Wind Turbine Monitoring
Designing a PCB for remote monitoring starts with planning. You’ll need to decide which sensors to include, how to power the system, and how data will be transmitted. Here’s a breakdown of the key components:
- Microcontroller: A popular choice is a 32-bit processor with built-in Wi-Fi, capable of handling multiple sensor inputs and data processing at speeds up to 80 MHz.
- Sensors: Common options include anemometers for wind speed (outputting 0-5V signals), current sensors for power output (measuring up to 10A), and temperature sensors (accurate within ±0.5°C).
- Power Supply: A 5V or 3.3V regulator to step down turbine-generated power or battery input, ensuring stable operation with minimal ripple (under 50mV).
- Communication Module: A Wi-Fi module supporting 2.4 GHz bands for IoT connectivity, with a range of at least 50 meters in open areas.
Sketch a schematic that connects these components, keeping signal paths short to reduce noise (aim for trace lengths under 10 cm for high-speed signals). Ensure the PCB layout accounts for proper grounding to avoid interference, especially since wind turbines often operate in noisy electrical environments.
Step 2: Sensor Integration for Accurate Data Collection
Sensors are the eyes and ears of your remote monitoring system. Integrating them into your DIY PCB requires careful selection and calibration to ensure accurate data. Here are the main sensors to consider:
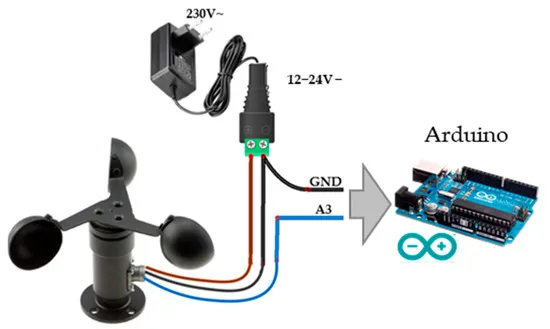
Wind Speed Sensor (Anemometer)
An affordable anemometer can output a voltage proportional to wind speed, often in the range of 0.4V to 2V for speeds of 0 to 30 m/s. Connect this to an analog-to-digital converter (ADC) pin on your microcontroller, ensuring the input impedance is at least 10 kΩ to avoid signal distortion.
Current and Voltage Sensors for Power Output
Use a non-invasive current sensor (like a Hall effect sensor) to measure AC or DC current up to 10A with an accuracy of ±1%. Pair it with a voltage sensor (measuring 0-25V) to calculate power output in real-time. These sensors often output analog signals, so connect them to ADC pins and use a 10-bit resolution for precise readings.
Temperature and Vibration Sensors
Temperature sensors (like NTC thermistors) can monitor gearbox or generator heat, with a typical range of -40°C to 125°C. Vibration sensors (piezoelectric type) detect mechanical issues by measuring displacement in the range of 0.1 to 10 mm/s. Both can be interfaced via I2C or analog pins on your PCB.
Make sure to calibrate each sensor after installation by comparing readings to known values. For instance, test wind speed readings against a handheld anemometer during setup to confirm accuracy within 5%.
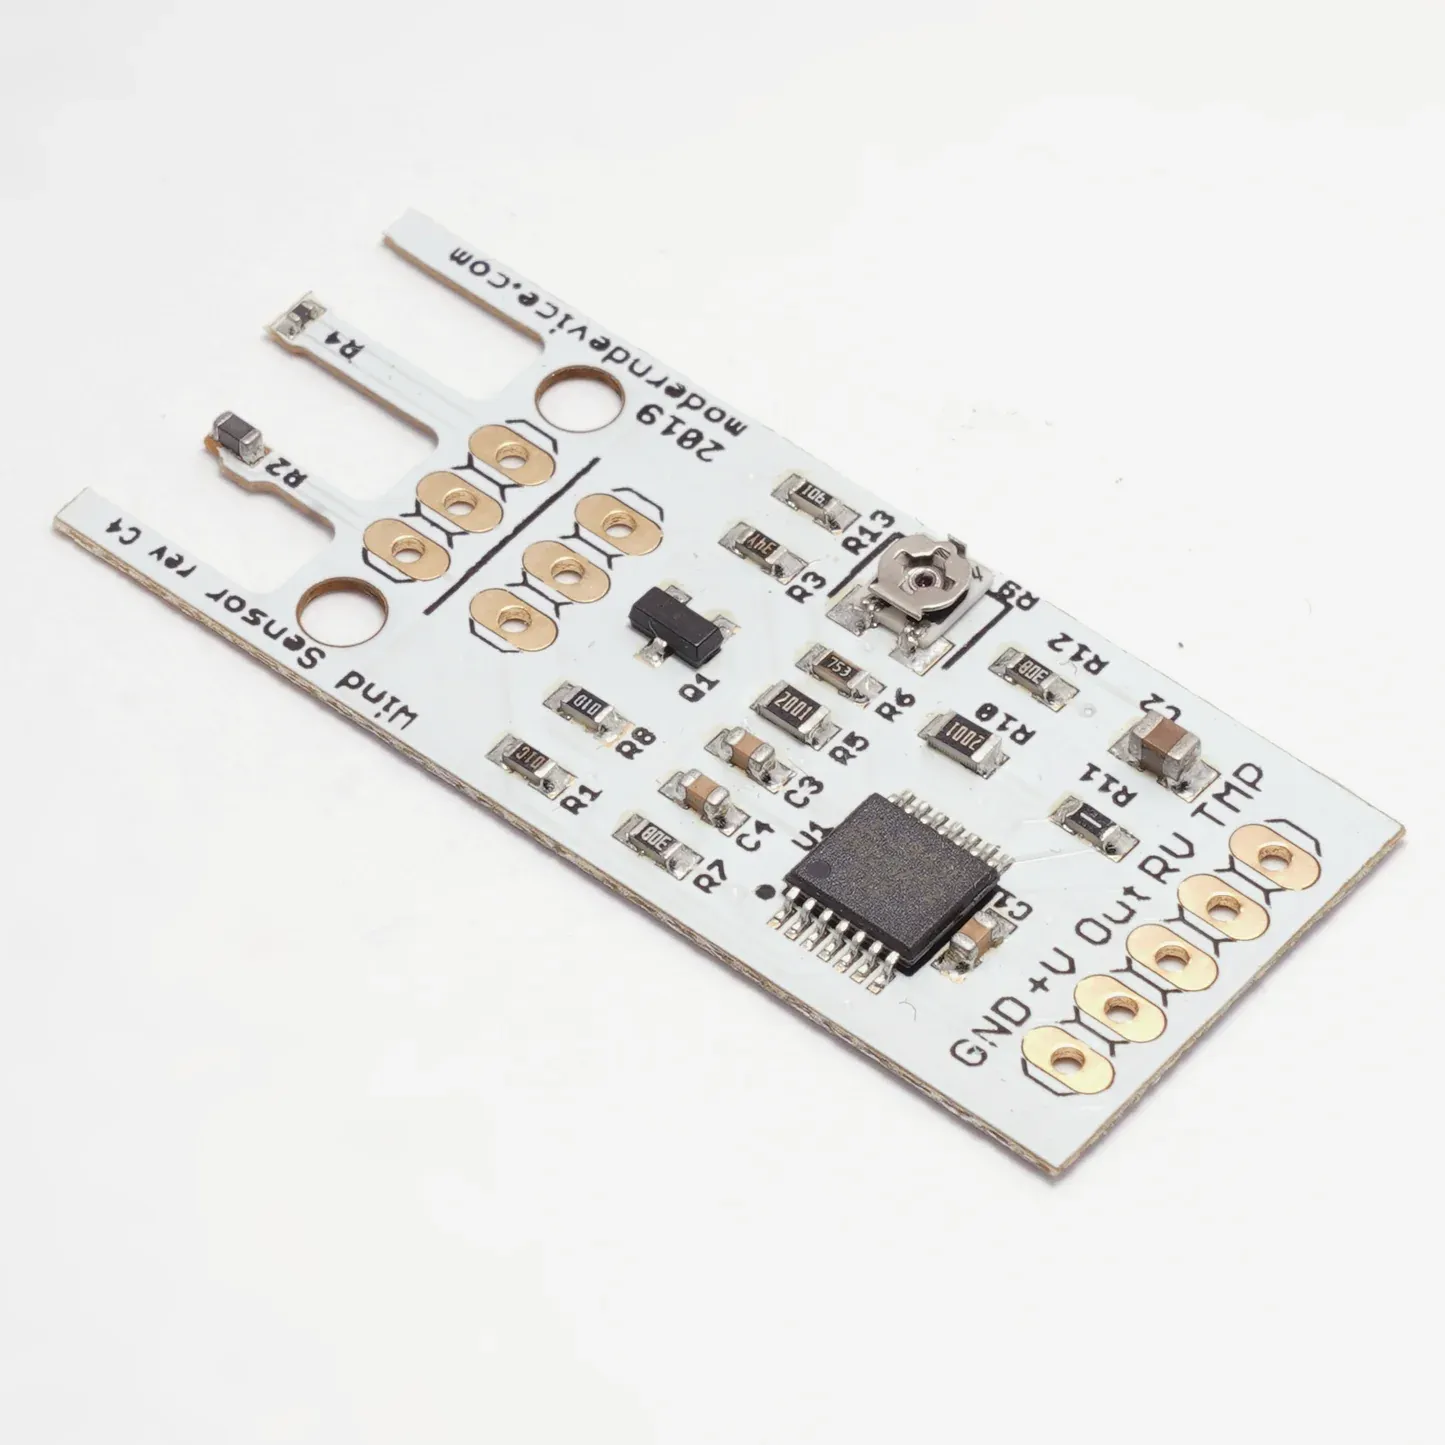
Step 3: Building and Testing Your DIY PCB
Once your design is ready, it’s time to fabricate the PCB. Use design software to finalize your schematic and layout, ensuring all traces are at least 0.25 mm wide for current-carrying paths (supporting up to 1A). Double-check for proper spacing (at least 0.2 mm between traces) to prevent short circuits.
After fabrication, assemble the board by soldering components in place. Start with the microcontroller, then add sensors and power components. Use a multimeter to verify connections, checking for continuity and ensuring input voltages stay within 5% of expected values (e.g., 5V ± 0.25V).
Test the PCB by powering it with a stable 5V source and running a simple code to read sensor data. Upload firmware to your microcontroller to log data every 10 seconds and check for anomalies like readings outside expected ranges (e.g., wind speed over 50 m/s, which likely indicates a fault).
Step 4: Setting Up IoT for Remote Access
IoT is what makes remote wind turbine monitoring possible. To enable this, program your microcontroller to send data to a cloud platform via Wi-Fi. Here’s how to set it up:
- Connect to a Cloud Service: Use a free IoT platform that supports MQTT protocol for lightweight data transmission. Configure your Wi-Fi module to connect to your home network with a signal strength of at least -70 dBm for reliability.
- Transmit Data: Format sensor data into JSON packets (e.g., {"wind_speed": 15.2, "power": 320.5}) and send them every 60 seconds to minimize bandwidth usage (about 1-2 KB per minute).
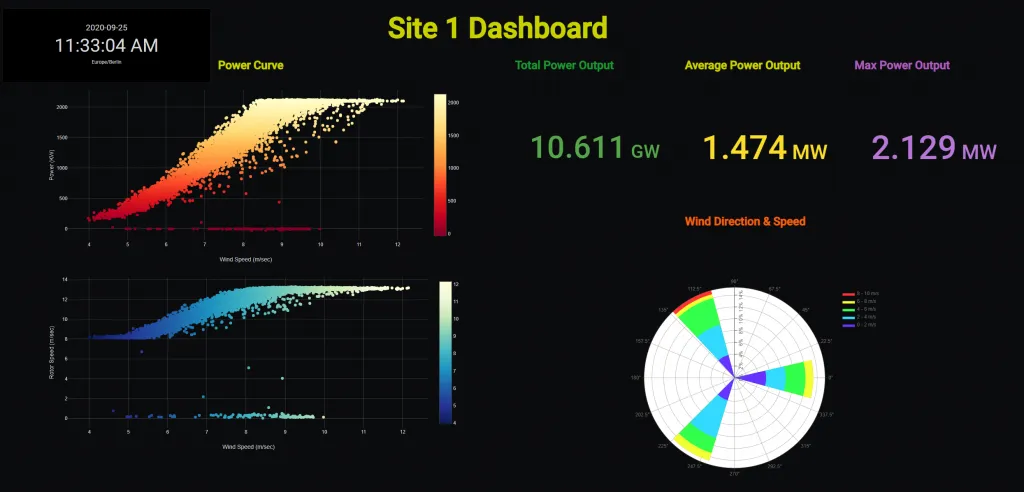
- Access Data Remotely: Set up a dashboard on the cloud platform to visualize data in graphs or tables. Alternatively, use a mobile app to receive alerts if values exceed thresholds (e.g., temperature over 80°C).
This IoT setup ties into home automation by allowing you to integrate turbine data with other smart devices. For example, you could program an alert to shut down non-essential appliances if power output drops below 100W.
Step 5: Installing the System on Your Wind Turbine
With your DIY PCB ready, install it on your wind turbine. Mount the board in a weatherproof enclosure (IP65 rating or higher) to protect it from rain and dust. Place sensors at appropriate locations:
- Anemometer at the highest point for unobstructed wind readings.
- Current and voltage sensors near the generator output wires.
- Temperature and vibration sensors on the gearbox or nacelle.
Secure all wiring with cable ties and use shielded cables for sensor connections to reduce electromagnetic interference (EMI), especially since turbines can generate noise with frequencies up to 1 kHz. Power the system using a small battery (12V, 5Ah) or directly from the turbine’s output with a step-down converter.
Run a final test after installation by monitoring data for 24 hours. Check for consistent readings and ensure data transmission to the cloud works without interruption (aim for 99% uptime).
Benefits of DIY PCB in Remote Wind Turbine Monitoring
Building your own PCB for remote monitoring offers several advantages over off-the-shelf solutions. First, it’s cost-effective—components for a basic system can total under $50, compared to commercial systems costing hundreds. Second, it’s fully customizable; you can add or remove sensors based on your turbine’s needs. Finally, it’s a learning opportunity, especially for those interested in IoT projects and home automation, as it combines hardware design with software programming.
This approach also scales well. Start with basic monitoring, then expand to predictive maintenance by analyzing vibration data for wear patterns or integrating machine learning algorithms to forecast failures based on historical data (e.g., power output trends over 30 days).
Common Challenges and Solutions
While building a remote monitoring system is rewarding, you might face hurdles. Here are a few common issues and how to tackle them:
- Signal Noise: Wind turbines generate electrical noise that can skew sensor readings. Use low-pass filters with a cutoff frequency of 10 Hz to clean analog signals before they reach the microcontroller.
- Power Instability: Fluctuating turbine output can disrupt the system. Add a small capacitor (1000 μF, 16V) near the power input to smooth voltage spikes.
- Data Loss: Weak Wi-Fi signals can interrupt data transmission. Install a high-gain antenna (at least 5 dBi) to extend range, or buffer data locally on an SD card if the connection drops.
Conclusion: Take Control with Remote Wind Turbine Monitoring
Creating a remote monitoring system for your wind turbine using a DIY PCB is a practical and exciting project. By integrating sensors, designing a custom board, and leveraging IoT technology, you can track your turbine’s performance from anywhere, ensuring it runs smoothly and efficiently. This setup not only saves time and money but also opens doors to advanced home automation and renewable energy experiments.
Whether you’re a hobbyist or a seasoned engineer, the steps outlined here provide a clear path to success. Start small with basic sensors, test thoroughly, and scale up as you gain confidence. With remote wind turbine monitoring, you’re not just maintaining equipment—you’re building a smarter, more connected energy future.