 ALLPCB


Are you a hobbyist looking to master hand soldering SMT components for your DIY electronics projects? Surface Mount Technology (SMT) components are tiny, but with the right tools and techniques, you can solder them like a pro. In this comprehensive guide, we’ll walk you through every step of the process, from gathering tools to perfecting your soldering skills. Whether you're new to soldering or need tips for rework, this tutorial will help you succeed in your DIY electronics journey.
Why Learn Hand Soldering for SMT Components?
SMT components are the backbone of modern electronics. These small parts, soldered directly onto the surface of a printed circuit board (PCB), are found in everything from smartphones to hobbyist projects. Unlike traditional through-hole components, SMT parts are smaller, allowing for compact designs. However, their size makes them tricky to solder by hand without practice.
Learning to hand solder SMT components opens up a world of possibilities for hobbyists. You can build smaller, more efficient projects, repair modern devices, or even prototype your own designs. Plus, mastering this skill saves money compared to outsourcing assembly or using expensive equipment. Let’s dive into the essentials of hand soldering SMT components with this step-by-step soldering tutorial.
What You’ll Need: Tools and Materials for Hand Soldering
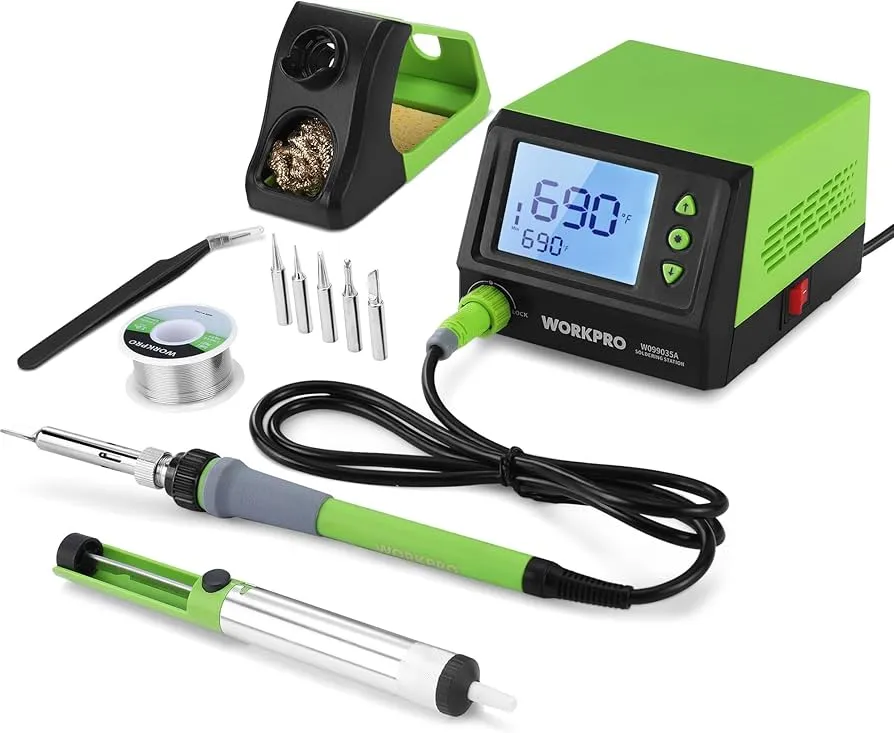
Before you start, gather the right tools. Having the proper equipment makes hand soldering SMT components much easier and safer. Here’s a list of essentials for DIY electronics enthusiasts:
- Soldering Iron: Use a temperature-controlled soldering iron with a fine tip (1mm or smaller). A 15-30 watt iron works well for most SMT work. Brands like Hakko or Weller are popular among hobbyists.
- Solder: Choose a thin lead-free solder wire (0.5mm to 0.8mm diameter) with a rosin core for better flow on small pads.
- Flux: Flux helps solder flow smoothly and prevents oxidation. A flux pen or liquid flux is ideal for SMT soldering.
- Tweezers: Precision tweezers are a must for placing tiny components like 0402 resistors or capacitors.
- Magnifying Glass or Microscope: SMT components are often smaller than 1mm, so magnification helps with placement and inspection.
- Desoldering Braid/Wick: Useful for rework or fixing mistakes when soldering.
- Isopropyl Alcohol and Brush: For cleaning the PCB after soldering to remove flux residue.
- Anti-static Mat and Wrist Strap: Protect sensitive components from static discharge.
- PCB or Practice Board: Start with a practice board if you’re new to SMT soldering to avoid damaging expensive projects.
Preparing Your Workspace for SMT Soldering
A clean, organized workspace is key to successful hand soldering. Here’s how to set up for safety and efficiency:
- Clear Your Area: Remove clutter to avoid losing tiny components. Use a small tray or container to hold parts.
- Good Lighting: Ensure your workspace is well-lit. A desk lamp with a magnifying lens can be a game-changer.
- Ventilation: Soldering produces fumes, so work in a ventilated area or use a fume extractor.
- Static Protection: Wear an anti-static wrist strap and work on an anti-static mat to protect components from damage.
Once your workspace is ready, let’s move on to the actual process of hand soldering SMT components.
Step-by-Step Guide to Hand Soldering SMT Components
Hand soldering SMT components might seem intimidating at first, but with practice, it becomes second nature. Follow these steps to get started with your DIY electronics project.
Step 1: Prepare the PCB and Components
Start by inspecting your PCB. Make sure the pads (the small metal areas where components will be soldered) are clean and free of debris. If there’s any dirt or oxidation, clean the board with isopropyl alcohol and a brush.
Next, organize your SMT components. These parts are tiny—some resistors or capacitors can be as small as 0.4mm x 0.2mm (0402 size). Use a magnifying glass to read markings if needed, and keep them in labeled containers to avoid mix-ups.
Step 2: Apply Flux to the Pads
Flux is your best friend when soldering SMT components. It helps the solder flow evenly and stick to the pads. Use a flux pen or a small brush to apply a thin layer of flux to the PCB pads where the component will sit. Don’t overdo it—a little goes a long way.
Step 3: Tin One Pad
Before placing the component, “tin” one of the pads by applying a small amount of solder. Set your soldering iron to around 300°C (572°F) for lead-free solder. Touch the tip to the pad for 1-2 seconds, then feed a tiny bit of solder wire until a small dome forms. This pre-tinned pad will act as an anchor for the component.
Step 4: Place the Component
Using precision tweezers, carefully pick up the SMT component and place it on the pads. Align it so one end touches the tinned pad and the other end sits on the bare pad. Double-check the orientation, especially for polarized components like diodes or capacitors—getting this wrong can ruin your circuit.
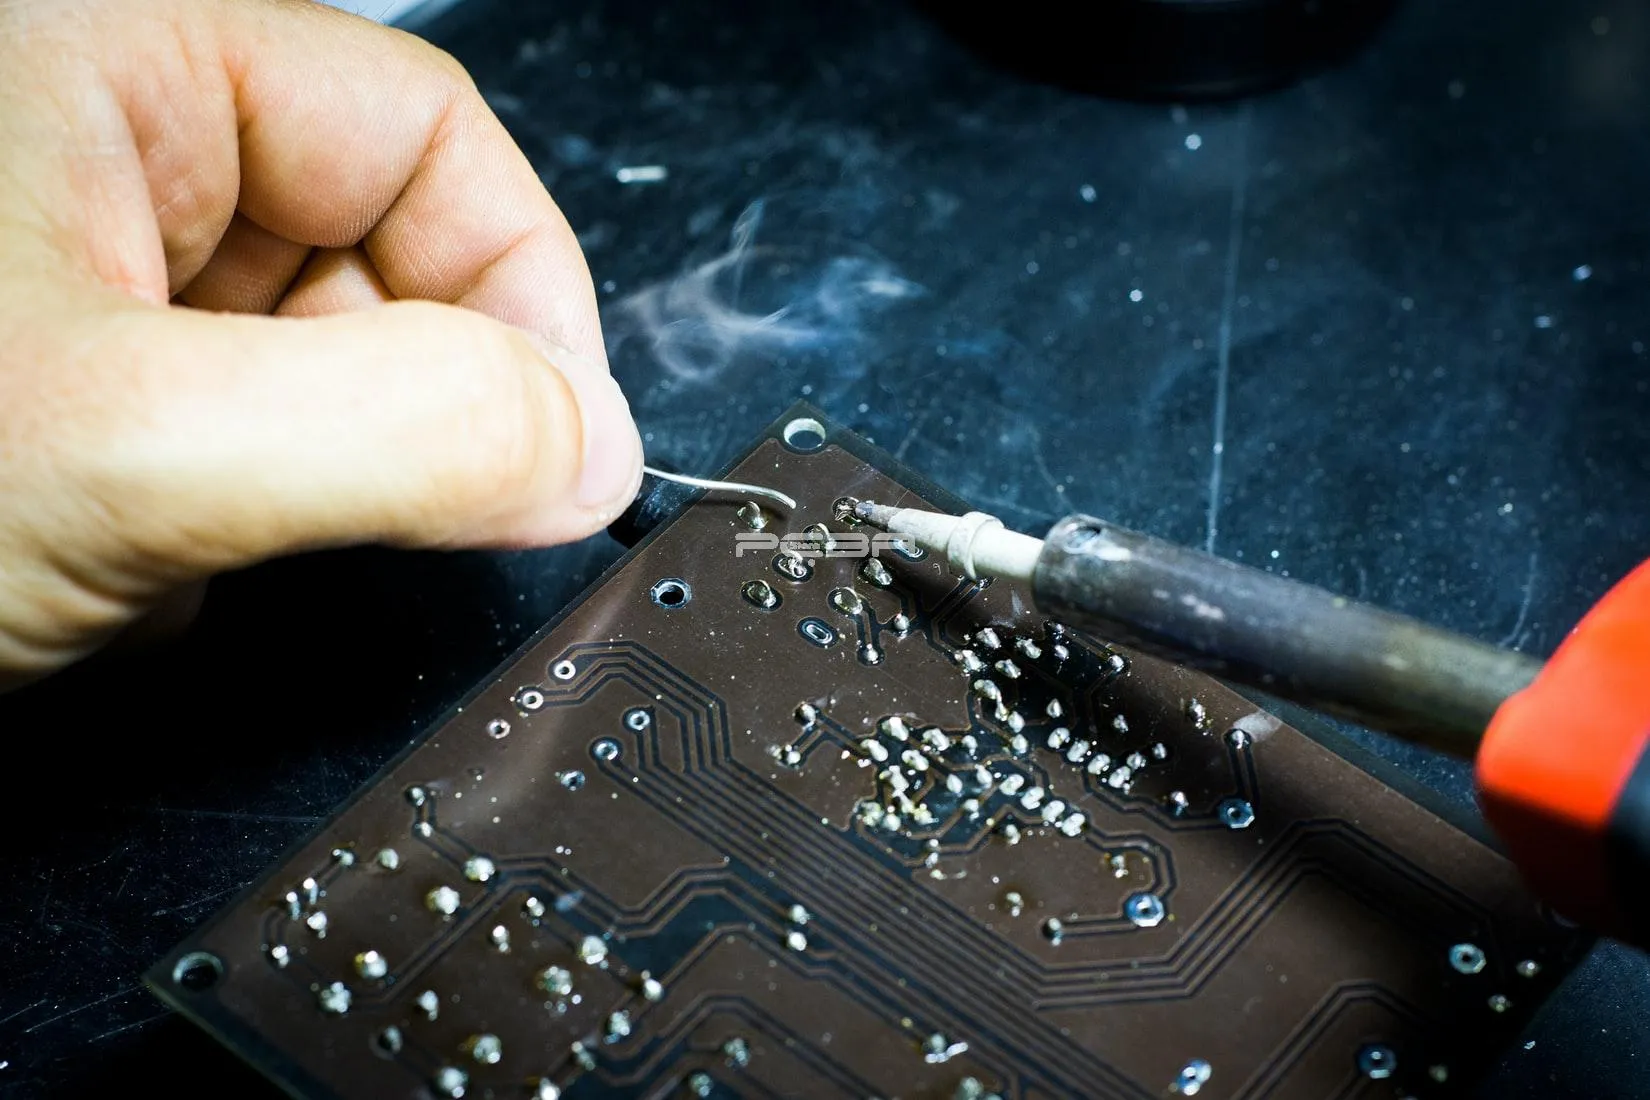
Step 5: Solder the First Connection
Heat the tinned pad with your soldering iron for about 1-2 seconds, allowing the solder to melt. Gently press the component into the molten solder with your tweezers. Remove the iron and let the solder cool. The component should now be secured on one side. If it’s not aligned perfectly, reheat the solder and adjust with tweezers.
Step 6: Solder the Other Side
Now, solder the other end of the component to the bare pad. Apply a tiny amount of solder to the tip of your iron, then touch it to the pad and component lead simultaneously. The solder should flow smoothly, forming a small, shiny fillet. Avoid using too much solder—excess can cause shorts.
Step 7: Inspect and Clean
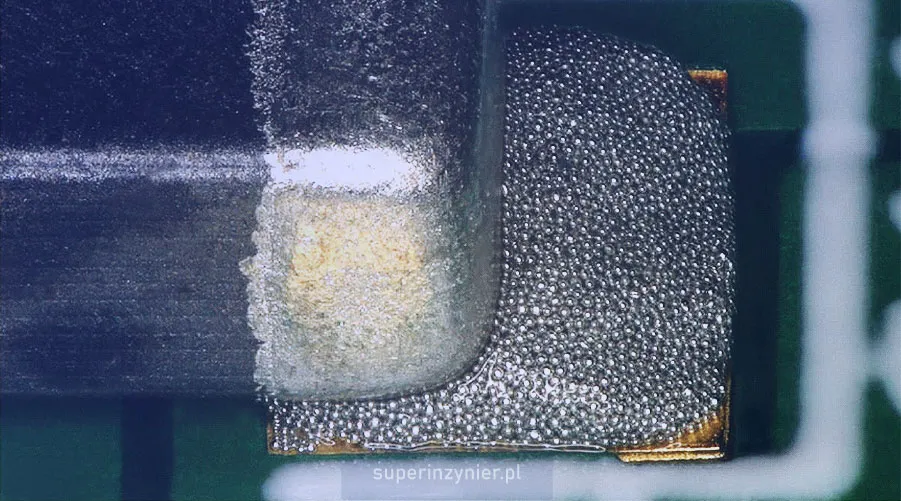
After soldering, inspect your work under magnification. A good solder joint looks shiny and concave, fully covering the pad and component lead without excess blobs. If you see a dull or cracked joint, it might be a “cold joint,” and you’ll need to reheat and add a bit more solder.
Finally, clean the board with isopropyl alcohol and a brush to remove flux residue. This prevents corrosion and makes your project look professional.
Tips for Successful Hand Soldering of SMT Components
Here are some additional tips to improve your hand soldering skills for SMT components:
- Practice First: If you’re new to SMT soldering, start with larger components like 1206 or 0805 resistors before moving to tiny 0402 parts.
- Control Heat: Too much heat can damage components or lift PCB pads. Keep soldering time per joint under 3 seconds.
- Use the Right Tip: A fine, conical tip works best for precision. Avoid chisel tips for SMT work as they’re too bulky.
- Avoid Bridging: Solder bridges (unwanted connections between pads) are common with SMT. If this happens, use desoldering braid to remove excess solder.
- Stay Patient: Rushing leads to mistakes. Take your time, especially when placing components.
Common Mistakes in SMT Soldering and How to Avoid Them
Even experienced hobbyists make mistakes when hand soldering SMT components. Here are some common issues and how to fix or prevent them:
- Cold Joints: These happen when the solder doesn’t fully melt, resulting in a weak connection. Fix by reheating the joint and adding a bit of fresh solder.
- Tombstoning: This is when a component stands upright on one end due to uneven heating. Prevent it by ensuring both pads are heated evenly during soldering.
- Component Damage: Overheating can fry sensitive parts. Use the lowest effective temperature (around 280-300°C) and limit heat exposure.
- Solder Bridges: Too much solder can connect adjacent pads. Remove excess with desoldering braid and apply flux to prevent recurrence.
Reworking SMT Components: Fixing Mistakes
Rework is a critical skill for DIY electronics. If a component is soldered incorrectly or needs replacement, follow these steps for SMT rework:
- Apply Flux: Add flux to the solder joints to make removal easier.
- Use Desoldering Braid: Place the braid over the solder joint, heat it with your iron, and let the braid absorb the solder. Repeat until the component is free.
- Clean the Pads: Remove any remaining solder or residue with isopropyl alcohol.
- Re-solder: Follow the soldering steps above to place and solder a new component.
Rework takes patience, but with practice, you’ll be able to fix mistakes without damaging your PCB.
Advanced Techniques for SMT Soldering
Once you’re comfortable with basic hand soldering, try these advanced techniques for more complex DIY electronics projects:
- Drag Soldering: Useful for soldering multi-pin components like ICs. Apply flux, add solder to the tip, and drag it across the pins to create quick, clean joints.
- Hot Air Rework Station: For larger components or rework, a hot air station can heat multiple pins at once, making removal and placement easier.
- Solder Paste and Reflow: For professional results, use solder paste and a hotplate or reflow oven. Apply paste to pads, place components, and heat to melt the solder uniformly.
Practice Makes Perfect: Start Small with DIY Kits
If you’re nervous about soldering SMT components on an important project, start with a practice kit. Many online stores offer affordable SMT soldering practice kits with components ranging from 1206 to 0402 sizes. These kits often include a PCB with labeled pads, letting you hone your skills risk-free. Spend a few hours practicing, and you’ll gain the confidence to tackle real projects.
Safety First: Protecting Yourself and Your Components
Soldering involves heat and chemicals, so safety is crucial. Always wear safety glasses to protect your eyes from solder splashes. Work in a well-ventilated area to avoid inhaling fumes, and wash your hands after handling solder or flux. Finally, unplug your soldering iron when not in use to prevent burns or fires.
Conclusion: Master Hand Soldering for SMT Components
Hand soldering SMT components is a valuable skill for any electronics hobbyist. With the right tools, techniques, and a bit of practice, you can create compact, professional-looking projects and handle rework with ease. This soldering tutorial has covered everything from preparing your workspace to advanced tips for DIY electronics. Remember to start small, be patient, and prioritize safety.


