ALLPCB


If you're a hobby PCB builder looking to master hand soldering SMD thermistors, you're in the right place. This guide will walk you through the essential tools, techniques, and safety tips for soldering these tiny components onto your printed circuit boards. Whether you're tackling a DIY thermistor PCB repair or learning how to hand solder small thermistors, we've got you covered with practical advice to ensure success.
In this detailed blog post, we'll dive deep into the world of surface-mount device (SMD) soldering, focusing specifically on thermistors—temperature-sensing components often used in circuits for monitoring or protection. You'll learn the step-by-step process, discover the best tools for the job, and pick up tips to avoid common mistakes. Let's get started on your journey to becoming a pro at hand soldering SMD PCBs!
What Are SMD Thermistors and Why Are They Important?
SMD thermistors are small, surface-mount components used to measure or control temperature in electronic circuits. They come in two main types: NTC (Negative Temperature Coefficient), where resistance decreases as temperature rises, and PTC (Positive Temperature Coefficient), where resistance increases with temperature. These components are critical in applications like battery management systems, power supplies, and temperature monitoring circuits.
For hobby PCB builders, working with SMD thermistors can be challenging due to their tiny size—often as small as 1.6mm x 0.8mm (0603 package) or even smaller. However, mastering the skill of soldering thermistors safely is essential for creating compact, efficient designs. Whether you're repairing a damaged board or building a custom project, knowing how to handle these components will elevate your skills.

Essential Tools for Hand Soldering SMD Thermistors
Before you begin soldering, having the right tools is crucial for precision and safety. Here's a list of must-have equipment for hobbyists working on hand soldering SMD PCBs:
- Soldering Iron: Use a temperature-controlled soldering iron with a fine tip (0.5mm to 1mm) for precision. A power rating of 25-40 watts is ideal for small components like thermistors. Set the temperature between 260°C and 300°C to avoid damaging the component or PCB.
- Solder Wire: Choose a thin, lead-free solder wire with a diameter of 0.5mm or less. A rosin-core solder is recommended for better flow and adhesion on small pads.
- Tweezers: Precision tweezers with fine tips are essential for handling tiny SMD thermistors without damaging them. Anti-static tweezers are a bonus to prevent electrostatic discharge (ESD).
- Flux: Flux helps improve solder flow and prevents oxidation. Use a no-clean flux pen or liquid flux for SMD work to ensure clean joints.
- Desoldering Tools: A desoldering braid (solder wick) and a small suction pump are handy for correcting mistakes or removing components during DIY thermistor PCB repair.
- Magnifying Glass or Microscope: A magnifying tool is vital for inspecting tiny solder joints and ensuring proper placement of components as small as 0402 or 0603 packages.
- Anti-static Mat and Wrist Strap: Protect sensitive components from ESD damage by working on an anti-static mat and wearing a grounded wrist strap.
- Cleaning Supplies: Isopropyl alcohol (90% or higher) and a small brush will help clean excess flux or residue after soldering.
Investing in quality tools may seem expensive at first, but they make the process of soldering small thermistors much easier and safer. With the right setup, you'll reduce the risk of damaging components or creating poor connections.
Preparing Your Workspace for Safe Soldering
Safety and organization are key when soldering thermistors safely. A cluttered or unsafe workspace can lead to accidents or damaged components. Follow these steps to prepare:
- Clear Your Work Area: Remove unnecessary items from your desk to avoid distractions and ensure you have enough space to work comfortably.
- Ventilation: Work in a well-ventilated area or use a fume extractor to avoid inhaling solder fumes, which can be harmful over time.
- Lighting: Ensure your workspace has bright, focused lighting to see small components and solder joints clearly.
- Organize Components: Use small containers or a component tray to keep SMD thermistors and other parts organized. Label them if needed to avoid mix-ups.
- Protect Your PCB: Secure your PCB on a non-slip surface or in a PCB holder to prevent it from moving while soldering.
Taking a few minutes to set up properly can save you from costly mistakes and ensure a smoother soldering experience.
Step-by-Step Guide: How to Hand Solder Small Thermistors
Now that you have your tools and workspace ready, let's dive into the process of hand soldering SMD thermistors. This step-by-step guide will help you achieve clean, reliable solder joints.
Step 1: Gather Your Materials and Inspect the PCB
Double-check that you have the correct SMD thermistor for your project. Verify its value (e.g., 10kΩ at 25°C for an NTC thermistor) using a multimeter if necessary. Inspect the PCB pads for damage or contamination, and clean them with isopropyl alcohol if needed.
Step 2: Apply Flux to the Pads
Use a flux pen to apply a small amount of flux to the PCB pads where the thermistor will be placed. Flux helps the solder adhere better and prevents oxidation during heating.
Step 3: Tin One Pad
Heat your soldering iron to the appropriate temperature (around 280°C for most lead-free solders). Touch the tip to one of the PCB pads and apply a small amount of solder to create a thin layer. This "tinning" makes it easier to position the thermistor.
Step 4: Position the Thermistor
Using precision tweezers, carefully place the SMD thermistor onto the pads. Align it so that each end of the component sits on its respective pad. The tinned pad will help hold it in place temporarily.
Step 5: Solder the First Pad
Touch the soldering iron tip to the tinned pad and the thermistor's end simultaneously. The existing solder should melt and bond with the component. Hold for 1-2 seconds, then remove the iron. Avoid excessive heat to prevent damage—thermistors can be sensitive to temperatures above 300°C for prolonged periods.
Step 6: Solder the Second Pad
Now, apply a small amount of solder to the iron tip and touch it to the second pad and the thermistor's other end. Let the solder flow to form a clean joint. Again, keep the contact time short—under 2 seconds is ideal.
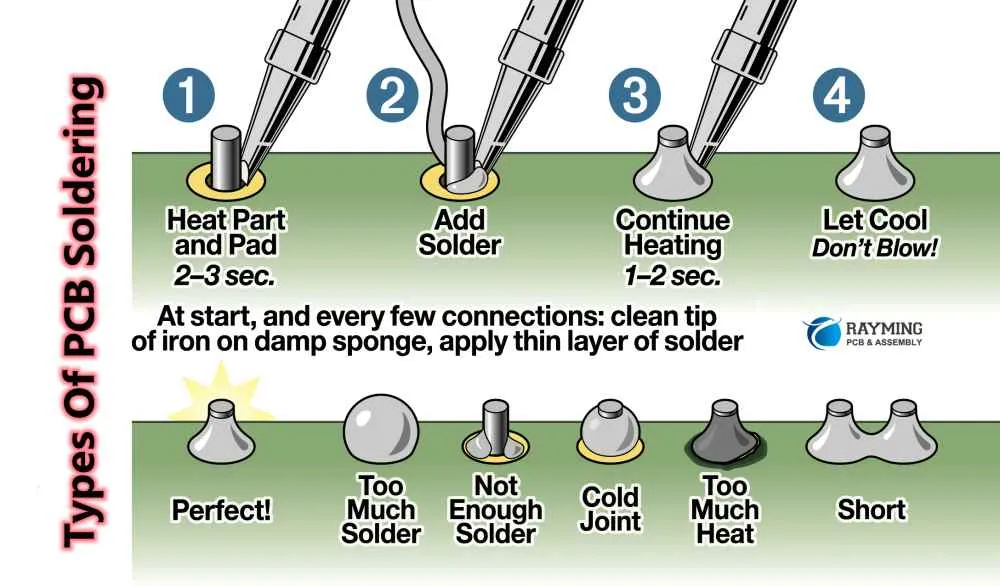
Step 7: Inspect the Joints
Use a magnifying glass to check both solder joints. They should be shiny, smooth, and concave, indicating a good connection. If the joint looks dull or uneven, reheat it briefly and add a tiny bit of fresh solder or flux to improve it.
Step 8: Clean the Area
After soldering, use isopropyl alcohol and a brush to remove any flux residue. This step prevents corrosion and keeps your PCB looking professional.
Common Mistakes to Avoid When Soldering Thermistors
Even with the best tools and techniques, mistakes can happen. Here are some common pitfalls to watch out for when hand soldering SMD PCBs:
- Overheating the Component: Applying heat for too long can damage the thermistor or lift the PCB pad. Limit contact time to 2-3 seconds per joint.
- Using Too Much Solder: Excess solder can create bridges between pads, causing short circuits. Use just enough to form a small, neat joint.
- Poor Alignment: Misplacing the thermistor can lead to weak connections. Take your time to position it accurately with tweezers.
- Ignoring ESD Precautions: Static discharge can destroy sensitive components. Always use an anti-static mat and wrist strap.
- Skipping Flux: Without flux, solder may not flow properly, leading to cold joints that fail over time.
Being mindful of these issues will help you achieve better results and avoid frustration during DIY thermistor PCB repair.
Tips for Soldering Thermistors Safely
Safety is paramount when working with soldering equipment and small components. Keep these tips in mind to protect yourself and your projects:
- Always unplug your soldering iron when not in use to prevent accidental burns or fires.
- Wear safety glasses to protect your eyes from solder splashes or debris.
- Keep a small fire extinguisher or damp cloth nearby in case of emergencies.
- Handle thermistors and other components with care to avoid physical damage or contamination from skin oils.
- Work slowly and patiently—rushing increases the likelihood of errors.
Advanced Techniques for Experienced Hobbyists
If you're comfortable with the basics of hand soldering SMD thermistors, consider exploring advanced methods to improve efficiency:
- Drag Soldering: For multiple small components, apply solder to the iron tip and drag it across the pads and component ends in one smooth motion. This technique requires practice but can save time.
- Hot Air Rework Station: While not strictly hand soldering, a hot air tool can be used for placing or removing thermistors by evenly heating the area. Set the temperature to around 300°C and use a small nozzle for precision.
- Solder Paste: For very tiny thermistors (like 0402 packages), apply solder paste to the pads with a syringe, place the component, and heat with a hot air tool or reflow oven. This method minimizes the risk of uneven joints.
These techniques may require additional tools or practice, but they can elevate the quality of your work on complex projects.
Troubleshooting Issues During DIY Thermistor PCB Repair
Sometimes, things don't go as planned. If you encounter issues while soldering or repairing a PCB with thermistors, here are some troubleshooting tips:
- Component Doesn't Work: If the thermistor isn't functioning after soldering, check for cold joints or damage from overheating. Use a multimeter to test its resistance at room temperature (e.g., a 10kΩ NTC thermistor should read close to 10kΩ at 25°C).
- Solder Bridge: If solder connects two pads accidentally, use a desoldering braid with flux to remove the excess solder.
- Lifted Pad: If a PCB pad comes off due to excessive heat, you may need to use a jumper wire to reconnect the circuit. Apply minimal heat during repairs.
- Thermistors Falling Off: If the component doesn't stay in place, ensure you're using enough flux and that the pads are clean before soldering.
Patience and careful inspection are key to resolving these problems without causing further damage.
Conclusion: Master Hand Soldering SMD Thermistors with Practice
Hand soldering SMD thermistors may seem daunting at first, but with the right tools, techniques, and a bit of practice, it becomes a rewarding skill for any hobby PCB builder. From selecting a fine-tipped soldering iron to mastering the art of flux application, every step contributes to creating reliable, professional-looking solder joints. Whether you're working on a DIY thermistor PCB repair or building a custom circuit, the knowledge you've gained here will help you tackle small components with confidence.
Remember to prioritize safety by setting up a proper workspace and following best practices for handling sensitive components. As you gain experience, experiment with advanced techniques to refine your skills further. Keep practicing, and soon, soldering even the tiniest thermistors will feel like second nature. Happy soldering!