ALLPCB


In high-speed PCB design, trace clearance for differential pairs is critical to maintaining signal integrity and ensuring reliable performance. For engineers working on designs involving differential pairs, trace clearance directly impacts impedance control and reduces issues like crosstalk and electromagnetic interference (EMI). So, what is the best practice for trace clearance in differential pairs? The general rule is to maintain a clearance of at least three times the trace width between differential pairs and other traces to minimize crosstalk, while ensuring consistent spacing within the pair for impedance matching.
In this comprehensive guide, we’ll dive deep into the importance of trace clearance for differential pairs, explore best practices for high-speed signals, and provide actionable tips on impedance control and signal integrity. Whether you’re designing for USB, Ethernet, or other high-speed protocols, this blog will equip you with the knowledge to optimize your PCB layouts.
Understanding Differential Pairs in High-Speed PCB Design
Differential pairs are a fundamental concept in high-speed PCB design. They consist of two traces carrying equal and opposite signals, often used in protocols like USB (90 ohms), Ethernet (100 ohms), and PCIe. The primary advantage of differential signaling is its ability to reject common-mode noise, making it ideal for high-speed data transmission where signal integrity is paramount.
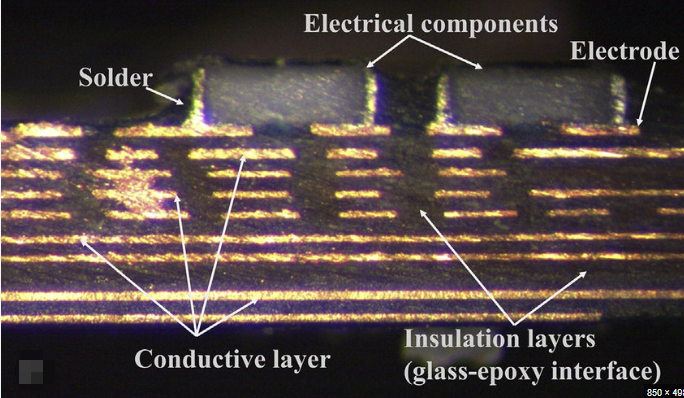
However, to achieve this noise rejection and maintain signal quality, the traces in a differential pair must be carefully designed. This includes controlling the spacing between the two traces within the pair (intra-pair spacing) and the clearance between the differential pair and other traces or components (inter-pair clearance). Improper clearance can lead to crosstalk, impedance mismatches, and degraded performance.
Related Reading: Differential Pair Routing: Techniques for High-Speed PCB Layouts
Why Trace Clearance Matters for Differential Pairs
Trace clearance plays a vital role in high-speed PCB design for several reasons. Let’s break down the key factors:
- Signal Integrity: Proper clearance prevents signal interference between adjacent traces. In high-speed designs, signals can couple between traces if they are too close, leading to crosstalk and data errors.
- Impedance Control: Differential pairs require a specific impedance, often defined by the signaling standard (e.g., 100 ohms for Ethernet). Clearance between traces, along with trace width and dielectric properties, directly affects impedance. Inconsistent clearance can cause reflections and signal degradation.
- EMI Reduction: Adequate spacing reduces electromagnetic interference by minimizing the coupling of unwanted signals. This is especially important in high-speed designs where EMI can disrupt performance.
In short, trace clearance is not just a layout preference—it’s a necessity for maintaining the performance of high-speed signals.
Best Practices for Trace Clearance in Differential Pairs
Now that we understand the importance of trace clearance, let’s explore the best practices for designing differential pairs in high-speed PCBs. These guidelines will help you achieve optimal signal integrity and impedance control.
1. Maintain Consistent Intra-Pair Spacing
The spacing between the two traces of a differential pair (intra-pair spacing) should be consistent along the entire length. This spacing, combined with trace width, determines the differential impedance. For example, a common standard like USB 2.0 often requires a differential impedance of 90 ohms, which might translate to a trace width of 6 mils and intra-pair spacing of 6 mils on a standard FR-4 substrate with a dielectric constant of 4.2.
Use PCB design software with impedance calculators to determine the exact spacing based on your stack-up and material properties. Avoid variations in spacing, as even small deviations can cause impedance mismatches and signal reflections.
2. Follow the 3W Rule for Inter-Pair Clearance
To minimize crosstalk between differential pairs and other traces, maintain a clearance of at least three times the trace width (often referred to as the 3W rule). For instance, if your trace width is 5 mils, the clearance between the differential pair and any adjacent trace should be at least 15 mils. This spacing reduces electromagnetic coupling and ensures signal integrity.
In densely populated boards, achieving this clearance can be challenging. In such cases, consider routing differential pairs on different layers or using shielding techniques like ground vias to isolate signals.
3. Route Over a Solid Ground Plane
A solid ground plane beneath differential pairs provides a low-impedance return path for signals, which is crucial for maintaining signal integrity. Avoid routing differential pairs over split planes or gaps in the ground plane, as these discontinuities can introduce impedance variations and increase EMI.
For multi-layer boards, ensure that the reference plane (ground or power) is continuous under the differential pair. If a plane transition is unavoidable, use stitching vias to connect the planes and minimize disruptions.
4. Match Trace Lengths for Differential Pairs
Length matching is critical for differential pairs to prevent skew, where one signal arrives before the other, causing timing errors. The length mismatch should typically be less than 5 mils for high-speed signals like PCIe, which operates at data rates up to 8 GT/s. Use serpentine routing or meandering to adjust trace lengths, but keep intra-pair spacing consistent during these adjustments.
Modern PCB design tools often include features for automatic length matching, making this process easier and more accurate.
5. Avoid Sharp Bends and Vias
Sharp bends in differential pair traces can cause signal reflections and impedance discontinuities. Instead, use smooth, gradual curves with a radius of at least three times the trace width. For example, for a 6-mil trace, the bend radius should be at least 18 mils.
Similarly, minimize the use of vias for differential pairs, as they introduce parasitic capacitance and inductance. If vias are necessary, ensure they are placed symmetrically for both traces to maintain balance.
Impedance Control in Differential Pairs
Impedance control is a cornerstone of high-speed PCB design, especially for differential pairs. The differential impedance depends on several factors, including trace width, intra-pair spacing, and the dielectric constant of the PCB material. Here’s how to ensure proper impedance control:
- Calculate Impedance: Use an impedance calculator or simulation tool to determine the required trace width and spacing for your target impedance. For instance, a 100-ohm differential impedance for Ethernet might require a trace width of 5 mils and spacing of 8 mils on a 1.6mm FR-4 board.
- Choose the Right Material: PCB materials with a stable dielectric constant (like FR-4 or high-frequency laminates) help maintain consistent impedance. High-frequency designs may benefit from low-loss materials with dielectric constants around 3.5 or lower.
- Consider Stack-Up Design: The layer stack-up affects impedance. Ensure that the differential pair is routed on layers with appropriate reference planes to achieve the desired impedance.
Work closely with your PCB manufacturer to confirm impedance values during fabrication, as variations in material properties or etching can affect the final result.
Common Challenges and Solutions for Trace Clearance
Designing trace clearance for differential pairs in high-speed PCBs comes with challenges. Here are some common issues and how to address them:
1. Limited Board Space
In compact designs, maintaining the 3W clearance rule can be difficult. To overcome this, consider routing differential pairs on inner layers with ground planes on adjacent layers for shielding. Alternatively, use smaller trace widths if supported by your manufacturing process, but recalculate impedance to avoid mismatches.
2. Crosstalk in High-Density Designs
High-density boards increase the risk of crosstalk. To mitigate this, increase clearance beyond the 3W rule if possible, or use broadside routing (stacking differential pairs on adjacent layers) to save space while controlling interference.
Related Reading: Differential Signaling: A Powerful Technique for Crosstalk Reduction
3. Impedance Variations Due to Manufacturing Tolerances
Manufacturing tolerances can lead to variations in trace width and spacing, affecting impedance. Specify controlled impedance requirements in your design files and collaborate with your PCB fabricator to ensure tight tolerances, such as ±10% for trace width and spacing.
Tips for Ensuring Signal Integrity in High-Speed Designs
Beyond trace clearance, several other practices contribute to signal integrity in high-speed PCB designs involving differential pairs:
- Use Decoupling Capacitors: Place decoupling capacitors near power pins of high-speed components to stabilize the power supply and reduce noise.
- Implement Shielding: For sensitive differential pairs, consider adding guard traces or ground vias around the pair to act as a shield against interference.
- Simulate Your Design: Use signal integrity simulation tools to analyze your layout for potential issues like crosstalk, reflections, or EMI before fabrication.
Conclusion: Mastering Trace Clearance for Differential Pairs
Trace clearance for differential pairs is a critical aspect of high-speed PCB design that directly impacts signal integrity and impedance control. By maintaining consistent intra-pair spacing, adhering to the 3W rule for inter-pair clearance, routing over solid ground planes, and prioritizing length matching, you can optimize your design for reliable performance. Additionally, understanding impedance control and addressing common challenges like limited board space or crosstalk will further enhance your high-speed signal designs.
Whether you’re working on USB, Ethernet, or other high-speed protocols, these best practices provide a solid foundation for success. With careful planning and the right tools, you can achieve exceptional signal integrity and ensure your PCB performs flawlessly in demanding applications.