 ALLPCB


If you're new to electronics manufacturing and wondering what SMT is, you're in the right place. SMT, or Surface Mount Technology, is a method used to assemble electronic components directly onto the surface of a printed circuit board (PCB). This beginner's guide will walk you through the basics of SMT for beginners, provide a surface mount assembly tutorial, offer an intro to the SMT process, and serve as an SMT components guide. Whether you're a hobbyist or starting a career in electronics, this article will help you understand the essentials of SMT and how it shapes modern circuit design.
Let’s dive deeper into the world of SMT, breaking down its key concepts, processes, and benefits to give you a solid foundation.
What is Surface Mount Technology (SMT)?
Surface Mount Technology is a game-changer in electronics manufacturing. Unlike older methods where components had leads inserted into holes on a PCB (known as through-hole technology), SMT allows components to be placed directly onto the board’s surface. This results in smaller, lighter, and more efficient designs, making SMT the go-to choice for most modern electronics like smartphones, laptops, and wearable devices.
The core idea behind SMT is simple: tiny components are mounted on the PCB using solder, a metal alloy that creates a strong electrical connection. This method reduces the size of the final product and speeds up the assembly process with automation. For beginners, understanding SMT is the first step to working with advanced electronics.
Why Choose SMT? Benefits for Beginners
SMT offers several advantages that make it ideal for both large-scale production and small projects. Here are some key benefits:
- Smaller Size: SMT components are much smaller than through-hole components, allowing for compact designs. For example, a typical SMT resistor might measure just 1.6mm x 0.8mm, compared to a through-hole resistor that could be over 10mm long.
- Faster Production: SMT assembly is often automated, using machines to place thousands of components per hour. This speed is critical in industries where time-to-market matters.
- Cost-Effective: Smaller components and automated assembly reduce material and labor costs, making SMT a budget-friendly option for mass production.
- Better Performance: SMT reduces the length of electrical paths on a PCB, which can lower impedance and improve signal speed. For high-frequency applications, this can mean signal speeds up to 5 GHz or more with proper design.
For beginners, SMT might seem intimidating due to the small size of components, but with the right tools and knowledge, it’s an accessible and rewarding technology to learn.
Understanding SMT Components: A Beginner’s Guide
SMT components are the building blocks of modern electronics. As part of this SMT components guide, let’s explore the most common types you’ll encounter:
- Resistors: These control the flow of electric current. SMT resistors are tiny, often labeled with codes like “0603” (indicating a size of 0.06 inches by 0.03 inches).
- Capacitors: Used to store and release electrical energy, SMT capacitors come in similar small packages and are critical for filtering noise in circuits.
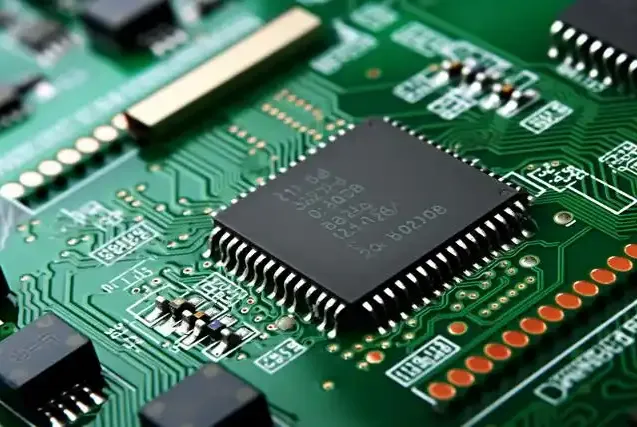
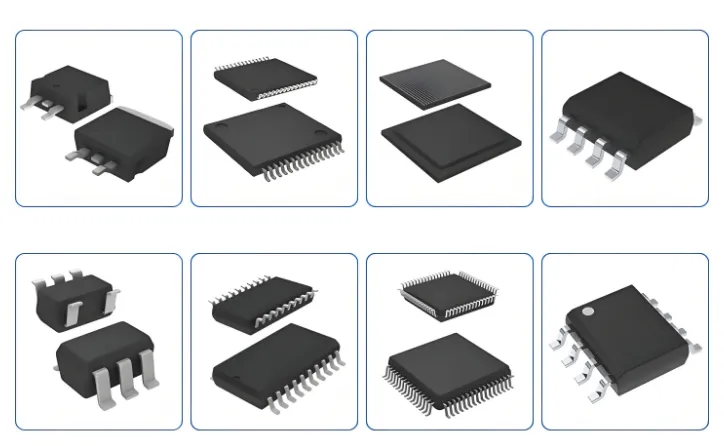
- Integrated Circuits (ICs): These are the “brains” of a circuit, containing complex functions in a small chip. SMT ICs often have multiple pins for connection, arranged in formats like QFP (Quad Flat Package) with pin counts ranging from 8 to over 100.
- Diodes and LEDs: Diodes direct current flow, while LEDs emit light. SMT versions are compact, often measuring less than 2mm in length.
These components lack long leads, instead featuring flat contacts or pads that connect to the PCB. For beginners, identifying and handling these tiny parts can be a challenge, but magnification tools and steady hands make it manageable.
Intro to SMT Process: How It Works Step by Step
Now that you know what SMT is and its components, let’s break down the SMT process in this intro to SMT process section. Surface mount assembly involves several key steps, each critical to creating a functional PCB.
1. Solder Paste Application
The process starts with applying solder paste—a mix of tiny solder particles and flux—to the PCB. This is done using a stencil, a thin metal sheet with cutouts matching the PCB’s layout. The paste is spread over the stencil, ensuring it only sticks to areas where components will be placed.
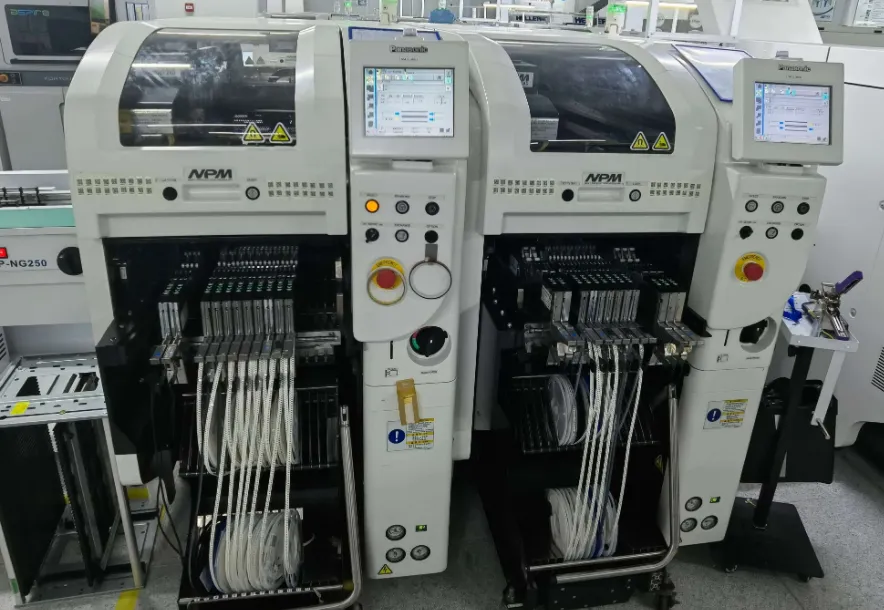
2. Component Placement
Next, components are placed onto the solder paste. In professional settings, this is done by pick-and-place machines that can position thousands of components per hour with precision down to 0.01mm. For hobbyists, tweezers and a steady hand work just fine for smaller projects.
3. Reflow Soldering
Once components are in place, the PCB goes through a reflow oven. The oven heats the board to a specific temperature profile, often peaking around 245°C for lead-free solder, melting the solder paste to form solid connections. The board then cools down, securing the components.
4. Inspection and Testing
After soldering, the PCB is inspected for defects like misaligned components or poor solder joints. Automated optical inspection (AOI) systems can scan boards at high speed, while manual checks with a magnifying glass work for smaller setups. Finally, functional testing ensures the circuit works as intended.
This surface mount assembly tutorial highlights the precision and care needed in each step. Even small errors, like excess solder paste, can lead to issues like short circuits, so attention to detail is key.
Tools You Need for SMT Assembly
For beginners diving into SMT for the first time, having the right tools is essential. Here’s a list of basics to get started with surface mount assembly:
- Tweezers: Precision tweezers with fine tips help handle tiny components without damaging them.
- Soldering Iron or Hot Air Station: A fine-tip soldering iron (around 1mm tip size) or a hot air rework station is ideal for SMT soldering. Look for temperature control to avoid overheating components.
- Solder Paste and Flux: Use high-quality solder paste for clean joints, and flux to improve solder flow and remove oxidation.
- Magnifying Glass or Microscope: SMT components are small, often under 1mm in size, so magnification is crucial for accurate placement and inspection.
- Reflow Oven or Hot Plate: For larger projects, a small reflow oven or hot plate can heat the entire board evenly during soldering.
Starting with these tools, even hobbyists can achieve professional-looking results. As you gain experience, you might consider investing in more advanced equipment to streamline the process.
Challenges in SMT for Beginners and How to Overcome Them
While SMT offers many benefits, it comes with challenges, especially for those new to surface mount assembly. Here are common issues and tips to address them:
- Small Component Size: Handling parts smaller than a grain of rice can be frustrating. Use tweezers and work in a well-lit area with magnification to improve accuracy.
- Soldering Defects: Problems like tombstoning (where a component lifts on one end) or cold joints (weak connections) can occur. Ensure even solder paste application and follow the correct reflow temperature profile—typically starting at 150°C preheat, peaking at 245°C, and cooling gradually.
- Component Misalignment: If components shift during reflow, it’s often due to uneven paste or board movement. Double-check placement before heating and secure the board during the process.
Practice is the best way to overcome these hurdles. Start with simple projects, like assembling a small LED circuit, before moving to complex designs with high-density components.
Tips for Successful SMT Assembly
To wrap up this surface mount assembly tutorial, here are practical tips to help beginners succeed with SMT:
- Start Small: Begin with larger SMT components (like 1206-sized resistors) before tackling tiny 0402 or 0201 parts.
- Keep It Clean: A clean workspace and PCB prevent contamination that can affect solder joints. Use isopropyl alcohol and a brush to clean boards after assembly.
- Follow Datasheets: Component datasheets provide critical info, like recommended soldering temperatures (often around 260°C max for 10 seconds) and pin layouts. Always check them before starting.
- Use Proper Lighting: Good lighting helps you see tiny components and solder joints clearly, reducing errors.
- Practice Patience: SMT requires precision, so take your time to avoid mistakes. Rushing can lead to costly rework.
Conclusion: Start Your SMT Journey Today
Surface Mount Technology might seem complex at first, but with this beginner’s guide to surface mount assembly, you now have a clear starting point. From understanding SMT components to mastering the SMT process, you’re equipped with the basics to dive into modern electronics manufacturing. Whether you’re building a simple project or exploring a career in PCB design, SMT opens up a world of possibilities for creating smaller, faster, and more efficient circuits.
Take the next step by gathering your tools and trying a small SMT project. With practice, you’ll gain confidence and skills to tackle even the most intricate designs. Remember, every expert started as a beginner, and with dedication, you’ll master SMT in no time.


