 ALLPCB


If you're new to working with Surface Mount Device (SMD) components and wondering how to apply solder paste effectively, you're in the right place. Solder paste is a crucial material for soldering tiny SMD parts onto a printed circuit board (PCB). In this guide, we'll walk you through the basics of applying solder paste using tools like a solder paste syringe or stencil, and we'll explain techniques such as hot air reflow and using a reflow oven. By the end, you'll have a clear understanding of SMD soldering and be ready to tackle your first project with confidence.
This comprehensive beginner's guide will dive deep into the process of applying solder paste for SMD components. We'll cover the tools you need, step-by-step instructions, and tips for success. Whether you're a hobbyist or just starting in electronics assembly, this article will help you master the essentials of SMD soldering.
What Are SMD Components and Why Use Solder Paste?
SMD components are tiny electronic parts designed to be mounted directly onto the surface of a PCB. Unlike through-hole components, which have leads that go through holes in the board, SMD parts are much smaller and allow for compact, high-density designs. Examples include resistors, capacitors, and integrated circuits (ICs) in packages like SOIC or QFN.
Solder paste is a mix of tiny solder particles and flux, a chemical that helps the solder flow and bond to the metal surfaces. It's used in SMD soldering because it can be applied precisely to small pads on the PCB, making it ideal for automated or manual assembly. When heated—often with hot air reflow or a reflow oven—the paste melts and forms a strong electrical and mechanical connection between the component and the board.
Understanding solder paste and how to apply it is key to achieving clean, reliable joints in your projects. Let's explore the tools and methods for getting started with SMD soldering.
Essential Tools for Applying Solder Paste in SMD Soldering
Before you begin, you'll need the right tools to apply solder paste and complete the soldering process. Here's a breakdown of the essentials for working with SMD components:
- Solder Paste: Choose a lead-free or leaded solder paste based on your project requirements. Common alloys include SAC305 (tin-silver-copper) for lead-free options. Store it in a refrigerator at around 4-8°C (39-46°F) to maintain its shelf life, typically 6-12 months.
- Solder Paste Syringe: A syringe with a fine needle tip allows for manual application of solder paste on small pads. It's ideal for small-scale or prototype work.
- Solder Paste Stencil: A thin metal or plastic sheet with cutouts matching the PCB's pad layout. Stencils are used for precise, uniform paste application, especially in larger batches.
- Hot Air Reflow Tool: A handheld or stationary hot air gun that blows heated air (around 250-300°C or 482-572°F) to melt the solder paste and secure components.
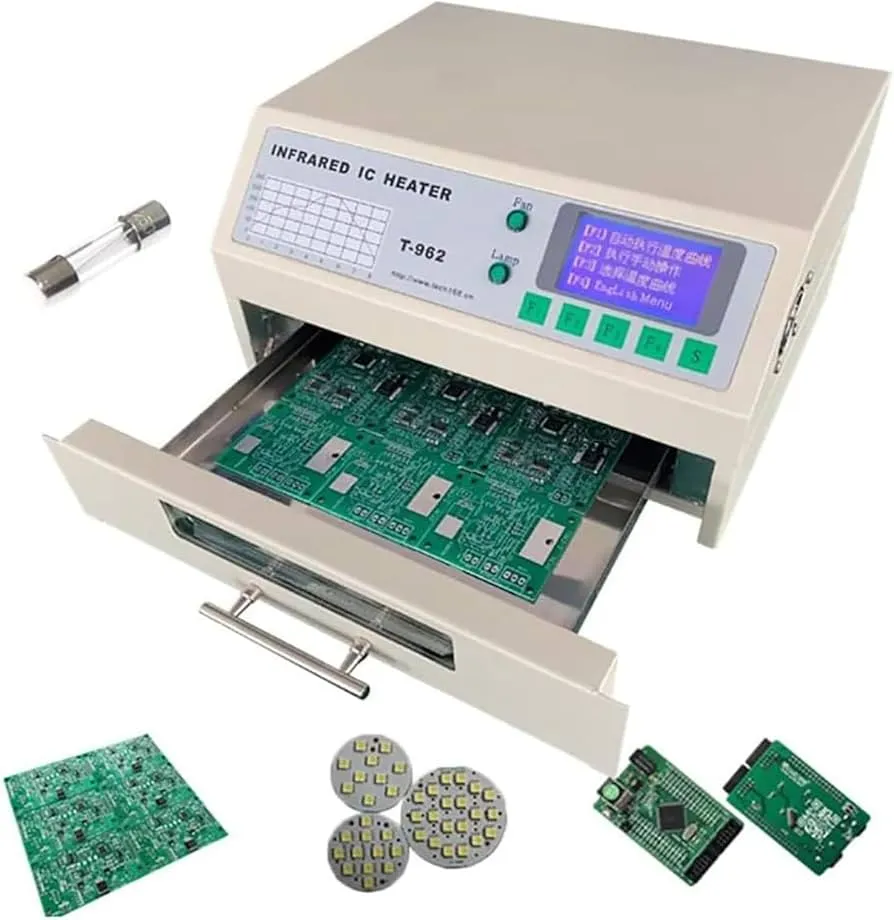
- Reflow Oven: A specialized oven that heats the entire PCB following a specific temperature profile (e.g., preheat at 150°C, reflow at 245°C) for consistent soldering across all components.
- Tweezers: Fine-tip tweezers for placing tiny SMD components accurately on the paste.
- Flux Pen: Additional flux can help with solder flow and prevent oxidation during heating.
- Magnifying Glass or Microscope: Essential for inspecting small pads and components, especially for parts as tiny as 0402 resistors (0.4mm x 0.2mm).

Step-by-Step Guide to Applying Solder Paste for SMD Components
Now that you have your tools ready, let's go through the process of applying solder paste and soldering SMD components. We'll cover two common methods: using a solder paste syringe for manual application and using a solder paste stencil for precision.
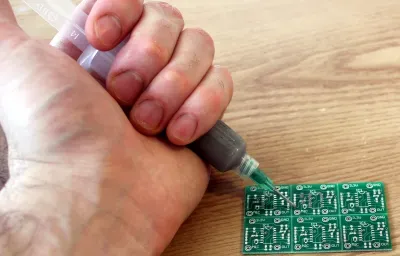
Method 1: Applying Solder Paste with a Syringe
This method is best for small projects or when you don't have a stencil. It requires a steady hand but is accessible for beginners.
- Prepare Your Workspace: Work in a clean, well-lit area. Ensure your PCB is secured on a flat surface to prevent movement. Wear gloves if handling leaded solder paste to avoid skin contact.
- Condition the Solder Paste: If stored in a fridge, let the solder paste warm to room temperature (around 20-25°C or 68-77°F) for about 30-60 minutes. This prevents condensation and ensures smooth application.
- Attach the Needle to the Syringe: Use a fine needle tip (e.g., 22-25 gauge) on the solder paste syringe for precise control. Avoid reusing needles as they can clog.
- Apply Paste to Pads: Gently squeeze the syringe to deposit a small dot of solder paste on each PCB pad. For tiny components like 0603 resistors, aim for a dot about 0.5mm in diameter. Too much paste can cause bridging (solder connecting adjacent pads), while too little may result in weak joints.
- Place SMD Components: Using tweezers, carefully place each component onto the paste-covered pads. Ensure proper alignment with the PCB's silkscreen or layout markings.
- Reflow the Solder: Use a hot air reflow tool set to around 280-300°C (536-572°F). Hold the nozzle 2-3 cm (about 1 inch) above the component and move in a circular motion for 10-20 seconds until the paste melts and forms shiny joints. Alternatively, place the board in a reflow oven following the manufacturer's temperature profile.
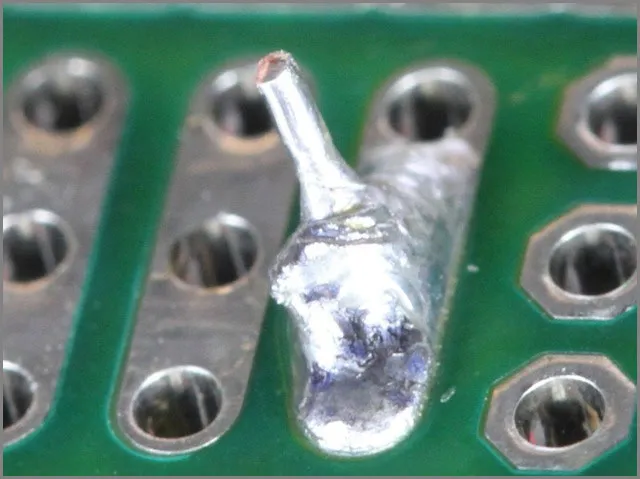
- Inspect the Joints: After cooling, use a magnifying glass to check for cold solder joints (dull appearance) or bridges. Rework if necessary by adding flux and reheating.
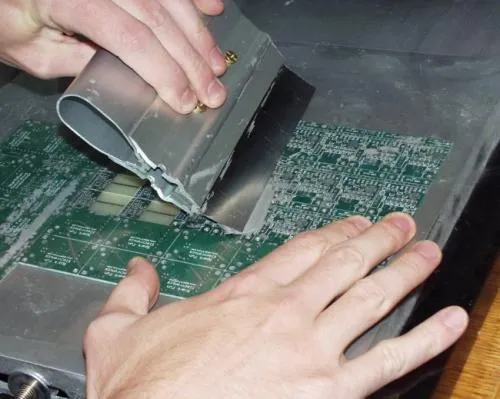
Method 2: Using a Solder Paste Stencil for Precision
For larger projects or when precision is critical, a solder paste stencil is the preferred method. It ensures uniform paste application across multiple pads.
- Align the Stencil: Place the stencil over the PCB, ensuring the cutouts align perfectly with the pads. Secure the stencil and board with tape or a fixture to prevent shifting.
- Apply Solder Paste: Use a squeegee or metal spatula to spread solder paste over the stencil. Apply firm, even pressure at a 45-degree angle to push the paste through the openings onto the pads. Use just enough paste to cover the stencil surface without excess.
- Remove the Stencil: Carefully lift the stencil straight up to avoid smearing the paste. Inspect the pads to ensure even coverage. Clean the stencil immediately with isopropyl alcohol and a brush to prevent clogging.
- Place Components: As with the syringe method, use tweezers to position SMD components on the paste-covered pads.
- Reflow the Solder: Use a hot air reflow tool or reflow oven as described earlier to melt the paste and secure the components.
- Check for Quality: After cooling, inspect the board for proper solder joints. Look for consistent, shiny connections without excess solder or misaligned parts.
Hot Air Reflow vs. Reflow Oven: Which Is Best for Beginners?
When it comes to melting solder paste for SMD components, you have two primary options: a hot air reflow tool or a reflow oven. Both have their advantages, especially for beginners.
Hot Air Reflow Tool
A hot air tool is affordable and portable, making it a popular choice for hobbyists. It works by directing a stream of hot air onto specific areas of the PCB to melt the solder paste. Set the temperature to around 280-300°C (536-572°F) for most lead-free solder pastes. Keep the nozzle moving to avoid overheating components, which can cause damage—many SMD parts have a maximum temperature tolerance of around 260°C (500°F) for 10 seconds.
Pros: Low cost, easy to use for small boards, good for rework or repairs.
Cons: Uneven heating on larger boards, requires practice to avoid burning components.
Reflow Oven
A reflow oven provides controlled, uniform heating across the entire PCB, following a temperature profile with stages like preheat, soak, reflow, and cooling. For example, a typical profile for lead-free solder might preheat to 150°C (302°F) for 60-90 seconds, then peak at 245°C (473°F) for 20-30 seconds during reflow.
Pros: Consistent results, ideal for multiple components or larger boards, hands-free operation.
Cons: More expensive, requires setup and learning to program temperature profiles.
For beginners, starting with a hot air reflow tool is often more practical due to its lower cost and simplicity. As you gain experience or work on larger projects, investing in a reflow oven can improve efficiency and quality.
Tips for Successful SMD Soldering with Solder Paste
To ensure great results when applying solder paste and soldering SMD components, keep these tips in mind:
- Use the Right Amount of Paste: Applying too much solder paste can lead to short circuits between pads, while too little can cause weak joints. Aim for a thin, even layer—about 0.1-0.2mm thick when using a stencil.
- Work Quickly: Solder paste can dry out or lose effectiveness if exposed to air for too long. Apply it and place components within 30-60 minutes.
- Control Heat Carefully: Overheating can damage sensitive SMD components or cause tombstoning, where one end of a component lifts off the pad. Follow recommended temperature settings and avoid prolonged heat exposure.
- Clean Your Tools: Residue on syringes, stencils, or tweezers can contaminate future projects. Clean with isopropyl alcohol after each use.
- Practice on Scrap Boards: If you're new to SMD soldering, test your skills on a practice PCB before working on your main project. This builds confidence and helps you refine your technique.
Common Mistakes to Avoid in SMD Soldering
Even with the best tools and intentions, beginners can run into issues when working with solder paste and SMD components. Here are some common pitfalls and how to avoid them:
- Misaligned Components: Double-check component placement before reflow. Use a magnifying glass to ensure pins align with pads.
- Solder Bridges: Excess paste can connect adjacent pads, causing shorts. If this happens, use a desoldering braid with flux to remove excess solder.
- Cold Solder Joints: If joints appear dull or grainy, they may not have heated properly. Reapply flux and reflow the area with your hot air tool.
- Damaged Components: Avoid overheating by keeping reflow times short and temperatures within component specifications (check datasheets for limits).
Conclusion: Start Your SMD Soldering Journey with Confidence
Applying solder paste for SMD components may seem daunting at first, but with the right tools and techniques, it becomes a manageable and rewarding skill. Whether you're using a solder paste syringe for small projects or a solder paste stencil for precision, mastering SMD soldering opens up a world of possibilities in electronics design and repair. Experiment with hot air reflow tools or a reflow oven to find what works best for your needs, and always prioritize precision and patience.
By following the steps and tips in this guide, you're well on your way to creating reliable, professional-quality PCB assemblies. Keep practicing, and soon you'll handle even the smallest SMD components with ease. At ALLPCB, we're here to support your journey with high-quality PCB manufacturing and assembly services tailored to your projects.


