 ALLPCB


If you're diving into the world of unmanned aerial vehicles (UAVs) and want to assemble your own drone PCB, mastering basic soldering techniques is essential. Soldering is the process of joining electronic components to a printed circuit board (PCB) using a molten metal alloy, ensuring a strong electrical connection. For beginners, drone PCB soldering can seem daunting, but with the right tools, techniques, and practice, you can achieve professional results. This guide will walk you through the fundamentals of UAV circuit board assembly, offering a step-by-step soldering guide for drones, beginner PCB soldering techniques, and tips for assembling drone PCB components.
In this comprehensive blog, we'll cover everything you need to know to get started, from preparing your workspace to troubleshooting common issues. Whether you're a hobbyist or an aspiring engineer, these practical tips will help you build a reliable and functional drone PCB. Let's get started!
Why Soldering Matters for Drone PCB Assembly
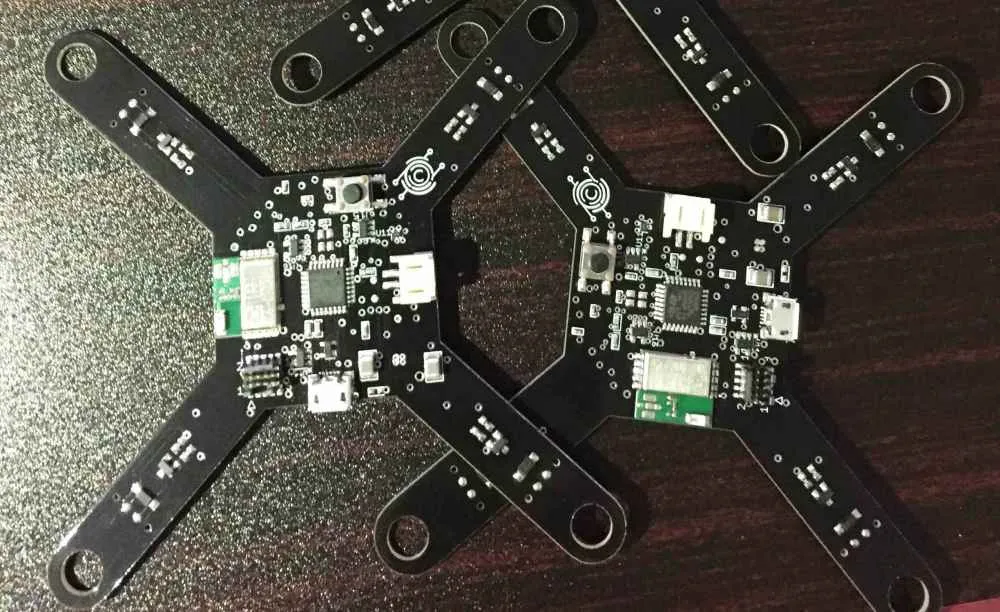
Soldering is the backbone of any electronic assembly, especially for UAV circuit board assembly. A drone's PCB is the central hub that connects critical components like the flight controller, motors, battery, and sensors. Poor soldering can lead to weak connections, signal loss, or even complete failure during flight. For instance, a loose connection on a motor wire could cause a drone to lose control mid-air, resulting in a crash. By learning proper soldering techniques, you ensure the reliability and safety of your drone.
Beyond functionality, good soldering also enhances the durability of your drone. With vibrations and stress during flight, soldered joints must withstand physical strain. Mastering beginner PCB soldering techniques ensures that your drone can handle the rigors of operation.
Tools and Materials for Drone PCB Soldering
Before you begin assembling drone PCB components, gather the necessary tools and materials. Having the right equipment makes the process smoother and safer. Here's a list of essentials for beginners:
- Soldering Iron: Choose a 25-40 watt soldering iron with a fine tip for precision. Adjustable temperature models (around 300°C for most electronics) are ideal for drone PCB work.
- Solder: Use lead-free rosin-core solder with a diameter of 0.8-1.0mm for small components. A 60/40 tin-lead solder can also work if regulations permit in your area.
- Soldering Station or Helping Hands: These hold your PCB steady, preventing accidental burns or misalignment.
- Desoldering Tools: A solder sucker or desoldering braid helps fix mistakes by removing excess solder.
- Wire Cutters and Strippers: Essential for trimming leads and preparing wires for motor or battery connections.
- Multimeter: Useful for testing connections and ensuring continuity after soldering.
- Safety Gear: Wear safety glasses to protect your eyes from solder splashes, and work in a well-ventilated area to avoid inhaling fumes.
- Cleaning Supplies: Isopropyl alcohol (90% or higher) and a small brush to clean flux residue after soldering.
With these tools in hand, you're ready to set up your workspace for UAV circuit board assembly. Keep your area clutter-free, use a heat-resistant mat, and ensure good lighting to see small components clearly.
Preparing Your Drone PCB for Soldering
Preparation is key to successful drone PCB soldering. Before you heat up your soldering iron, take these steps to ensure a smooth assembly process:
- Inspect the PCB: Check your drone PCB for any visible defects, such as scratches or misaligned pads. Ensure all holes and pads are clean and free of debris.
- Organize Components: Lay out all components (flight controller, ESCs, capacitors, etc.) according to your drone's schematic. This prevents mistakes during assembly.
- Dry Fit Components: Place components on the PCB without soldering to confirm they fit correctly. For through-hole components, insert leads into holes; for surface-mount devices (SMDs), align them with the pads.
- Clean the PCB: Wipe the board with isopropyl alcohol to remove dust or oils that could interfere with soldering.
Preparation also involves understanding your drone's design. For example, a typical quadcopter PCB might have four motor connection points, each requiring precise soldering to handle currents of 10-20 amps or more, depending on the motor size. Knowing these specifications helps you choose the right soldering technique and materials.
Step-by-Step Soldering Guide for Drones
Now that you're prepared, let's dive into the core of this soldering guide for drones. Follow these steps to assemble your UAV circuit board with confidence:
Step 1: Set Up Your Soldering Iron
Plug in your soldering iron and set the temperature to around 300°C for most drone PCB components. Allow it to heat up for a few minutes. Tin the tip by applying a thin layer of solder—this helps with heat transfer and prevents oxidation. Wipe the tip on a damp sponge or use a brass wire cleaner to keep it shiny.
Step 2: Position the Component
Place the component on the PCB. For through-hole parts like connectors, insert the leads through the holes. For SMDs like resistors or LEDs, align them with the solder pads. Use tweezers for precision, especially with tiny components common in drone PCBs.
Step 3: Apply Solder to the Joint
Touch the soldering iron tip to the pad and the component lead simultaneously for 1-2 seconds to heat them. Then, feed a small amount of solder (about 1-2mm) to the joint. The solder should melt and flow evenly, forming a shiny, cone-shaped connection. Avoid applying too much solder, as it can create bridges between pads.
Step 4: Cool and Inspect
Remove the iron and let the joint cool naturally for a few seconds. Do not blow on it, as this can create a weak, brittle connection. Inspect the joint—it should be smooth and shiny, not dull or cracked. A dull joint often indicates a "cold solder joint," which may fail under stress.
Step 5: Trim Excess Leads
For through-hole components, use wire cutters to trim excess leads close to the joint. Be careful not to damage the solder or PCB.
Step 6: Clean the Board
After soldering, clean the PCB with isopropyl alcohol and a brush to remove flux residue. Flux can corrode connections over time if left on the board.
Beginner PCB Soldering Techniques and Tips
For those new to soldering, assembling drone PCB components can be challenging. Here are some beginner-friendly tips to improve your skills and avoid common pitfalls:
- Practice First: Before working on your actual drone PCB, practice soldering on a scrap board or kit. This builds confidence and helps you get a feel for the iron and solder flow.
- Avoid Overheating: Limit soldering time to 3-4 seconds per joint to prevent damage to components or PCB traces. Overheating can lift pads or burn out sensitive parts like microcontrollers.
- Use the Right Amount of Solder: Too little solder results in weak joints, while too much can cause shorts. Aim for a small, even layer that covers the pad and lead without bulging.
- Work in Small Sections: Solder a few components at a time, starting with the smallest or lowest-profile parts. This prevents overcrowding and makes handling easier.
- Check Polarity: For components like diodes or capacitors, ensure correct orientation before soldering. Reversing polarity can damage the component or the entire circuit.
Additionally, when soldering motor wires or battery connectors, use thicker solder or higher wattage irons if needed, as these joints often handle higher currents (e.g., 15-30 amps for a mid-size drone). Always double-check your work with a multimeter to confirm continuity and avoid shorts.
Common Soldering Mistakes in Drone PCB Assembly
Even with a solid soldering guide for drones, mistakes happen, especially for beginners. Here are common issues during UAV circuit board assembly and how to fix them:
- Cold Solder Joints: These occur when the joint isn’t heated properly, resulting in a dull, grainy appearance. Fix by reheating the joint and adding a small amount of fresh solder.
- Solder Bridges: Excess solder can connect adjacent pads, causing shorts. Use desoldering braid to wick away the extra solder.
- Lifted Pads: Overheating or excessive force can lift PCB pads. If this happens, you may need to run a small jumper wire to reconnect the circuit.
- Component Damage: Heat-sensitive parts like sensors can be damaged by prolonged exposure. Use a heat sink (like a small alligator clip) on leads to dissipate heat during soldering.
Patience is key. If something goes wrong, take a break and revisit the issue with a clear mind. Most soldering mistakes are fixable with the right tools and techniques.
Troubleshooting Your Drone PCB After Soldering
After assembling drone PCB components, test your work to ensure everything functions correctly. Use these troubleshooting steps:
- Visual Inspection: Look for loose joints, solder bridges, or misaligned components.
- Continuity Test: Use a multimeter to check for proper connections between soldered points. For example, ensure motor pads show continuity with the ESC connections.
- Power Test: Connect the battery (with caution) and check if the flight controller powers up. Listen for unusual buzzing or beeping that might indicate a short.
- Flight Test: If all systems check out, perform a short hover test in a safe area to confirm stability and responsiveness.
If issues arise, trace them back to specific soldered areas. For instance, if one motor doesn’t spin, check the solder joints on its connection pads for cracks or insufficient solder. Addressing problems early prevents bigger failures down the line.
Safety Precautions for Drone PCB Soldering
Soldering involves heat and potentially harmful fumes, so safety is paramount. Follow these guidelines to protect yourself during drone PCB soldering:
- Work in a well-ventilated space to avoid inhaling solder fumes, which can irritate your lungs.
- Never touch the soldering iron tip—it can reach temperatures over 300°C and cause severe burns.
- Unplug the iron when not in use to prevent accidental contact or fires.
- Keep a small fire extinguisher nearby in case of emergencies, especially when working with batteries.
Safety isn’t just about protecting yourself; it’s also about protecting your drone. Avoid soldering near flammable materials, and always disconnect the battery before working on the PCB to prevent shorts or shocks.
Conclusion: Mastering Soldering for UAV Circuit Board Assembly
Soldering is a fundamental skill for anyone interested in assembling drone PCB components. By following this soldering guide for drones, you’ve learned the basics of drone PCB soldering, from gathering tools to executing proper techniques and troubleshooting issues. These beginner PCB soldering techniques can help you build a reliable UAV that performs well in the air.
Remember, practice makes perfect. Start with small projects, refine your skills, and pay attention to detail. With time, you’ll gain the confidence to tackle more complex UAV circuit board assemblies. At ALLPCB, we’re committed to supporting your journey in electronics assembly with resources and expertise. Keep building, keep learning, and soon you’ll have a drone ready to take flight!


