 ALLPCB


If you're looking for a simple method for PCB drying, you've come to the right place. Baking your PCBs in an oven is an effective way to remove moisture from printed circuit boards, ensuring they function properly and last longer. Whether you're dealing with wet electronics after cleaning or preventing moisture-related issues during assembly, drying PCB oven techniques can save the day. In this guide, we'll walk you through the process of baking PCB to dry them, explain why it's important to dry PCB electronics, and provide step-by-step instructions tailored for beginners.
Moisture on a PCB can lead to corrosion, short circuits, or even complete failure of your electronic components. By using a controlled baking process, you can eliminate these risks and maintain the quality of your boards. Let's dive into the details of this drying method, explore best practices, and help you achieve reliable results with minimal effort.
Why Drying PCBs Is Crucial for Electronics
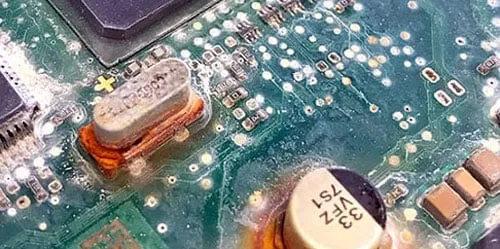
Printed circuit boards (PCBs) are the backbone of modern electronics, and moisture is one of their biggest enemies. When water or humidity gets trapped on or inside a PCB, it can cause a range of problems. For instance, moisture can lead to oxidation of metal traces, resulting in poor conductivity. In severe cases, it can create short circuits between components, rendering the board unusable. Additionally, during soldering, trapped moisture can vaporize and cause components to pop off or crack due to rapid expansion—a phenomenon known as "popcorning."
Drying PCB electronics is especially important after processes like aqueous cleaning, where boards are washed with water-based solutions to remove flux residues or contaminants. If not dried properly, the leftover moisture can degrade performance over time. Baking offers a reliable way to evaporate this moisture, ensuring your boards are ready for assembly or storage. By mastering a simple method for PCB drying, you can prevent costly failures and extend the lifespan of your projects.
Understanding the Basics of Baking PCBs to Dry
Baking PCBs to dry them involves using a controlled heat source, such as an oven, to evaporate moisture from the board's surface and internal layers. This method is widely used in both hobbyist and professional settings because it's effective and doesn't require expensive equipment. However, it must be done carefully to avoid damaging the board or its components.
The principle behind drying PCB oven techniques is simple: heat causes water molecules to turn into vapor and escape from the board. Most PCBs are made from materials like FR-4, a fiberglass-epoxy composite, which can withstand moderate temperatures. However, excessive heat can warp the board, damage solder masks, or harm sensitive components. That's why following the right temperature and time guidelines is essential for a successful drying process.
Benefits of Using an Oven for PCB Drying
Using a drying PCB oven method offers several advantages, especially for beginners who may not have access to specialized equipment. Here are some key benefits:
- Accessibility: Most households and small workshops already have an oven, making this a cost-effective solution.
- Uniform Heating: Ovens provide consistent heat distribution, ensuring that moisture is removed evenly across the board.
- Control: Modern ovens allow precise temperature settings, reducing the risk of overheating your PCB.
- Versatility: This method works for various types of PCBs, from single-layer boards to complex multi-layer designs.
By baking PCB to dry, you can achieve professional-grade results with minimal investment. It's a practical approach for hobbyists working on small projects or engineers testing prototypes.
Step-by-Step Guide: Simple Method for PCB Drying
Now that you understand the importance of drying PCB electronics, let's walk through a beginner-friendly process for baking your boards. Follow these steps to ensure safe and effective results using a drying PCB oven technique.
Step 1: Prepare Your PCB for Drying
Before placing your PCB in the oven, take a few minutes to prepare it. If the board has been exposed to water or cleaning solutions, gently pat it dry with a lint-free cloth to remove excess liquid. Avoid using paper towels, as they can leave fibers on the board. If possible, use compressed air to blow out water from tight spaces, such as under components or between traces.
Inspect the board for any visible debris or contaminants. If necessary, clean it with isopropyl alcohol (at least 90% concentration) using a soft brush. Let the alcohol evaporate naturally for a few minutes before proceeding to the next step.
Step 2: Set Up Your Oven
Choose a clean, dedicated oven or toaster oven for drying PCB electronics. Avoid using an oven that’s also used for cooking food, as food particles or grease can contaminate the board. Preheat the oven to a low temperature, ideally between 85°C (185°F) and 105°C (221°F). These temperatures are safe for most PCBs and effectively evaporate moisture without causing thermal stress.
Place a clean, heat-resistant tray or baking sheet inside the oven to hold the PCB. You can line the tray with parchment paper or a silicone mat to prevent direct contact between the board and the metal surface, reducing the risk of scratches or static buildup.
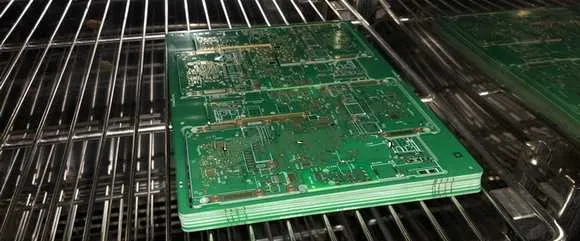
Step 3: Bake the PCB to Dry
Place the PCB on the tray, ensuring it lies flat and isn’t touching any oven walls or other objects. If you're drying multiple boards, leave enough space between them for air circulation. Close the oven door and set a timer for 2 to 4 hours, depending on the board's size and moisture level. For smaller or single-layer boards, 2 hours may be sufficient, while larger or multi-layer boards might need closer to 4 hours.
During the baking process, avoid opening the oven door frequently, as this can cause temperature fluctuations. If your oven has a fan or convection setting, use it to promote even heat distribution.
Step 4: Cool Down and Inspect
Once the baking time is complete, turn off the oven and let the PCB cool down inside for at least 30 minutes. Avoid removing the board immediately, as sudden temperature changes can cause thermal shock and potentially crack the board or components. After cooling, carefully take the PCB out and inspect it for any signs of damage, such as warping or discoloration of the solder mask.
If the board looks dry and undamaged, it’s ready for use or storage. If you notice lingering moisture or suspect incomplete drying, repeat the process for an additional hour at the same temperature.
Temperature and Time Guidelines for Drying PCB Oven
Choosing the right temperature and duration is critical when baking PCB to dry. Here are some general guidelines based on industry practices and material tolerances:
- Temperature Range: 85°C to 105°C (185°F to 221°F) is safe for most standard PCBs made of FR-4 material. Avoid exceeding 125°C (257°F), as higher temperatures can degrade the epoxy resin or damage components.
- Duration: 2 to 4 hours is typically sufficient for removing moisture. For boards with mounted components, stick to the lower end of this range to prevent heat stress on sensitive parts.
- Special Cases: If your PCB includes moisture-sensitive components (like certain ICs or LEDs), refer to the manufacturer’s datasheet for maximum temperature exposure. Some components may require baking at lower temperatures (e.g., 75°C or 167°F) for longer periods (up to 48 hours).
Always prioritize caution and start with lower temperatures if you're unsure about the board's material or component tolerances. Overheating can cause irreversible damage, such as delamination of layers in multi-layer PCBs.
Precautions When Baking PCB to Dry
While drying PCB oven methods are straightforward, there are important safety measures to keep in mind to protect both yourself and your electronics:
- Avoid High Temperatures: Never exceed the recommended temperature range, as this can warp the board or melt solder joints.
- Use Proper Ventilation: If the PCB was cleaned with chemicals like isopropyl alcohol, ensure the oven area is well-ventilated to avoid inhaling fumes during baking.
- Handle with Care: Use heat-resistant gloves or tongs when removing the tray from the oven to avoid burns.
- Monitor the Process: Don’t leave the oven unattended for long periods. Check periodically to ensure there are no issues like overheating or smoke.
- Remove Sensitive Parts: If possible, remove heat-sensitive components before baking. If they can’t be removed, consult their specifications to ensure the baking temperature won’t cause damage.
Alternative Methods for Drying PCB Electronics
While baking is a popular and simple method for PCB drying, it’s not the only option. Depending on your resources and the specific needs of your project, you might consider these alternatives:
- Desiccator or Dry Box: A desiccator uses silica gel or other drying agents to absorb moisture from the air around the PCB. This method is slower but ideal for boards with heat-sensitive components.
- Compressed Air: For light moisture, compressed air can blow water out of hard-to-reach areas. However, it may not fully dry internal layers of multi-layer boards.
- Heat Gun or Hair Dryer: A low-heat setting on a heat gun or hair dryer can work for quick drying, but it’s less precise and risks uneven heating.
Each method has its pros and cons, but baking remains one of the most reliable and accessible ways to dry PCB electronics, especially for beginners.
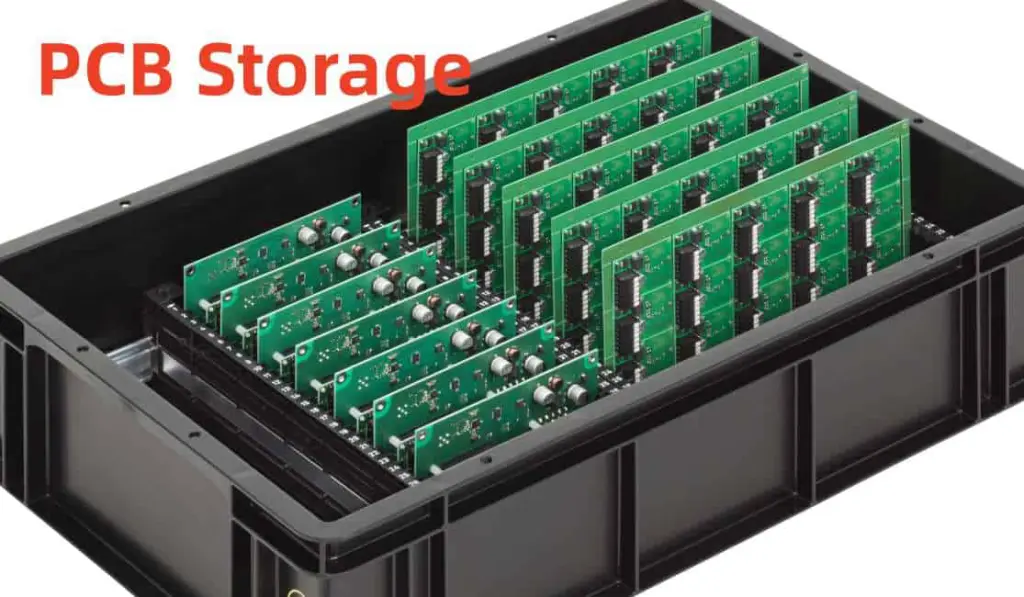
Storing Dried PCBs to Prevent Moisture Buildup
After successfully drying your PCBs, proper storage is key to keeping them moisture-free. Store your boards in a dry, cool environment, ideally in airtight containers with desiccant packets to absorb any ambient humidity. Avoid exposing them to damp areas like basements or garages, as even small amounts of moisture can seep back into the board over time.
If you’re not planning to use the PCB immediately, consider vacuum-sealing it in a moisture-barrier bag. This extra step can protect your board during long-term storage and ensure it’s ready for assembly when needed.
Common Mistakes to Avoid When Drying PCB Oven
Even with a simple method for PCB drying, mistakes can happen. Here are some common pitfalls to watch out for:
- Using Too High a Temperature: Setting the oven above 125°C (257°F) can damage the PCB’s materials or components.
- Skipping the Cool-Down Period: Removing the board too quickly after baking can cause thermal shock and cracking.
- Ignoring Component Specifications: Not checking the heat tolerance of mounted components can lead to failures during baking.
- Overcrowding the Oven: Placing too many boards too close together can block airflow and result in uneven drying.
By being mindful of these issues, you can ensure a smooth and effective drying process for your PCBs.
Conclusion: Master the Art of Baking PCBs to Dry
Baking your PCBs is a proven, beginner-friendly way to remove moisture and protect your electronics from damage. By following the steps outlined in this guide—preparing your board, setting the right temperature, baking for the appropriate duration, and cooling down properly—you can master this simple method for PCB drying. Using a drying PCB oven technique not only saves time and money but also ensures your boards remain reliable for assembly or long-term storage.
Whether you're a hobbyist tinkering with small projects or an engineer working on complex designs, knowing how to dry PCB electronics is a valuable skill. With the right precautions and practices, baking PCB to dry can become a routine part of your workflow, helping you achieve better results with every project. Keep these tips in mind, and you'll be well on your way to maintaining high-quality, moisture-free PCBs.


