 ALLPCB


Designing your first PCB (Printed Circuit Board) for low-volume production can feel like a daunting task, especially if you’re a beginner or hobbyist. But don’t worry—it’s entirely achievable with the right guidance. In this blog, we’ll walk you through the simple steps to create an easy PCB design that works for small-scale projects. Whether you’re working on a beginner PCB, a simple circuit board, a hobbyist PCB, or a DIY PCB, this guide will help you navigate the process with confidence. Let’s dive into the detailed steps to turn your idea into a functional board for low-volume production.
Why Design a PCB for Low-Volume Production?
Low-volume production is ideal for hobbyists, startups, or small projects where you only need a handful of boards—typically between 1 to 100 units. This approach saves money compared to mass production and allows for testing and tweaking designs without a huge investment. By focusing on an easy PCB design, beginners can avoid unnecessary complexity while still achieving a professional result. In this guide, we’ll focus on practical tips tailored for beginner PCB designers aiming for small batches.
Step 1: Define Your Project Requirements
Before you start designing, take a moment to clearly outline what your PCB needs to do. This step is crucial for a simple circuit board that meets your expectations. Consider the following:
- Purpose: What will your circuit do? Is it a power supply, a microcontroller board, or a sensor module?
- Components: List all the parts you’ll use, such as resistors, capacitors, ICs, or connectors. Make sure their specifications (like voltage and current ratings) match your needs.
- Size: How big or small should the board be? For low-volume hobbyist PCB projects, a compact design often works best to save on costs.
- Power Needs: Determine the voltage and current requirements. For example, a typical microcontroller like those in many DIY projects might operate at 3.3V or 5V with currents under 500mA.
By defining these requirements upfront, you’ll avoid redesigns later. Keep it simple for your first DIY PCB by sticking to basic functionality before adding complex features.

Step 2: Choose the Right Design Software
For an easy PCB design, selecting beginner-friendly software is key. Many free or low-cost tools are available that cater to beginner PCB designers and hobbyists. These programs let you draw schematics (the wiring diagram) and lay out your board. Some popular options include open-source tools or free versions of professional software with intuitive interfaces.
Look for software that offers:
- A simple drag-and-drop interface for placing components.
- Libraries with common parts for hobbyist PCB projects.
- Export options for manufacturing files (like Gerber files) needed for production.
Most of these tools also include tutorials or community forums where you can learn the basics. Spend a little time exploring the software before diving into your design to make the process smoother.
Step 3: Create a Schematic Diagram
Now it’s time to draw the schematic for your simple circuit board. This is like a blueprint showing how components connect electrically. Start by placing your main components in the software, then draw wires to connect them based on your circuit’s logic.
Here are some tips for a clean schematic:
- Group related components together (e.g., keep power supply parts in one area).
- Use labels for wires instead of drawing long, messy lines. For instance, label a connection as “VCC” for power instead of drawing it across the page.
- Add values to components, like “10kΩ” for a resistor or “1uF” for a capacitor, to avoid confusion.
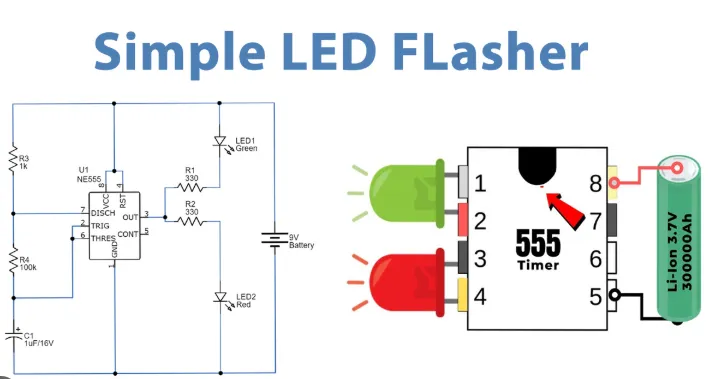
For a beginner PCB, start with a basic circuit. A good example is an LED blinker using a 555 timer IC, which requires just a few components and operates at a low frequency (around 1Hz for blinking).
Step 4: Design the PCB Layout
Once your schematic is ready, move to the PCB layout phase. This is where you arrange components on a virtual board and route the traces (conductive paths) between them. For a hobbyist PCB, keep the layout as straightforward as possible to minimize errors.
Follow these guidelines for an easy PCB design:
- Component Placement: Place components logically. For example, put connectors near the board’s edge for easy access, and group related parts (like a microcontroller and its supporting capacitors) close together.
- Trace Routing: Keep traces short and direct. Avoid crossing traces on the same layer; use a two-layer board if needed (most low-volume boards are two-layer for simplicity).
- Width of Traces: For low-power circuits, a trace width of 0.25mm to 0.5mm is often enough. For higher currents (e.g., 1A), increase to 1mm or more. Use online calculators to confirm based on current and copper thickness (typically 1oz, or 35μm).
- Ground Plane: Add a solid ground plane on one layer to reduce noise, especially for digital circuits. This is a must for stable DIY PCB designs.
Take your time with this step. A messy layout can lead to signal interference or manufacturing issues, even in a simple circuit board.
Step 5: Perform Design Rule Checks (DRC)
Before finalizing your design, run a Design Rule Check using your software. This tool checks for common errors like traces that are too close together or components overlapping. For low-volume production, manufacturers often have specific rules, such as a minimum trace spacing of 0.15mm or a minimum drill size of 0.3mm for vias (holes connecting layers).
Fix any errors flagged by the DRC. This step ensures your beginner PCB design is ready for manufacturing without costly mistakes.
Step 6: Export Manufacturing Files
After verifying your design, export the files needed for production. These are usually Gerber files, which define each layer of the PCB (copper, solder mask, silkscreen, etc.), and a drill file for via holes. Most software makes this process easy with a built-in export option.
Double-check the exported files using a free Gerber viewer to ensure everything looks correct. For a DIY PCB, this step is critical to avoid delays or errors during production.
Step 7: Choose a Manufacturing Service for Low-Volume Production
For low-volume production of your hobbyist PCB, look for a service that specializes in small batches. These services often offer competitive pricing for orders as low as 5 to 10 boards. When selecting a manufacturer, consider:
- Cost: Prices for small runs can start at $1–$2 per board for basic designs (e.g., 2-layer, 10cm x 10cm).
- Turnaround Time: Many services deliver within 5–7 days for small orders.
- Quality Checks: Ensure they provide testing (like electrical testing) to catch manufacturing defects.
Upload your Gerber files through their online portal and review the order details. Some platforms even offer instant quotes, making it easy to budget for your simple circuit board.
Step 8: Assemble Your PCB (Optional)
If your project requires components to be soldered onto the board, decide whether to do it yourself or use an assembly service. For a DIY PCB, hand-soldering works well for small batches. Use a soldering iron with a fine tip (around 1mm) and lead-free solder for safety. Work in a well-ventilated area and follow basic soldering tips:
- Start with smaller components like resistors before moving to larger ones like connectors.
- Heat the pad and component lead together, then apply solder for a clean joint.
- Inspect for cold solder joints (dull or cracked connections) and fix them.
For low-volume runs, some manufacturers offer assembly services at a reasonable cost, saving time if you’re new to soldering.
Step 9: Test Your PCB
Once your board is assembled, test it to ensure everything works. Use a multimeter to check for continuity between connections and verify voltages at key points. For example, if your circuit runs at 5V, measure the input pin of your microcontroller to confirm it’s receiving the correct voltage.
If something doesn’t work, troubleshoot by checking solder joints, component placement, and your schematic. Debugging is a normal part of creating a beginner PCB, so don’t get discouraged.
Tips for Success in Low-Volume PCB Design
To wrap up, here are a few extra tips to make your easy PCB design journey smoother:
- Start Small: Begin with a basic project to build confidence before tackling complex designs.
- Double-Check Everything: Review your schematic and layout multiple times to catch errors early.
- Use Standard Components: Stick to widely available parts to avoid supply issues during low-volume production.
- Keep Learning: Watch online tutorials or join forums to pick up new skills for future hobbyist PCB projects.
Conclusion
Designing your first PCB for low-volume production doesn’t have to be complicated. By following these simple steps, you can create a simple circuit board that meets your needs, even as a beginner. From defining your project to testing the final board, each stage builds your skills and brings your idea to life. With an easy PCB design approach, you’ll be ready to produce small batches for personal projects or prototypes. Take it one step at a time, and soon you’ll be crafting professional-quality DIY PCB designs with ease.


