 ALLPCB


If you’re designing a printed circuit board (PCB) for a vending machine, choosing the right components is critical to ensure reliability, efficiency, and long-term performance. Whether you’re searching for a vending machine PCB components list, the best components for vending machine PCB, or reliable components for vending machine electronics, this guide will walk you through the essentials. We’ll also help you build a robust vending machine PCB BOM (Bill of Materials) to streamline your project.
In this comprehensive blog, we’ll break down the key components needed for a vending machine PCB, discuss why each is important, and provide tips for selecting high-quality parts that meet the unique demands of vending machine electronics. Let’s dive into the details to help you create a design that stands the test of time.
Why Component Selection Matters for Vending Machine PCBs
Vending machines operate in diverse environments, often running 24/7 with exposure to temperature fluctuations, humidity, and physical wear. The PCB inside a vending machine controls critical functions like payment processing, product dispensing, and user interface management. A single faulty component can lead to downtime, costly repairs, or customer dissatisfaction.
Selecting the best components for vending machine PCB design ensures durability, minimizes power consumption, and supports seamless operation. By focusing on reliability and compatibility, you can avoid common issues like overheating, signal interference, or premature failure. Let’s explore the core components you’ll need and how to choose them wisely.
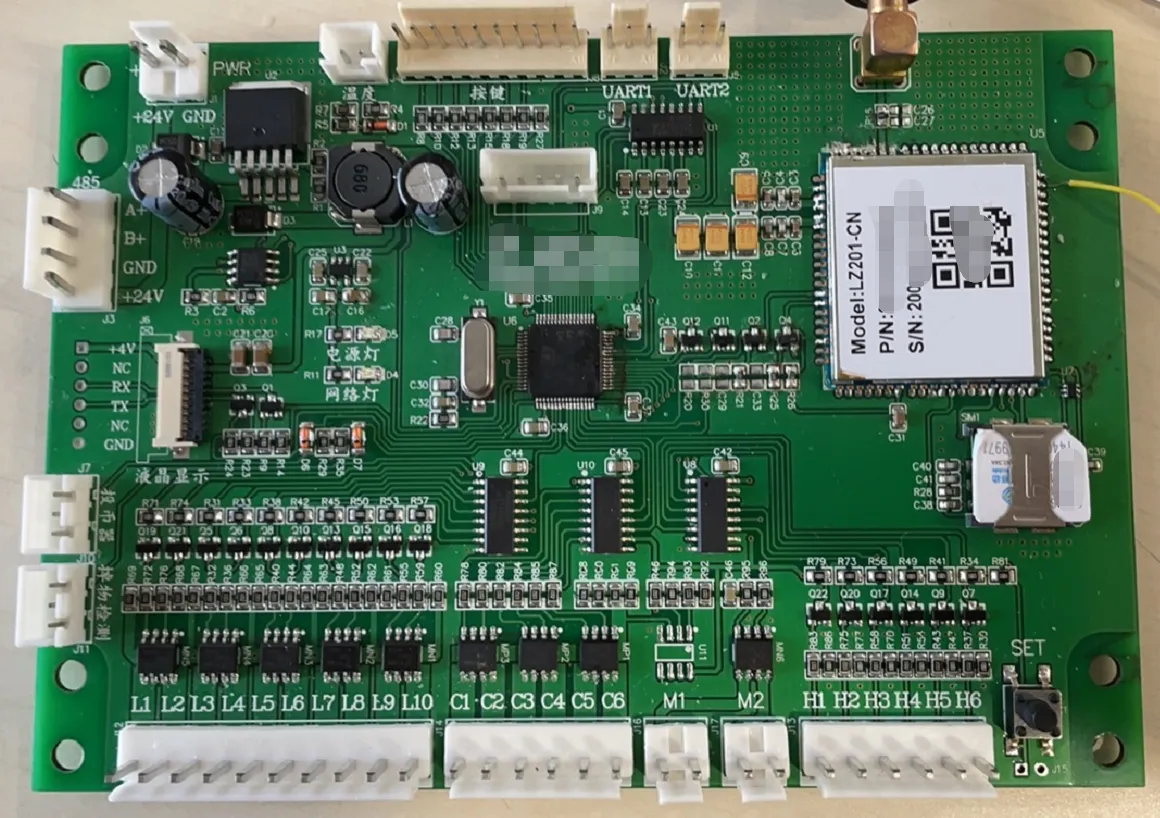
Essential Vending Machine PCB Components List
Creating a vending machine PCB components list starts with understanding the core functions of the machine. Below is a detailed breakdown of the primary components you’ll need, along with their roles and considerations for selection.
1. Microcontroller Unit (MCU)
The microcontroller is the brain of the vending machine PCB, handling tasks like user input processing, motor control for dispensing, and communication with payment systems. A reliable MCU must have sufficient processing power, multiple I/O pins, and support for communication protocols like I2C or SPI.
For vending machines, consider MCUs with at least 32-bit architecture for faster processing. Look for models with built-in memory (e.g., 256 KB Flash) and low power consumption (under 100 mA in active mode) to handle continuous operation without overheating. Ensure the MCU supports industrial temperature ranges (-40°C to 85°C) to withstand harsh environments.
2. Power Supply Components
Vending machines require stable power delivery to operate motors, displays, and sensors. Key power supply components include voltage regulators, capacitors, and diodes.
- Voltage Regulators: Use linear or switching regulators to step down input voltages (e.g., from 12V to 5V or 3.3V) for the MCU and peripherals. Choose regulators with high efficiency (above 85%) to reduce heat generation.
- Capacitors: Include decoupling capacitors (e.g., 0.1 μF ceramic capacitors) near the MCU to filter noise and stabilize voltage. Bulk capacitors (e.g., 10 μF to 100 μF) are also needed for handling sudden power demands during motor activation.
- Diodes: Add protection diodes to prevent damage from reverse polarity or voltage spikes, especially since vending machines often connect to external power sources.
3. Motor Drivers
Motor drivers control the dispensing mechanisms in vending machines, such as spiral motors or robotic arms. They must handle high currents (often 1-2 A per motor) and provide overcurrent protection to prevent damage.
Look for H-bridge motor drivers that support bidirectional control and have built-in thermal shutdown features. Ensure the driver’s voltage rating matches your motor requirements (e.g., 12V or 24V) and can handle the stall current of the motor, which can be up to 3 times the running current.
4. Sensors
Sensors detect product availability, user interactions, and environmental conditions. Common sensors for vending machines include:
- Optical Sensors: Used for detecting product drops or jams in the dispensing area. Choose infrared sensors with a detection range of 5-10 cm for accuracy.
- Temperature Sensors: Essential for refrigerated vending machines to monitor cooling performance. Select sensors with a range of -20°C to 50°C and accuracy of ±0.5°C.
- Proximity Sensors: Detect user presence or coin insertion. Capacitive or inductive sensors with a response time under 10 ms work well for quick detection.
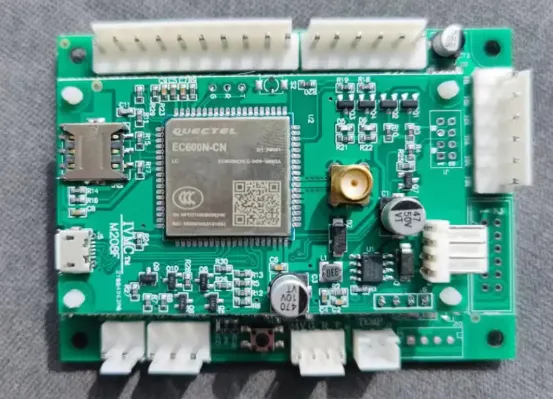
5. Communication Modules
Modern vending machines often support cashless payments and remote monitoring, requiring communication modules like Wi-Fi, Bluetooth, or cellular connectivity. For Wi-Fi, choose modules with a data rate of at least 150 Mbps to ensure fast transaction processing. If using cellular connectivity for remote updates, opt for 4G modules with fallback to 3G for broader coverage.
Ensure the module supports secure protocols (e.g., HTTPS) to protect payment data and has low power modes (under 1 mA in sleep) to save energy during idle periods.
6. Display and User Interface Components
The user interface, including displays and keypads, relies on components like LCD drivers or LED indicators. For small displays, use OLED screens with a resolution of 128x64 pixels for clear visibility and low power draw (under 50 mA). If using touchscreens, ensure the controller supports capacitive touch with a response time of less than 20 ms for smooth interaction.
For keypads, select membrane switches or tactile buttons rated for at least 1 million presses to withstand frequent use in public spaces.
7. Relays and Switches
Relays control high-power components like compressors in refrigerated units or vending motors. Choose electromechanical relays with a contact rating of at least 10 A at 250V AC to handle heavy loads. Solid-state relays are an alternative for silent operation and longer lifespan (up to 10 million cycles).
Ensure the relay includes a flyback diode to protect the PCB from voltage spikes when switching inductive loads.
8. Passive Components
Resistors, capacitors, and inductors are the backbone of any PCB. For vending machine electronics, prioritize components with tight tolerances (e.g., ±1% for resistors) to ensure consistent performance. Use multilayer ceramic capacitors (MLCCs) with a voltage rating twice the operating voltage (e.g., 25V rated for 12V systems) to prevent failure under stress.
Criteria for Choosing the Best Components for Vending Machine PCB
With so many options available, selecting the best components for vending machine PCB design can be overwhelming. Here are key criteria to guide your decisions and ensure you’re using reliable components for vending machine electronics.
1. Durability and Environmental Resistance
Vending machines often operate in outdoor or high-traffic areas, exposing PCBs to dust, moisture, and temperature extremes. Choose components with industrial-grade ratings, such as an operating temperature range of -40°C to 85°C and humidity tolerance up to 95% RH. Look for parts with conformal coatings or encapsulation for added protection against corrosion.
2. Power Efficiency
Energy efficiency reduces operating costs and heat buildup. Opt for components with low quiescent current (under 100 μA for MCUs in sleep mode) and high efficiency ratings (above 90% for voltage regulators). This is especially important for battery-powered or energy-conscious designs.
3. Compatibility and Integration
Ensure all components are compatible with each other in terms of voltage levels, communication protocols, and pin configurations. For example, if your MCU operates at 3.3V, avoid 5V-only peripherals unless you include level shifters. Check datasheets for signal timing requirements (e.g., I2C clock speed of 400 kHz) to prevent communication errors.
4. Availability and Cost-Effectiveness
While high-end components offer superior performance, balance quality with cost. Select parts that are widely available from multiple suppliers to avoid supply chain delays. Consider using standard package sizes (e.g., 0805 for SMD resistors) for easier assembly and lower manufacturing costs.
Building a Vending Machine PCB BOM (Bill of Materials)
A well-organized vending machine PCB BOM is essential for smooth manufacturing and assembly. Your BOM should list every component, including part numbers, quantities, specifications, and supplier information. Here’s how to create an effective BOM:
- List Core Components: Start with the MCU, motor drivers, sensors, and communication modules. Include specific part numbers and manufacturer details.
- Include Passive Components: Specify resistors, capacitors, and inductors with their values (e.g., 10 kΩ, 1 μF) and tolerances (e.g., ±5%).
- Add Connectors and Hardware: Don’t forget connectors for power, motors, and external interfaces, as well as mounting hardware if needed.
- Specify Alternatives: For critical components, list backup options with similar specs to avoid delays if a part is out of stock.
- Include Quantities: Account for spares (e.g., order 10% extra passives) to cover potential losses during assembly.
Use spreadsheet software to organize your BOM with columns for part name, description, value, package type, quantity, and supplier links. This ensures clarity for your PCB assembly team and reduces errors.
Tips for Sourcing Reliable Components for Vending Machine Electronics
Sourcing reliable components for vending machine electronics requires attention to quality and supplier reputation. Follow these tips to ensure you get dependable parts:
- Buy from Authorized Distributors: Purchase from trusted distributors to avoid counterfeit components that could fail prematurely.
- Check Component Lifespan Ratings: Look for parts with long mean time between failures (MTBF), such as capacitors rated for 10,000 hours at 85°C.
- Review Datasheets: Always read the technical specifications to confirm a component meets your design requirements, especially for current, voltage, and temperature ratings.
- Test Prototypes: Before full-scale production, build and test prototypes under real-world conditions to identify weak components early.
Common Mistakes to Avoid in Vending Machine PCB Design
Even with the best components, design errors can lead to performance issues. Avoid these common pitfalls:
- Underestimating Power Needs: Failing to account for peak current during motor operation can cause voltage drops or component failure. Always calculate worst-case power draw (e.g., 5 A for multiple motors running simultaneously).
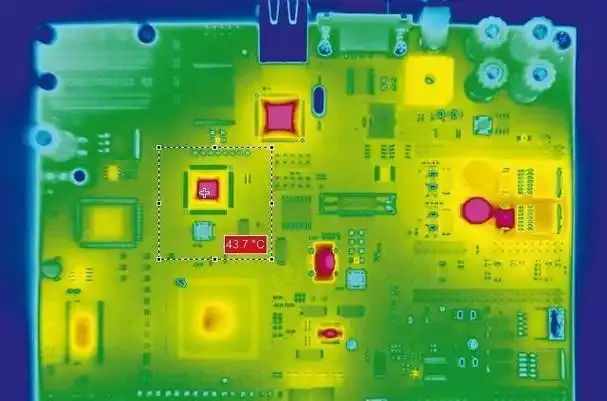
- Ignoring Thermal Management: High-power components like motor drivers generate heat. Include heat sinks or ensure adequate PCB spacing to prevent overheating (aim for junction temperatures below 125°C).
- Skipping EMI Protection: Motors and relays can cause electromagnetic interference (EMI). Use ferrite beads and bypass capacitors near sensitive components to filter noise.
Conclusion: Building a Reliable Vending Machine PCB
Designing a vending machine PCB requires careful selection of components to ensure reliability, efficiency, and durability. By following this guide, you now have a clear vending machine PCB components list, insights into the best components for vending machine PCB design, and tips for sourcing reliable components for vending machine electronics. A well-prepared vending machine PCB BOM will further streamline your project, reducing errors and costs.
Focus on durability, compatibility, and power efficiency when choosing parts, and always test your design under real-world conditions. With the right components and a thoughtful approach, your vending machine PCB will deliver consistent performance, keeping both operators and customers satisfied for years to come.


