 ALLPCB


If you're in the electronics industry, understanding the cost of your printed circuit board (PCB) components is crucial for staying competitive. Should-cost analysis is a powerful tool that helps you break down and predict the true cost of PCB electronic parts and overall board production. In this comprehensive guide, we'll dive deep into what should-cost analysis means for PCB design and manufacturing, how it works with electronic parts, and why it matters for your projects. Let’s explore this step by step to help you optimize costs without compromising quality.
What Is Should-Cost Analysis in PCB Design?
Should-cost analysis is a method used to determine what a product or component should cost based on a detailed breakdown of materials, labor, manufacturing processes, and overheads. Unlike traditional cost estimation, which often relies on supplier quotes or historical data, should-cost analysis takes a bottom-up approach. For PCB electronic parts, this means analyzing every element—from raw materials like copper and fiberglass to the tiniest resistors and capacitors—to arrive at a realistic cost figure.
This approach is especially valuable in the PCB industry, where costs can vary widely due to factors like component availability, board complexity, and production volume. By conducting a should-cost analysis, engineers and procurement teams can negotiate better with suppliers, identify cost-saving opportunities, and ensure they’re not overpaying for PCB electronic parts.
Why Should-Cost Analysis Matters for PCB Electronic Parts
PCBs are the backbone of modern electronics, and their components often account for a significant portion of the total cost. Whether you're designing a simple single-layer board for a consumer gadget or a complex multi-layer board for industrial equipment, understanding the cost of PCB electronic parts can make or break your project budget. Here are some key reasons why should-cost analysis is essential:
- Cost Transparency: It reveals hidden costs in the supply chain, helping you understand where your money is going.
- Better Negotiations: Armed with detailed cost data, you can negotiate fairer prices with suppliers of PCB electronic parts.
- Design Optimization: Identifying high-cost components early allows you to explore alternative parts or design changes to reduce expenses.
- Profitability: Accurate cost predictions ensure your project remains profitable, especially for high-volume production.

How to Perform Should-Cost Analysis for PCB Components
Conducting a should-cost analysis for PCB electronic parts might seem daunting, but breaking it down into manageable steps makes the process straightforward. Below, we outline a clear method to analyze costs effectively.
Step 1: Identify All PCB Electronic Parts
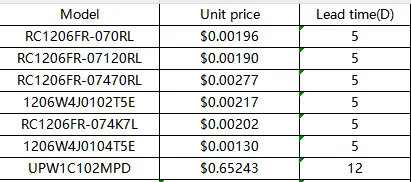
Start by creating a detailed bill of materials (BOM) for your PCB. This list should include every component, such as resistors, capacitors, integrated circuits (ICs), connectors, and diodes. For each item, note the specifications, such as resistance values (e.g., 1 kΩ for resistors) or capacitance (e.g., 10 μF for capacitors), as these details impact cost.
For example, a surface-mount resistor might cost just $0.01 per unit in bulk, while a specialized IC for high-speed signal processing could cost $5 or more per piece. Documenting these specifics ensures no cost is overlooked.
Step 2: Break Down Material Costs
Next, analyze the raw materials that go into each PCB electronic part. For instance, a capacitor might include ceramic or tantalum materials, while a PCB substrate could be made of FR4, a common fiberglass material costing around $0.10 to $0.50 per square inch for standard boards. Research current market prices for these materials, considering factors like bulk discounts or regional price differences.
Step 3: Factor in Manufacturing and Assembly Costs
Manufacturing costs for PCB electronic parts include the processes used to produce and assemble them onto the board. Surface-mount technology (SMT) assembly, for instance, is often cheaper than through-hole assembly due to automation, with costs ranging from $0.05 to $0.15 per component for high-volume runs. Include expenses for soldering, testing, and quality control in your analysis.

Step 4: Account for Overhead and Logistics
Overhead costs, such as tooling and equipment maintenance, and logistics costs, like shipping and customs duties, also play a role in the total cost of PCB electronic parts. For instance, importing components might add a 5-10% customs duty depending on your location, while shipping fees for urgent deliveries can spike costs by $0.50 per unit or more.
Step 5: Compare with Market Prices
Finally, compare your calculated should-cost figures with actual supplier quotes. If there’s a significant discrepancy—say, your analysis suggests a component should cost $0.20, but the supplier quotes $0.35—investigate why. It could be due to supply chain inefficiencies, minimum order quantities (MOQs), or other hidden markups.
Key Factors Affecting the Cost of PCB Electronic Parts
Several variables influence the cost of PCB electronic parts during a should-cost analysis. Understanding these can help you make informed decisions to optimize expenses.
- Component Type and Complexity: Basic passive components like resistors and capacitors are inexpensive, often costing less than $0.05 each, while active components like microcontrollers or high-frequency RF chips can range from $1 to $20 per unit.
- Volume and Scale: Ordering 10,000 units of a component typically reduces the per-unit cost by 20-30% compared to ordering just 100 units due to economies of scale.
- Material Selection: High-performance materials, such as Rogers substrates for high-speed signal applications (costing up to $2 per square inch), are pricier than standard FR4 materials.
- Lead Time: Expedited production or delivery of PCB electronic parts can increase costs by 10-25%, especially if components are sourced internationally.
- Availability: Supply chain disruptions, like those seen in recent years, can cause price spikes for specific components. For example, a shortage of semiconductors might double the cost of certain ICs.
Benefits of Should-Cost Analysis for PCB Projects
Implementing should-cost analysis in your PCB projects offers numerous advantages beyond just cost savings. Here’s how it can transform your workflow:
- Enhanced Decision-Making: With a clear cost breakdown, you can decide whether to use a cheaper alternative component without sacrificing performance. For instance, swapping a $2 IC for a $1.50 equivalent with similar specs could save thousands over a large production run.
- Improved Supplier Relationships: Transparent cost data fosters trust with suppliers, leading to better long-term partnerships.
- Risk Mitigation: Identifying potential cost overruns early helps you plan contingencies, such as sourcing alternative PCB electronic parts or adjusting project timelines.
- Competitive Edge: Lowering production costs while maintaining quality allows you to price your products more competitively in the market.
Challenges in Should-Cost Analysis for PCB Electronic Parts
While should-cost analysis is a powerful tool, it’s not without challenges. Being aware of these hurdles can help you address them proactively.
- Data Accuracy: Incomplete or outdated data on material costs or manufacturing processes can skew your analysis. Always use the most current market prices and supplier information.
- Complexity: Analyzing costs for a PCB with hundreds of components, each with unique specifications, can be time-consuming. Consider using software tools to automate parts of the process.
- Dynamic Markets: Prices for PCB electronic parts fluctuate due to supply chain issues or geopolitical factors. A component costing $0.10 today might jump to $0.20 in a month.
Practical Tips to Optimize Costs with Should-Cost Analysis
To get the most out of should-cost analysis for PCB electronic parts, follow these actionable tips:
- Standardize Components: Use common, widely available parts whenever possible to reduce costs. For example, choosing a standard 0805-sized resistor over a custom size can save on procurement expenses.
- Collaborate Early: Involve your procurement and design teams during the initial stages of PCB development to align on cost targets.
- Leverage Bulk Buying: Negotiate bulk discounts for high-volume orders of PCB electronic parts, potentially reducing per-unit costs by up to 30%.
- Monitor Market Trends: Stay updated on price changes for key components, especially during global supply chain disruptions, to adjust your analysis accordingly.
- Use Simulation Tools: Software can simulate signal integrity and impedance (e.g., ensuring traces maintain a 50-ohm impedance for high-speed signals) to help select cost-effective components without trial-and-error.
Real-World Example: Applying Should-Cost Analysis
Imagine you’re designing a PCB for a consumer IoT device. Your BOM includes 50 components, with a microcontroller costing $3.50, 20 resistors at $0.02 each, and various capacitors and connectors totaling $1.50. Using should-cost analysis, you calculate the material and assembly cost per board at $7.50. However, your supplier quotes $10 per board. Digging deeper, you find the discrepancy comes from a high markup on the microcontroller.
With this insight, you source an alternative microcontroller with similar specs (e.g., supporting a 16 MHz clock speed) for $2.80, reducing the total cost to $6.80 per board. For a production run of 5,000 units, this saves $3,500—a significant win for your project budget.
Conclusion: Mastering Costs with Should-Cost Analysis
Should-cost analysis is a game-changer for managing the expenses of PCB electronic parts. By breaking down costs into granular details—from raw materials to assembly and logistics—you gain a clear picture of what your PCB should cost. This empowers you to make informed design choices, negotiate better deals, and ultimately deliver high-quality products at competitive prices.
Whether you’re an engineer, procurement specialist, or project manager, integrating should-cost analysis into your workflow can streamline your PCB projects. Start by building a detailed BOM, researching market prices, and comparing your findings with supplier quotes. With practice, you’ll master the art of cost optimization, ensuring your designs are both innovative and budget-friendly.


