ALLPCB


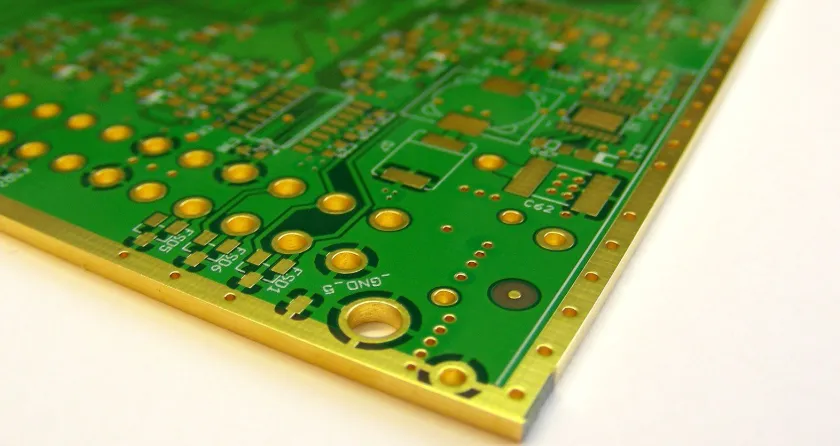
When designing a printed circuit board (PCB), one of the most critical decisions you'll make is selecting the right copper thickness. Measured in mils or ounces per square foot, copper thickness directly impacts your PCB's current capacity, heat dissipation, and overall performance. So, how do you choose the right value for your project? In short, it depends on your PCB's purpose, current requirements, and design constraints. For most standard applications, a copper thickness of 1 oz (equivalent to 1.37 mils) works well, but high-current or specialized designs may require thicker copper, such as 2 oz (2.74 mils) or more.
In this comprehensive guide, we'll dive deep into the world of PCB copper thickness, exploring mils vs ounces, how thickness affects current capacity, and key design considerations. We'll also walk you through practical calculation methods to ensure your PCB meets performance needs. Whether you're a beginner or an experienced engineer, this post will help you make informed decisions for your next project.
Understanding PCB Copper Thickness: Mils vs Ounces Explained
Copper thickness in PCB design is a fundamental concept, but it can be confusing due to the two common units of measurement: mils and ounces. Let's break it down.
What Are Mils?
Mils refer to thousandths of an inch. It's a direct measurement of the copper layer's thickness on a PCB. For instance, a copper thickness of 1.37 mils means the copper layer is 0.00137 inches thick. This unit is straightforward and often used in technical specifications when precision is needed.
What Are Ounces?
Ounces, on the other hand, refer to the weight of copper per square foot of PCB surface area. It's an indirect way to measure thickness. When 1 ounce of copper is spread evenly over one square foot, it results in a thickness of approximately 1.37 mils. So, 1 oz copper equals 1.37 mils, 2 oz equals 2.74 mils, and so on. This measurement is widely used in the industry because it ties directly to manufacturing standards.
Mils vs Ounces: Which Should You Use?
While both units are interchangeable with a simple conversion (1 oz = 1.37 mils), ounces are more commonly referenced in PCB design and manufacturing. Most fabricators and design tools use ounces as the default unit. However, if you're working on precise calculations or need to communicate exact measurements, mils can be more intuitive. For consistency, it's best to stick with ounces when discussing your project with manufacturers.
Why Copper Thickness Matters in PCB Design
Copper thickness isn't just a number—it's a critical factor that influences several aspects of your PCB's performance. Here's why it matters:
1. Current Carrying Capacity
The thicker the copper, the more current it can handle without overheating. Thin copper layers (like 0.5 oz or 0.685 mils) are suitable for low-power circuits, but high-power applications, such as power supplies or motor controllers, often require 2 oz (2.74 mils) or even 4 oz (5.48 mils) copper to prevent excessive heat buildup.
2. Heat Dissipation
Thicker copper conducts heat better, helping to dissipate thermal energy from components. This is especially important in high-frequency or high-power designs where heat can degrade performance or damage the board.
3. Signal Integrity
In high-speed designs, copper thickness affects impedance and signal integrity. Thinner copper can lead to higher resistance and signal loss, while thicker copper provides better stability for controlled impedance traces.
4. Mechanical Strength
Thicker copper adds durability to the PCB, making it less prone to cracking or damage during handling and assembly. This is a key consideration for larger boards or those used in harsh environments.
5. Cost Implications
Thicker copper increases manufacturing costs. Balancing performance needs with budget constraints is essential when selecting copper thickness.
Standard Copper Thickness Values for PCBs
PCB copper thickness typically ranges from 0.5 oz to 4 oz, with 1 oz (1.37 mils) being the industry standard for most general-purpose applications. Here's a breakdown of common values and their typical uses:
- 0.5 oz (0.685 mils): Used in lightweight, low-power designs like wearable electronics or small sensors. Best for fine traces and minimal current needs.
- 1 oz (1.37 mils): The default choice for most consumer electronics, providing a good balance of current capacity and cost. Suitable for moderate power and standard trace widths.
- 2 oz (2.74 mils): Common in power electronics, automotive, and industrial applications where higher current is required. Offers better heat dissipation.
- 3-4 oz (4.11-5.48 mils): Used in heavy-duty applications like high-power inverters or large power supplies. Provides maximum current capacity and thermal management but at a higher cost.
How to Calculate the Right Copper Thickness for Your PCB
Selecting the appropriate copper thickness involves understanding your project's electrical and thermal requirements. Here's a step-by-step guide to help with PCB thickness calculation:
Step 1: Determine Current Requirements
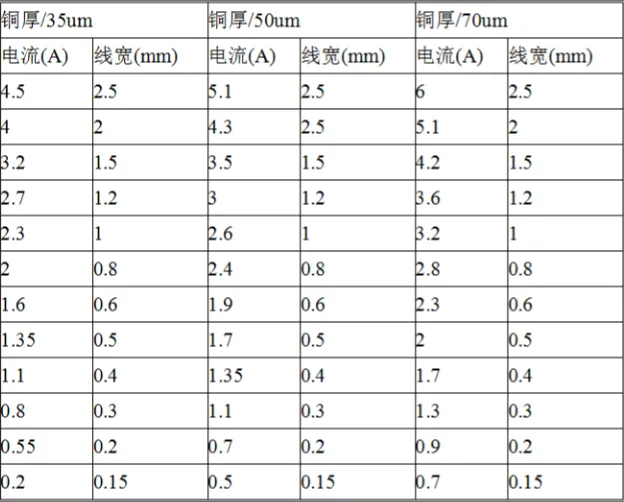
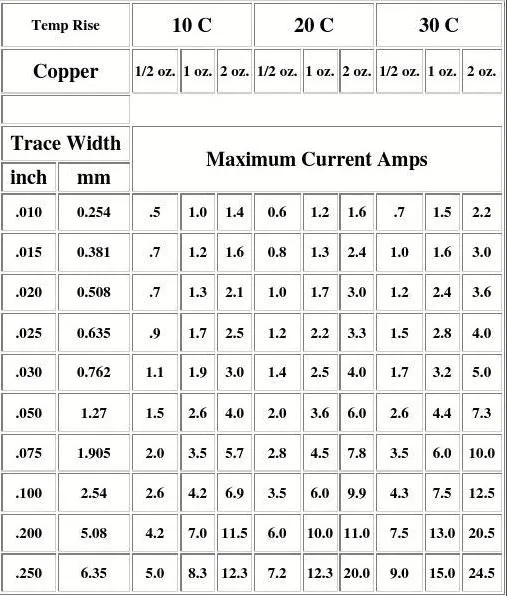
Start by calculating the maximum current your traces will carry. Use tools like online trace width calculators based on IPC-2221 standards, which factor in current, temperature rise, and trace width to recommend a minimum copper thickness. For example, a 50-mil-wide trace with 1 oz copper can handle about 2.6 amps with a 10°C temperature rise.
Step 2: Consider Temperature Rise
Temperature rise refers to how much the trace heats up under load. A common acceptable rise is 10°C to 20°C. Thicker copper reduces resistance and thus lowers the temperature rise. If your design operates in a high-temperature environment, opt for thicker copper (e.g., 2 oz or more).
Step 3: Evaluate Trace Width Constraints
If board space is limited, you may not be able to widen traces to carry more current. In such cases, increasing copper thickness is a practical solution. For instance, moving from 1 oz to 2 oz copper can double the current capacity of a trace without changing its width.
Step 4: Factor in Signal Speed and Impedance
For high-speed designs, copper thickness impacts characteristic impedance. Thinner copper can increase resistance and affect signal integrity. Use simulation tools or consult impedance calculators to ensure your chosen thickness aligns with your signal requirements. Typical controlled impedance values for high-speed signals range from 50 to 100 ohms, often requiring precise copper thickness.
Step 5: Balance Cost and Performance
Thicker copper costs more due to increased material and manufacturing complexity. If your design doesn't require high current or thermal performance, sticking with 1 oz copper can save money without sacrificing functionality.
PCB Design Considerations for Copper Thickness Selection
Beyond calculations, several practical PCB design considerations influence copper thickness selection. Keep these factors in mind to optimize your design:
1. Application Environment
Will your PCB operate in a harsh environment with high temperatures, humidity, or vibration? Thicker copper (e.g., 2 oz or more) improves durability and thermal management, making it ideal for automotive or industrial applications.
2. Board Size and Layer Count
Larger boards or multi-layer designs may require thicker copper to manage heat across greater distances or through multiple layers. For example, a 4-layer PCB with high-power components might benefit from 2 oz copper on outer layers for better heat dissipation.
3. Manufacturing Capabilities
Not all manufacturers can handle extremely thick copper (above 3 oz) due to etching and plating limitations. Confirm with your fabrication partner to ensure they can produce the desired thickness without compromising trace accuracy.
4. Assembly and Soldering
Thicker copper can absorb more heat during soldering, potentially leading to cold joints or uneven heating. Ensure your assembly process accounts for this by adjusting soldering temperatures or durations.
5. Regulatory Standards
Certain industries, like aerospace or medical, have strict standards for PCB design, including copper thickness. Familiarize yourself with relevant guidelines (e.g., IPC standards) to ensure compliance.
Copper Thickness and Current Capacity: Key Relationships
Understanding the relationship between copper thickness and current capacity is essential for avoiding design failures. Here's how they connect:
Resistance and Heat Generation
Thinner copper has higher electrical resistance, leading to more heat generation when current flows through it. For example, a 1 oz copper trace with a width of 10 mils might handle 1 amp with a 20°C temperature rise, while a 2 oz trace of the same width could handle nearly 2 amps under the same conditions.
Trace Width as a Complementary Factor
Wider traces can carry more current, but space constraints often limit trace width. Increasing copper thickness is an alternative way to boost current capacity without enlarging the trace. For instance, doubling copper thickness from 1 oz to 2 oz can roughly double the current capacity for a given trace width.
Thermal Management
Thicker copper spreads heat more effectively, reducing hot spots on the board. In high-power designs, using 3 oz or 4 oz copper can prevent thermal runaway, where excessive heat damages components or the board itself.
Common Mistakes to Avoid When Selecting Copper Thickness
Even experienced designers can make errors when choosing copper thickness. Here are some pitfalls to watch out for:
- Underestimating Current Needs: Choosing too thin copper can lead to overheating and failure. Always calculate current requirements and add a safety margin.
- Ignoring Thermal Effects: Failing to account for temperature rise can result in unreliable performance, especially in compact designs with poor airflow.
- Over-specifying Thickness: Using thicker copper than necessary increases costs without adding value. For low-power circuits, 1 oz is often sufficient.
- Neglecting Manufacturer Limits: Not all fabricators can produce boards with very thick copper. Verify capabilities before finalizing your design.
Final Tips for Choosing the Right Copper Thickness
Selecting the right copper thickness for your PCB project is a balance of performance, cost, and manufacturability. Start with the industry standard of 1 oz (1.37 mils) for general-purpose designs, and scale up to 2 oz or more if your application demands higher current capacity or better heat dissipation. Use calculation tools and standards like IPC-2221 to guide your decision, and always consider the specific needs of your project, from signal integrity to environmental conditions.
By understanding the relationship between mils and ounces, evaluating current and thermal requirements, and factoring in practical design considerations, you'll be well-equipped to make an informed choice. A well-designed PCB with the right copper thickness ensures reliability, efficiency, and longevity for your electronic products.
At ALLPCB, we're committed to helping you achieve optimal results for your PCB projects. Whether you're working on a simple prototype or a complex high-power design, our expertise and manufacturing capabilities can support your vision from concept to completion.