 ALLPCB


Introduction
Stencil printing forms the foundation of surface mount technology assembly in DIY electronics projects. For hobbyists venturing into PCB assembly, mastering this technique ensures precise solder paste deposition on pads, setting the stage for reliable component placement and reflow soldering. Without proper stencil printing, common issues like bridging or insufficient solder volume can derail even the simplest prototypes. This handbook breaks down the process into actionable steps tailored for beginners, drawing on practical insights to build confidence. Whether assembling a custom microcontroller board or experimenting with fine-pitch components, understanding stencil printing elevates hobbyist workflows from trial-and-error to consistent results. By the end, you will grasp the essentials to integrate stencil printing into your PCB assembly routine.
What Is Stencil Printing?
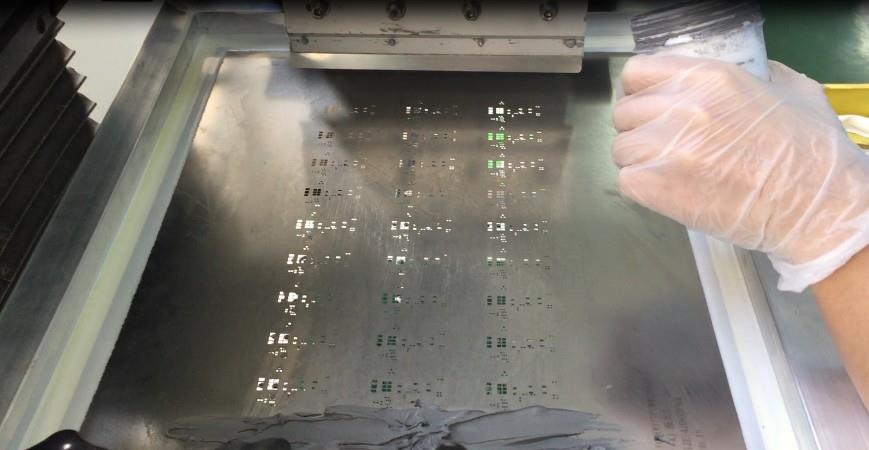
Stencil printing involves using a thin metal sheet, known as a stencil, with precisely cut apertures that align with PCB pads. Solder paste is forced through these openings onto the board using a squeegee, creating uniform deposits ready for component placement. This method replaces manual paste application, which often leads to inconsistencies in volume and placement for hobbyists. In PCB assembly, stencil printing achieves high accuracy, especially for surface mount devices. The stencil typically features fiducial marks for alignment, ensuring the paste matches pad locations perfectly. For DIY electronics enthusiasts, frameless or adhesive-backed stencils offer an accessible entry point without specialized equipment.
Why Stencil Printing Matters for Hobbyists
In the realm of DIY electronics, stencil printing streamlines PCB assembly by minimizing defects that plague hand-soldering attempts. Hobbyists frequently encounter challenges with tiny components, where uneven paste application causes tombstoning or open joints during reflow. Adopting stencil printing allows for repeatable results, saving time on prototypes and small batches. It aligns with industry practices scaled down for home use, fostering skills transferable to professional settings. Moreover, precise paste volume prevents excess material that leads to shorts, enhancing overall board reliability. For beginners, this technique demystifies surface mount assembly, opening doors to advanced projects like wearable tech or IoT devices.
The Technical Principles Behind Stencil Printing
Stencil design relies on aperture geometry to control solder paste release, balancing volume and clean separation from walls. Key factors include the stencil thickness relative to pad size and the area ratio, which influences paste transfer efficiency. Thinner stencils suit fine-pitch components by reducing paste volume, while thicker ones provide more material for larger pads. Material choice, often stainless steel for durability, ensures repeated use without deformation. Surface treatments on the stencil underside promote paste release, preventing sticking during lift-off. These principles, outlined in standards like IPC-7525, guide hobbyists in evaluating stencil quality for their PCB assembly needs.
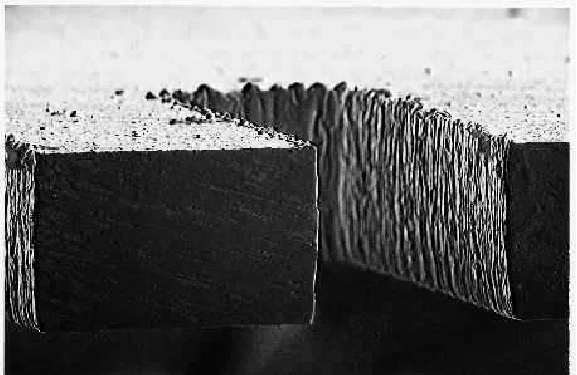
Alignment precision depends on fiducials, small circular or triangular marks on both stencil and PCB, allowing visual matching under good lighting. Proper tension keeps the stencil taut against the board, avoiding gapping that smears paste. Squeegee angle and speed affect shear force, which shears paste cleanly from apertures. Paste rheology, its viscosity under pressure, interacts with stencil features for optimal deposition. Understanding these mechanisms helps troubleshoot variations in print quality across different DIY electronics projects.
Step-by-Step Guide to Stencil Printing for Beginners
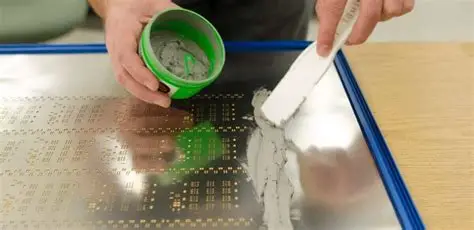
Start by preparing your workspace: a flat, clean surface with good lighting and low humidity to prevent paste drying. Secure the PCB using low-tack tape on all edges, ensuring it lies perfectly flat to match stencil contact. Position the stencil over the board, aligning fiducials visually; double-check with a magnifying glass for accuracy. Load a small amount of solder paste along one edge of the stencil, avoiding overfilling to prevent spillage.
Use a metal squeegee blade at a 45- to 60-degree angle, applying even, moderate pressure while sweeping in one direction. Perform a single pass for consistency, then slowly lift the stencil straight up to allow paste release. Inspect the print under angled light for uniformity, gaps, or bridges. Clean the stencil immediately with isopropyl alcohol and a lint-free wipe, followed by vacuuming apertures if needed.
For multiple prints, reapply paste sparingly and repeat, monitoring for buildup. After printing, allow the paste to stabilize briefly before placing components. This manual process suits hobbyists without automated printers, yielding professional-grade results with practice.
Best Practices for Stencil Printing in DIY PCB Assembly
Select a stencil thickness appropriate for your component pitch; finer features demand thinner profiles for better release. Maintain cleanliness rigorously, as residue causes defects like insufficient paste or smearing. Store solder paste in a refrigerator and warm it to room temperature before use to achieve ideal viscosity. Practice on scrap boards to dial in squeegee pressure and speed, noting what works for your setup.
Use adhesive stencils or frames with adjustable tension for hobbyist rigs, enhancing contact uniformity. Incorporate fiducials in your PCB design from the start to simplify alignment. Follow guidelines from IPC-7525 for aperture shapes, such as trapezoidal or rounded corners, to improve paste flow. Document your parameters, like sweep direction, for repeatability across projects.
Control environmental factors: avoid direct sunlight or drafts that dry paste prematurely. Opt for Type 4 or finer paste particles for small apertures, ensuring smooth printing. These practices reduce trial runs, boosting efficiency in hobbyist PCB assembly.
Common Troubleshooting Issues in Stencil Printing
Bridging, where paste connects adjacent pads, often stems from excessive volume or poor stencil separation. Reduce squeegee pressure or thin the paste slightly, and verify aperture walls are smooth. Insufficient paste deposits signal clogged apertures; clean thoroughly and check for damage. Misalignment appears as offset paste; refine fiducial use and secure the PCB more firmly.
Smeared or scooped paste indicates uneven pressure or gapping; flatten the board and increase stencil tension. Paste drying too quickly causes poor release; work in shorter sessions and store materials properly. For persistent issues, inspect stencil flatness, as warpage distorts prints.
Standards like J-STD-001 provide criteria for acceptable solder joints post-print, helping evaluate fixes. Systematic checks, starting with alignment and cleanliness, resolve most hobbyist challenges. Log defects and adjustments to refine your technique over time.
Advanced Tips for Hobbyists Scaling Up
Once basics are mastered, experiment with step stencils for mixed component heights, though manual handling adds complexity. Integrate stencil printing into a reflow oven workflow for full SMT lines at home. Design PCBs with printer-friendly features, like larger fiducials for visual alignment. Join online communities to share prints and gather feedback on DIY setups. These steps transition beginners to efficient PCB assembly pipelines.
Conclusion
Stencil printing empowers hobbyists to achieve professional PCB assembly results without industrial tools. From understanding principles to mastering troubleshooting, this handbook equips you with practical knowledge for DIY electronics success. Consistent practice with best methods yields reliable solder deposits, minimizing reflow defects. Embrace standards like IPC-7525 to inform your designs, ensuring quality from the first print. Start small, iterate, and watch your projects come alive with precise surface mount assembly.
FAQs
Q1: What is the most common mistake beginners make in stencil printing for PCB assembly?
A1: Misalignment tops the list, often from rushed fiducial matching or unstable PCB fixturing. Secure the board with tape, use magnification, and verify under light before printing. This prevents offset paste leading to assembly failures. Proper setup ensures even deposition across all pads.
Q2: How do hobbyists clean a stencil after printing solder paste?
A2: Wipe apertures with isopropyl alcohol using a lint-free cloth, then vacuum residue. Avoid abrasives that damage walls. Dry completely before storage. Regular cleaning maintains print quality in DIY electronics workflows.
Q3: Why does solder paste bridging occur during stencil printing?
A3: Excess pressure, thick paste, or damaged apertures cause bridging between pads. Lower squeegee force, clean thoroughly, and ensure good release. Inspect prints immediately to rework early. This keeps hobbyist PCB assembly defect-free.
Q4: Can beginners use stencil printing for fine-pitch components in DIY projects?
A4: Yes, with thinner stencils and fine-particle paste. Align carefully and practice sweeps for clean release. Start with prototypes to build skill. It revolutionizes precision in hobbyist PCB assembly.
References
IPC-7525C — Stencil Design Guidelines. IPC, 2021
J-STD-001J — Requirements for Soldered Electrical and Electronic Assemblies. IPC, 2020
IPC-A-610H — Acceptability of Electronic Assemblies. IPC, 2019


