ALLPCB


Are you a hobbyist struggling with damaged PCB gold fingers on your circuit boards? Whether you're dealing with corroded edge connectors, scratches, or worn-out plating, repairing damaged PCB gold fingers doesn’t have to be a daunting task. In this comprehensive guide, we’ll walk you through the step-by-step process of cleaning corroded gold fingers, using a gold plating repair kit, soldering on gold fingers, and even replacing gold fingers on PCBs. With the right tools and techniques, you can revive your boards and ensure reliable connections. Let’s dive into the world of DIY gold finger plating and repair!
What Are PCB Gold Fingers and Why Do They Matter?
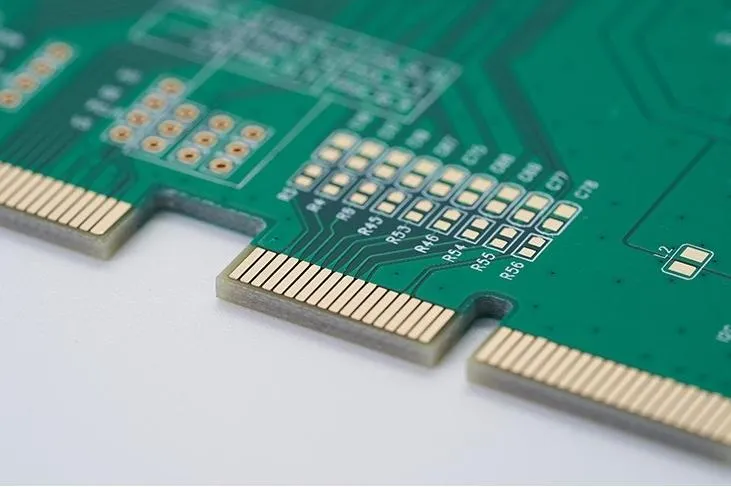
PCB gold fingers, often called edge connectors, are the gold-plated pads or strips located at the edge of a printed circuit board. These connectors are designed to interface with other boards or slots, such as in computer memory modules, graphics cards, or other electronic devices. Gold is used because of its excellent conductivity and resistance to corrosion, ensuring a stable connection over time. Typically, the gold layer is around 3 to 50 microinches thick, depending on the application, to balance durability and cost.
However, gold fingers can get damaged due to wear and tear, improper handling, or exposure to harsh environments. Scratches, corrosion, or solder contamination can disrupt signal integrity, leading to connection failures or data loss. For hobbyists working on personal projects or salvaging old electronics, knowing how to repair these connectors is a valuable skill that can save time and money.
Common Issues with PCB Gold Fingers
Before diving into repair techniques, it’s important to understand the common problems that affect gold fingers:
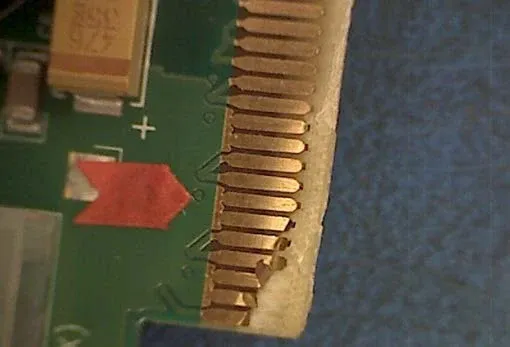
- Corrosion: Exposure to moisture or chemicals can cause oxidation, leading to a dull or tarnished appearance and poor connectivity.
- Physical Damage: Scratches or dents from mishandling can disrupt the gold layer, affecting signal transmission.
- Solder Contamination: During soldering near the edge connectors, solder can accidentally coat the gold fingers, reducing their effectiveness.
- Wear from Repeated Use: Frequent insertion and removal of the board can wear down the gold plating, exposing the underlying material.
Identifying the specific issue with your PCB will help you choose the right repair method, whether it’s cleaning corroded gold fingers or fully replacing gold fingers on PCBs.
Tools and Materials for DIY PCB Gold Finger Repair
To tackle gold finger repairs as a hobbyist, you’ll need a few essential tools and materials. Here’s a list to get you started:
- Isopropyl alcohol (90% or higher) for cleaning.
- Soft-bristled brush or cotton swabs for gentle cleaning.
- Gold plating repair kit (available online or at electronics stores) for replating.
- Fine-grit sandpaper (2000 grit or higher) or a fiberglass scratch brush for removing minor damage.
- Soldering iron and solder for advanced repairs.
- Masking tape to protect surrounding areas during repair.
- Multimeter to test connectivity after repairs.
- Protective gloves and safety goggles for handling chemicals in plating kits.
Having these tools on hand will make the process smoother and help you achieve professional-looking results with DIY gold finger plating.
Step-by-Step Guide to Repairing Damaged PCB Gold Fingers
Now that you’re equipped with the right tools, let’s walk through the process of repairing damaged PCB gold fingers. Depending on the extent of the damage, you may need to follow one or more of these methods.
Step 1: Cleaning Corroded Gold Fingers
If your gold fingers appear tarnished or corroded, cleaning is the first step. Corrosion can increase contact resistance, often exceeding 50 milliohms, which disrupts signal integrity.
- Prepare the Area: Work in a well-ventilated space and wear protective gloves to avoid skin contact with cleaning agents.
- Use Isopropyl Alcohol: Dampen a cotton swab or soft brush with isopropyl alcohol and gently rub the gold fingers to remove dirt, grease, or oxidation. Avoid excessive pressure to prevent scratching the gold layer.
- Dry Thoroughly: Use a clean, lint-free cloth to dry the area completely. Moisture can lead to further corrosion if left on the board.
- Inspect and Test: Check the gold fingers under good lighting for any remaining residue. Use a multimeter to measure contact resistance; ideally, it should be below 10 milliohms for a reliable connection.
If cleaning doesn’t resolve the issue, you may need to move on to more advanced repair techniques.
Step 2: Removing Minor Scratches and Damage
For minor scratches or surface damage, light abrasion can help smooth the gold fingers before replating.
- Mask Surrounding Areas: Use masking tape to cover nearby components or traces to avoid accidental damage.
- Gently Abrade: Use a fiberglass scratch brush or 2000-grit sandpaper to lightly buff the damaged area. Focus only on the affected spot to avoid removing too much gold.
- Clean Again: Remove any debris with isopropyl alcohol and a soft cloth.
Be cautious with this step, as excessive abrasion can strip away the thin gold layer, exposing the underlying nickel or copper, which corrodes more easily.
Step 3: Using a Gold Plating Repair Kit for DIY Gold Finger Plating
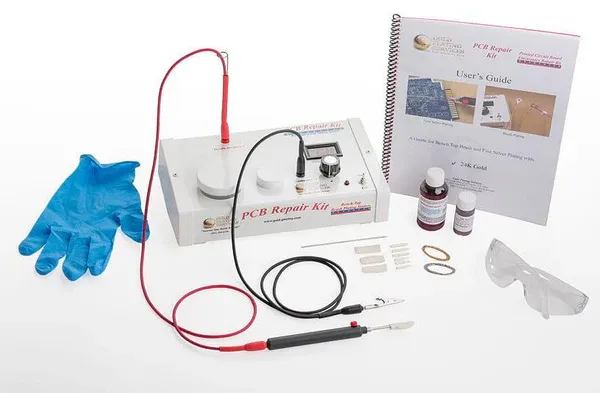
If the gold layer is worn or damaged beyond simple cleaning, a gold plating repair kit can restore the surface. These kits typically include a plating solution, a power source (like a battery or USB-powered device), and applicators.
- Read Instructions: Follow the specific guidelines provided with your kit, as processes can vary.
- Prepare the Surface: Ensure the gold fingers are clean and free of debris. Any contamination can affect the plating quality.
- Apply Plating Solution: Dip the applicator in the gold plating solution and gently rub it over the damaged area. The kit’s power source will facilitate the deposition of a thin gold layer, typically 5-10 microinches thick per application.
- Rinse and Dry: After plating, rinse the area with distilled water to remove excess solution, then dry it thoroughly.
- Test Connectivity: Use a multimeter to confirm that the resistance is within acceptable limits (under 10 milliohms).
Gold plating repair kits are a cost-effective solution for hobbyists, often costing between $20 and $50, and they can extend the life of your PCB significantly.

Step 4: Soldering on Gold Fingers for Severe Damage
In cases where the gold fingers are severely damaged or missing small sections, soldering on gold fingers might be necessary. This method is more advanced and requires precision to avoid further damage.
- Assess the Damage: Determine if the underlying traces are intact. If they’re broken, soldering won’t work without repairing the traces first.
- Use Thin Solder: Apply a very thin layer of solder to the damaged area using a fine-tip soldering iron. Keep the temperature low (around 300°C or 570°F) to avoid overheating the board.
- Replate if Possible: After soldering, use a gold plating kit to cover the soldered area with a thin gold layer. This prevents corrosion of the solder and improves conductivity.
This method is a temporary fix and may not restore the original performance, as solder has higher resistance (around 15-20 milliohms) compared to gold plating.
Step 5: Replacing Gold Fingers on PCBs for Extensive Damage
If the gold fingers are beyond repair, replacing them entirely is the last resort. This process is complex and often requires professional assistance, but hobbyists with advanced skills can attempt it.
- Remove Old Plating: Carefully strip away the damaged gold layer using a fiberglass brush or chemical stripper, exposing the base material (usually nickel or copper).
- Apply New Base Layer: If the base layer is damaged, you may need to apply a thin nickel layer before gold plating. This step often requires specialized equipment.
- Replate with Gold: Use a gold plating kit or solution to apply a new gold layer, aiming for a thickness of 5-30 microinches depending on the application.
- Test the Board: Verify the new gold fingers’ performance with a multimeter and by testing the board in its intended slot.
Replacing gold fingers on PCBs is time-consuming and may not always yield perfect results for hobbyists without access to industrial-grade tools. If the board is critical, consider consulting a professional service.
Tips for Preventing Damage to PCB Gold Fingers
Prevention is always better than repair. Here are some practical tips to keep your PCB gold fingers in top condition:
- Handle boards by the edges, avoiding direct contact with gold fingers to prevent oils or dirt from transferring.
- Store PCBs in anti-static bags or containers to protect them from moisture and dust.
- Use proper insertion techniques when connecting boards to slots, ensuring alignment to avoid scratches or bending.
- Keep your workspace clean and free of contaminants that could corrode or damage the gold plating.
When to Seek Professional Help
While DIY repairs can be effective for minor issues, some situations call for professional expertise. If the PCB is part of a high-value device, has complex multilayer designs, or requires precise impedance matching (e.g., 50 ohms for high-speed signals), it’s best to consult a specialist. Professional services have access to advanced plating equipment and can ensure long-term reliability, especially for critical applications.
Conclusion: Revive Your PCBs with Confidence
Repairing damaged PCB gold fingers is a rewarding skill for hobbyists looking to salvage or maintain their circuit boards. From cleaning corroded gold fingers to using a gold plating repair kit and even soldering on gold fingers, this guide has covered the essential steps for DIY gold finger plating and repair. With patience and the right tools, you can restore functionality to your edge connectors and extend the life of your electronics projects.
Remember to start with the simplest solutions, like cleaning, before moving to more complex methods like replacing gold fingers on PCBs. By following these steps and taking preventive measures, you’ll keep your boards in excellent shape for years to come. Dive into your next repair project with confidence, knowing you have the know-how to tackle any gold finger challenge!