 ALLPCB


Hand-soldering components on a blind via PCB can be a challenging yet rewarding task for hobbyists and engineers alike. Blind vias, which are vias that connect an outer layer of a printed circuit board (PCB) to an inner layer without passing through the entire board, require special care during soldering to ensure proper connections and avoid damaging the board. In this comprehensive guide, we'll explore effective techniques and tips for hand soldering blind via PCBs, tailored specifically for hobbyists looking to master this skill. Whether you're new to PCB soldering or seeking advanced blind via soldering tips, this post will provide actionable insights to help you achieve clean, reliable results.
At its core, soldering blind vias involves precision, the right tools, and an understanding of the unique structure of these vias. Below, we'll dive into the essentials of hobbyist PCB soldering, focusing on soldering techniques for blind vias, and share practical advice to elevate your skills.
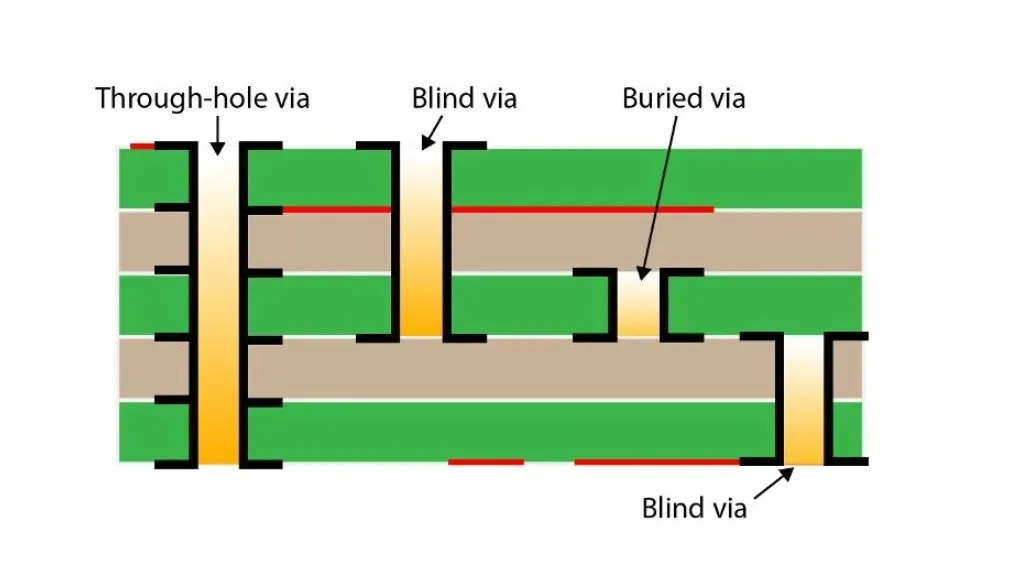
What Are Blind Vias and Why Are They Challenging?
Blind vias are a type of via used in multilayer PCBs to connect an external layer to one or more internal layers without extending through the entire thickness of the board. Unlike through-hole vias, which are visible and accessible from both sides of the PCB, blind vias are only accessible from one side. This design saves space and allows for more complex routing in high-density interconnect (HDI) boards, often used in compact devices like smartphones and wearables.
The challenge with blind vias lies in their hidden nature. Since you can't see or access the connection point on the opposite side, ensuring a proper solder joint becomes trickier. Overheating can damage the internal layers, while insufficient heat may result in a weak connection. For hobbyists working on hand soldering blind via PCBs, mastering the balance of heat and precision is critical.
Essential Tools for Hand Soldering Blind Via PCBs
Before diving into soldering techniques for blind vias, let’s cover the tools you'll need. Having the right equipment can make a significant difference in achieving clean, reliable solder joints on a blind via PCB. Here’s a list of essentials for hobbyist PCB soldering:
- Soldering Iron with Fine Tip: A temperature-controlled soldering iron with a fine tip (0.5mm to 1mm) is ideal for precision work on small vias. Aim for an iron with adjustable temperature settings between 250°C and 350°C to avoid overheating delicate components.
- Solder Wire: Use a thin lead-free solder wire with a diameter of 0.5mm to 0.8mm for better control. A rosin-core solder helps with flux activation during soldering.
- Flux Pen or Liquid Flux: Flux is crucial for cleaning the via and pad surfaces, ensuring better solder flow into the blind via.
- Desoldering Braid or Pump: Mistakes happen, and having a desoldering tool helps remove excess solder without damaging the PCB.
- Magnifying Glass or Microscope: Blind vias are often tiny, so a magnifying tool helps inspect your work for proper solder flow and joint quality.
- Tweezers: Precision tweezers are useful for placing small components over blind vias before soldering.
- Heat-Resistant Mat or PCB Holder: A stable work surface or holder keeps the PCB secure, preventing accidental movement during soldering.
With these tools in hand, you’re ready to tackle the unique challenges of hand soldering blind via PCBs. Investing in quality equipment tailored for fine work will save time and frustration in the long run.
Key Soldering Techniques for Blind Vias
Soldering blind vias requires a different approach compared to through-hole or surface-mount soldering. Below are proven soldering techniques for blind vias that hobbyists can apply to ensure strong, reliable connections.
1. Prepare the PCB and Components
Preparation is the foundation of successful soldering. Start by cleaning the PCB surface around the blind vias with isopropyl alcohol and a lint-free cloth to remove dirt, oils, or oxidation. Next, apply a small amount of flux to the via and the component pad using a flux pen. Flux helps the solder flow smoothly into the via, even if it’s not visible from the other side.
If you're placing a component over the blind via, ensure it’s aligned correctly using tweezers. Double-check the orientation to avoid rework later. For hobbyists, using a magnifying glass at this stage can help confirm precise placement.
2. Set the Right Temperature
Blind vias are sensitive to heat because the internal layers of the PCB can be damaged by excessive temperatures. Set your soldering iron to a moderate temperature, typically between 280°C and 320°C, depending on the solder type and PCB material. If you’re unsure, start at the lower end and increase gradually if the solder doesn’t flow properly.
Tip: Avoid holding the iron on the via for more than 3-5 seconds at a time to prevent thermal damage to the PCB’s internal layers. If the solder doesn’t melt quickly, check your iron’s temperature rather than applying more heat.
3. Apply Solder with Precision
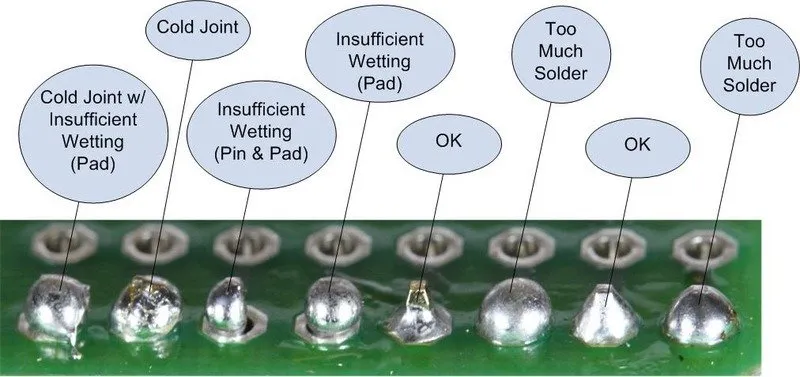
Place the soldering iron tip on the pad or via edge, not directly inside the via, to heat it evenly. After 1-2 seconds, touch the solder wire to the via or pad, allowing it to flow naturally. For blind vias, the solder must penetrate into the hidden connection, so ensure enough solder is applied to form a small, shiny dome over the via. However, avoid overloading with solder, as excess can create shorts with nearby traces.
A key blind via soldering tip is to watch for the solder to “wet” the surface, indicating a good bond. If the solder looks dull or grainy, it may be a cold joint, and you’ll need to reheat and add a tiny bit more solder or flux.
4. Inspect the Joint Carefully
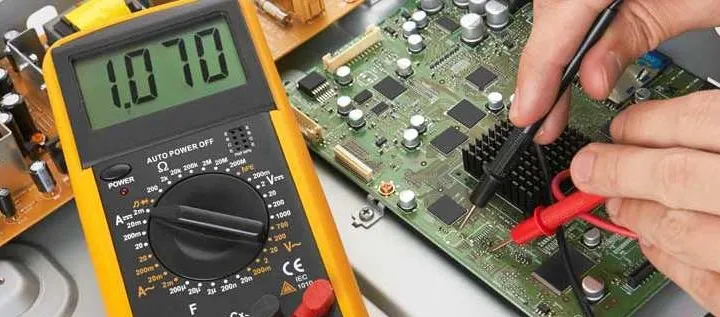
Since you can’t see the internal connection of a blind via, inspection relies on the external appearance of the solder joint. Use a magnifying glass or microscope to check for a smooth, shiny finish and ensure the solder has filled the via properly without gaps or cracks. If possible, test the connection with a multimeter set to continuity mode to confirm the blind via is conducting as expected.
Blind Via Soldering Tips for Hobbyists
Beyond the core techniques, here are additional blind via soldering tips tailored for hobbyist PCB soldering. These practical pointers can help you avoid common pitfalls and improve your results.
Tip 1: Practice on Scrap Boards First
If you’re new to hand soldering blind via PCBs, don’t start with your main project. Use a scrap or practice PCB with similar via structures to test your technique. Experiment with different temperatures and soldering times to get a feel for how much heat and solder are needed. This hands-on practice builds confidence and reduces the risk of damaging a valuable board.
Tip 2: Use Flux Generously
Flux is your best friend when soldering blind vias. It not only cleans the surface but also helps solder flow into tight spaces. If you notice the solder isn’t penetrating the via, add a tiny bit more flux and reheat the joint. Be sure to clean off excess flux residue after soldering with isopropyl alcohol to prevent corrosion over time.
Tip 3: Avoid Overheating
As mentioned earlier, blind vias are prone to heat damage because the internal layers are hidden and delicate. Limit contact time with the soldering iron to short bursts of 3-5 seconds. If you need to rework a joint, let the area cool completely before trying again. Overheating can cause delamination of the PCB layers, leading to permanent damage.
Tip 4: Test Continuity After Soldering
Since visual inspection alone isn’t enough for blind vias, use a multimeter to test for continuity between the soldered component and the expected connection point. This step confirms whether the solder has successfully reached the internal layer. If there’s no continuity, you may need to reflow the joint with additional flux and solder.
Tip 5: Keep Your Tools Clean
A clean soldering iron tip is essential for effective heat transfer. Use a brass wire cleaner or damp sponge to wipe the tip before and after each joint. A dirty tip can lead to uneven heating, resulting in poor solder flow or cold joints. Additionally, tin the tip with a thin layer of fresh solder to prevent oxidation during use.
Common Mistakes to Avoid When Soldering Blind Vias
Even with the best techniques, mistakes can happen. Here are some common errors hobbyists make during blind via soldering and how to avoid them.
- Using Too Much Solder: Excess solder can overflow and short nearby traces or pads. Apply just enough to form a small dome over the via.
- Insufficient Heat: If the iron isn’t hot enough, the solder won’t flow into the via, creating a weak connection. Ensure your iron is at the correct temperature for your solder type.
- Ignoring Flux: Skipping flux often results in poor solder wetting, especially in blind vias where penetration is critical. Always apply flux before soldering.
- Rushing the Process: Soldering blind vias requires patience. Rushing can lead to cold joints or thermal damage. Take your time to heat, apply solder, and inspect each joint.
Advanced Considerations for Blind Via Soldering
For hobbyists looking to take their skills further, understanding the technical aspects of blind vias can enhance your soldering approach. Blind vias often play a role in high-speed signal transmission, where impedance control is critical. For instance, a typical blind via in an HDI board might be designed to maintain a characteristic impedance of 50 ohms to match the signal path. Poor soldering can introduce parasitic capacitance or inductance, affecting signal integrity at frequencies above 1 GHz.
Additionally, the depth of a blind via impacts soldering difficulty. A via with a depth-to-diameter ratio (aspect ratio) greater than 1:1 can be harder to fill with solder due to limited access. In such cases, using a soldering iron with a finer tip and applying flux generously can help ensure proper penetration.
Conclusion: Mastering Hand Soldering on Blind Via PCBs
Hand soldering blind via PCBs is a skill that combines precision, patience, and the right tools. By understanding the unique challenges of blind vias and applying the soldering techniques for blind vias outlined in this guide, hobbyists can achieve professional-quality results. From preparing your workspace to testing continuity, each step plays a vital role in ensuring reliable connections without damaging the PCB.
Remember to start with practice boards, use flux generously, and avoid common mistakes like overheating or using too much solder. With these blind via soldering tips, you’ll be well on your way to mastering hobbyist PCB soldering. Keep refining your skills, and soon, even the most complex blind via designs will feel like second nature.
Whether you’re working on a personal project or prototyping a new design, the art of hand soldering blind via PCBs opens up a world of possibilities for creating compact, high-performance circuits. Take your time, follow these guidelines, and enjoy the satisfaction of a job well done.


