ALLPCB


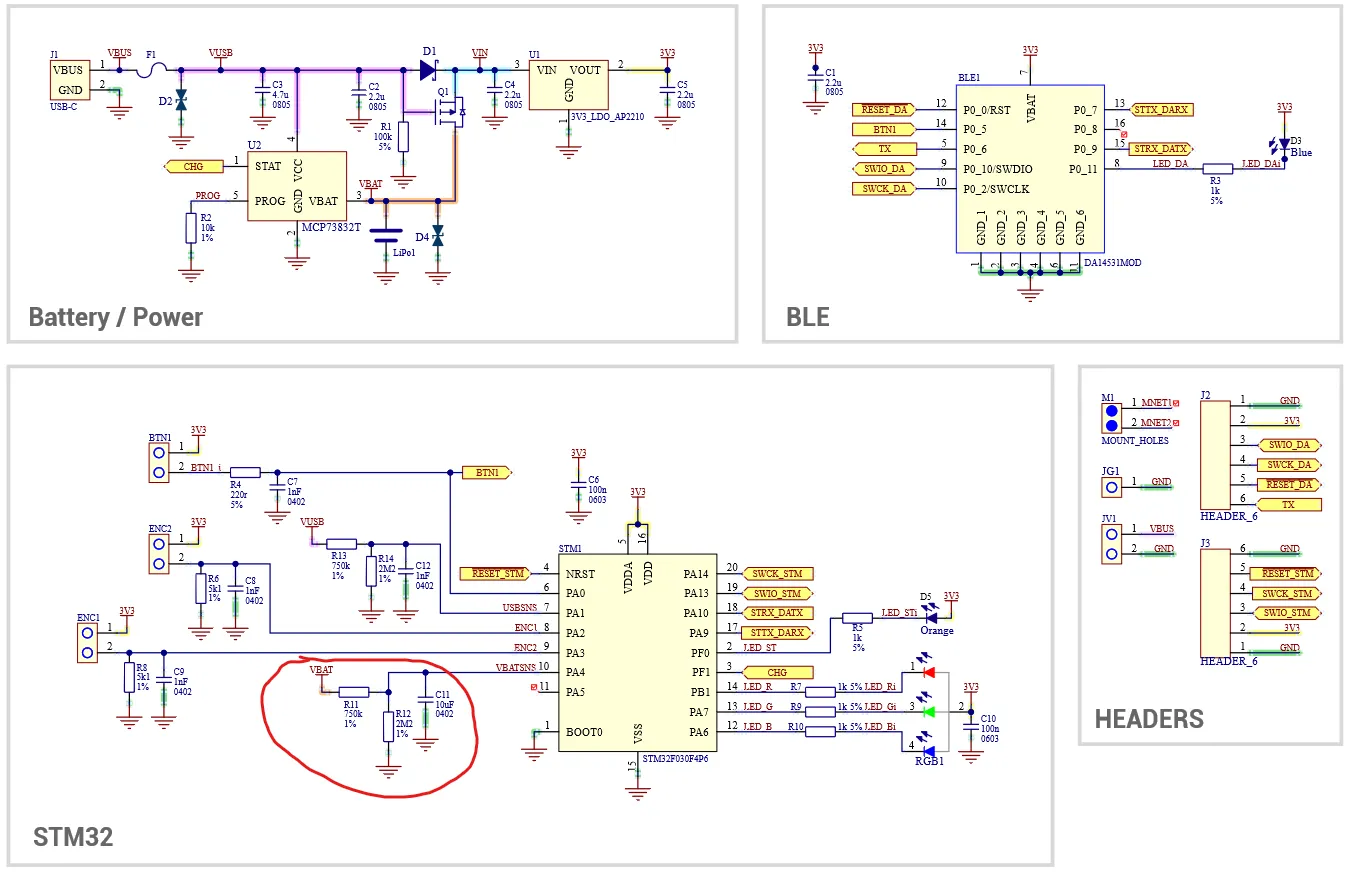
A programmer is a tool commonly used in embedded systems development to write firmware into a chip. ST-Link is a programmer from STMicroelectronics for programming STM32 microcontrollers. The following lists the detailed steps for using ST-Link to program a target device.
Step 1: Preparation
Prepare the necessary tools and materials before programming. Ensure you have an ST-Link programmer and a computer. Prepare a USB data cable to connect the ST-Link to the computer. Also have the firmware file to be programmed and the target microcontroller ready.
Step 2: Install ST-Link drivers
Install the ST-Link drivers before attempting to program. Download the latest drivers from the ST-Link support site and follow the installation instructions. Verify the computer correctly recognizes the ST-Link device.
Step 3: Connect ST-Link to the target
Use the USB cable to connect the ST-Link to your computer. Connect the ST-Link USB connector to the computer and the corresponding connector on the programmer. Then connect the ST-Link to the target microcontroller. Connection methods vary by chip; common approaches include Dupont jumper wires or soldered connections.
Step 4: Launch programming software
Open the programming software of your choice, such as ST-Link Utility, Keil MDK, or STM32CubeProgrammer. In the software interface select the appropriate target device and the ST-Link programmer, and confirm the software can connect to the ST-Link.
Step 5: Configure the target device
In the software, select the target microcontroller model and the connection mode. Some tools auto-detect the target device, while others require manual selection. Ensure the correct device and connection settings to avoid programming errors.
Step 6: Select the firmware file
Choose the firmware file to program. This is typically a binary file (.bin) or an Intel HEX file (.hex). After importing the file, the software will display file information in the interface.
Step 7: Configure programming parameters
Configure programming parameters such as the programming start address, transfer speed, and erase options. Adjust these settings according to your requirements and the target device documentation.
Step 8: Erase the target device
Before programming, erase any existing firmware on the target device. In the software select the erase area and perform the erase operation. Erasing clears existing data to ensure the new firmware is programmed correctly.
Step 9: Start programming
After verifying all settings, initiate the programming operation. The software will write the firmware to the target device and display progress and status messages. Wait for the programming to complete and note any status indicators from the tool.
Step 10: Verify programming results
After programming completes, verify the result. Use the verification function in the software to read back the target device memory and compare it with the original file to ensure correctness and integrity.
Following these ten steps allows you to use ST-Link to program firmware into an STM32 target device.