 ALLPCB


Introduction
In modern electronics, 8-layer PCB stackup design plays a critical role in achieving high performance, especially for applications involving high-speed signals and complex power distribution. Engineers often face challenges in balancing signal integrity, electromagnetic interference control, and thermal management within the constraints of multilayer boards. Optimizing the pcb layer stackup ensures reliable operation by providing proper reference planes, controlled impedances, and mechanical stability. This article explores structured approaches to 8 layer pcb design, drawing on established engineering principles to guide electric engineers toward superior outcomes. By focusing on layer arrangement and material considerations, designers can enhance overall board performance without compromising manufacturability.
What Is an 8-Layer PCB Stackup and Why It Matters
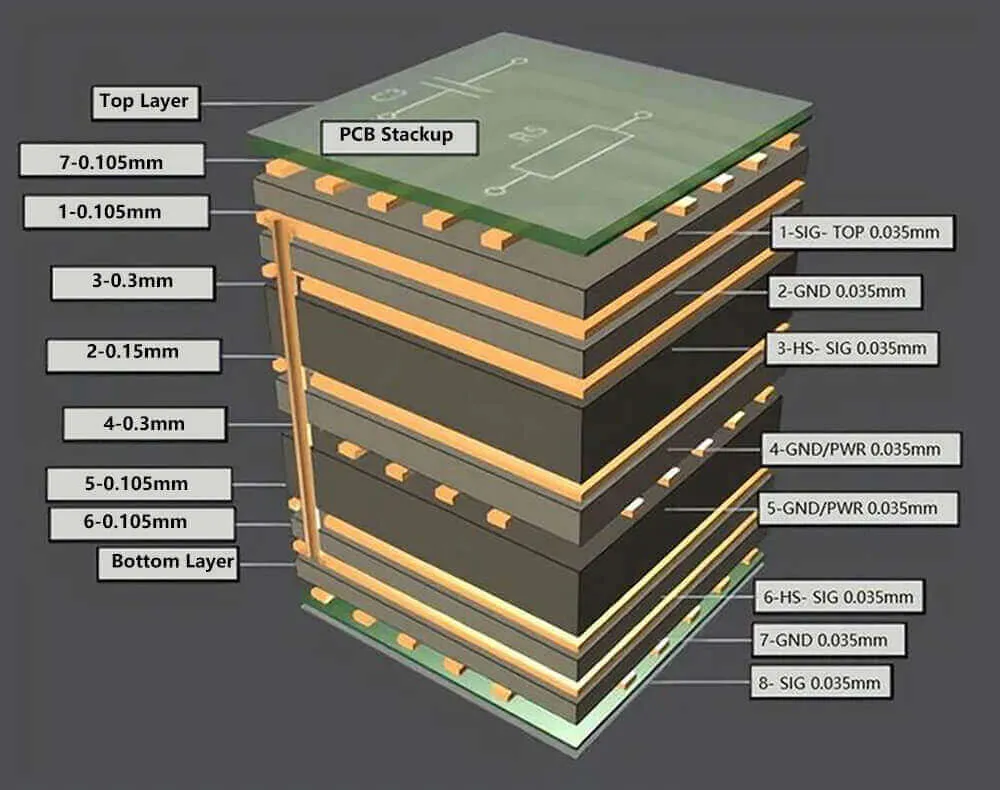
An 8-layer PCB stackup refers to the specific sequence of copper layers, dielectric materials, and prepregs that form the vertical structure of a multilayer printed circuit board. Each layer serves a distinct purpose, such as carrying signals, providing ground references, or distributing power. In 8 layer pcb design, this arrangement directly influences electrical characteristics like characteristic impedance, crosstalk, and return current paths. Poor stackup choices can lead to signal degradation, increased EMI emissions, and even mechanical issues like warpage during fabrication or assembly.
The relevance of pcb stack up optimization grows with rising clock speeds and data rates in designs for telecommunications, computing, and automotive systems. A well-optimized 8-layer PCB stackup supports denser routing, better power delivery, and compliance with performance requirements. For electric engineers, understanding these interactions allows for proactive mitigation of issues that could otherwise require costly respins. Ultimately, effective stackup design aligns electrical performance with fabrication feasibility, ensuring the board meets operational demands in real-world environments.
Key Technical Principles of 8-Layer PCB Stackup Design
The foundation of 8-layer PCB stackup optimization lies in providing continuous reference planes adjacent to signal layers to maintain signal integrity. Ground planes act as low-inductance return paths, minimizing loop inductance and reflections for high-speed traces. Power planes complement this by decoupling noise and supporting stable voltage distribution across the board. Dielectric thicknesses between layers must be precisely controlled to achieve target impedances, typically using thinner cores for stripline configurations where signals are embedded between planes.
Symmetry in the pcb layer stackup is another core principle to prevent warpage from asymmetric thermal expansion during lamination. Core and prepreg materials with matched coefficients of thermal expansion help maintain flatness post-fabrication. For EMI reduction, dedicating inner layers to ground and power creates shielding that confines fields within the board. This layered shielding effect is particularly vital in high-density designs where trace proximity could otherwise induce coupling.
Thermal management principles also dictate stackup choices, as inner power planes spread heat effectively through their large copper areas. Vias connecting these planes to surface components enhance heat dissipation, reducing hotspots. According to IPC-2221 guidelines, layer sequencing should prioritize these electrical and thermal pathways while respecting via aspect ratios for reliable plating. Balancing these elements ensures the stackup supports both DC power integrity and AC signal performance.
Crosstalk minimization follows from proper plane splitting and stitching. Split planes require careful via placement to avoid fields bridging gaps, which could radiate EMI. Engineers model these interactions early using field solvers to predict behaviors before committing to fabrication.
Best Practices for Optimizing 8-Layer PCB Stackup
Start with a standard configuration tailored to your application's needs, such as placing signal layers adjacent to ground planes in a sequence like signal-ground-signal-power-ground-power-signal-signal. This 8-layer PCB stackup provides robust reference planes for outer and inner signals while allocating dedicated power distribution. Adjust dielectric thicknesses to target 50-ohm single-ended or 100-ohm differential impedances, ensuring consistency across layers. Collaborate with fabricators early to validate core/prepreg combinations that meet these specs without exceeding drill aspect ratios.
Incorporate multiple ground planes to enhance shielding and reduce EMI, positioning them symmetrically around the core. For mixed-signal boards, dedicate planes to analog and digital sections to prevent noise coupling. Use stitching vias along plane edges to tie grounds together, forming a Faraday cage-like enclosure. This approach aligns with performance specs in IPC-6012 for rigid boards, emphasizing qualification through controlled layer builds.
Address power integrity by interleaving power and ground planes, creating distributed capacitance that bypasses high-frequency noise. Split power planes judiciously for different voltage rails, maintaining at least 0.010-inch gaps to avoid shorting during lamination. Thermal vias under power-hungry components should connect to inner planes, with arrays spaced for optimal spreading. Simulate PDN impedance to confirm low peaks at operating frequencies.
For high-speed designs, prioritize stripline over microstrip for inner layers to shield signals from external interference. Outer layers can use microstrip if routing density demands it, but pair with nearby ground pours. Mechanical optimization involves matching total thickness to assembly processes, typically 1.6 mm for standard boards, with symmetric buildup from the center. Final validation includes stackup diagrams with exact material callouts for fabricator review.
Common Challenges in 8-Layer PCB Stackup and Troubleshooting Strategies
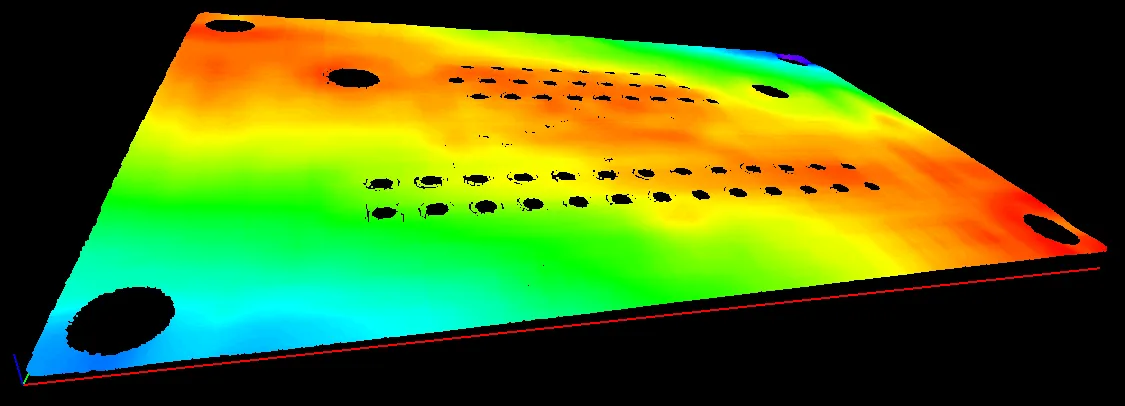
One frequent challenge is warpage due to asymmetric copper distribution or mismatched materials. Symmetric stackups mitigate this by mirroring layers above and below the neutral axis. If warpage persists, review CTE values of cores and prepregs, opting for low-warpage variants. Test panels during prototyping confirm flatness within tolerances.
Impedance variations arise from inconsistent dielectric constants or thicknesses. Calibrate models with TDR measurements on coupons to fine-tune the pcb stack up. Fabricator feedback on pressed thicknesses helps iterate designs accurately.
EMI escapes often stem from inadequate plane coverage or via fences. Audit splits and add guard traces where needed. Pre-layout EMI simulations guide adjustments before routing.
Power plane resonance challenges high-frequency PDNs. Decoupling caps between planes and ferrite beads suppress peaks. J-STD-020 guidelines for reflow sensitivity ensure materials withstand thermal cycling without delamination.
Conclusion
Optimizing an 8-layer PCB stackup demands a holistic approach integrating signal integrity, power distribution, thermal control, and mechanical reliability. By adhering to principles like adjacent reference planes, symmetric builds, and precise dielectric control, electric engineers can achieve superior performance in demanding applications. Practical steps, from standard configurations to simulation-driven tweaks, minimize risks and enhance manufacturability. Implementing these strategies ensures your pcb layer stackup not only meets specs but exceeds expectations for long-term reliability.
FAQs
Q1: What is the most common 8-layer PCB stackup for high-speed designs?
A1: A typical 8 layer pcb design stackup features signal layers paired with ground planes, such as L1 signal, L2 ground, L3 signal, L4 power, L5 ground, L6 power, L7 signal, L8 signal. This arrangement provides shielding and return paths essential for signal integrity. Ground planes on layers 2 and 5 reduce crosstalk, while power planes handle distribution. Always verify with fabricator for material compatibility.
Q2: How does pcb stack up affect signal integrity in 8-layer boards?
A2: Pcb layer stackup determines impedance control and return paths, critical for minimizing reflections and crosstalk. Adjacent planes create striplines with stable characteristic impedances. Poor pairing leads to increased insertion loss at high frequencies. Optimize by modeling trace widths and dielectric thicknesses early in the design process.
Q3: Why prioritize symmetry in 8-layer PCB stackup optimization?
A3: Symmetry in 8-layer PCB stackup prevents warpage from thermal stresses during lamination and reflow. Balanced copper distribution maintains flatness, aiding assembly yields. Asymmetric builds risk bowing, impacting connector mating and reliability. Center the stackup around a thick core for best results.
Q4: What role do power planes play in 8-layer PCB stackup performance?
A4: Power planes in pcb stack up provide low-impedance paths and decoupling capacitance with adjacent grounds. They reduce voltage droop and noise for high-current loads. Interleaving with grounds enhances PDN effectiveness. Careful splitting avoids resonances.
References
IPC-2221 — Generic Standard on Printed Board Design. IPC
IPC-6012E — Qualification and Performance Specification for Rigid Printed Boards. IPC, 2017
J-STD-020E — Moisture/Reflow Sensitivity Classification. JEDEC, 2014





