 ALLPCB


Introduction
For electronic hobbyists tackling through-hole component assembly on prototypes or small batches, benchtop wave soldering machines offer a step up from hand soldering. These compact devices automate the soldering process, delivering consistent results without the fatigue of manual work. They fit easily on a workbench, making them ideal for garages, home labs, or startup spaces where space and budget matter. Hobbyists often deal with mixed assemblies, and these machines handle that efficiently. Understanding their role can save time and improve joint quality in personal projects.
What Is a Benchtop Wave Soldering Machine and Why It Matters for Hobbyists
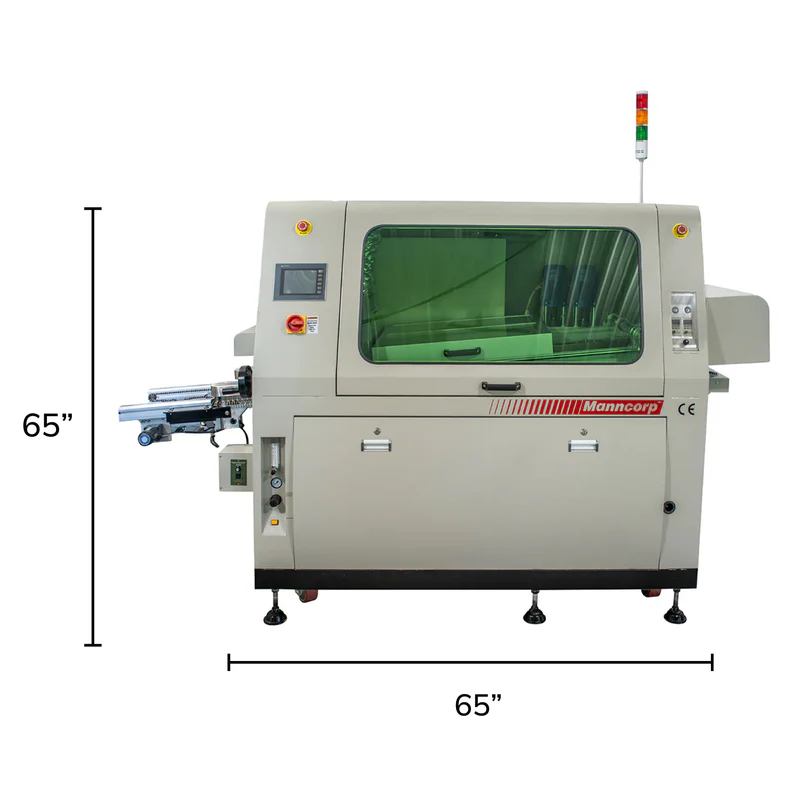
A benchtop wave soldering machine is a tabletop-sized system designed for soldering through-hole components onto printed circuit boards in low-volume production. It replicates the core process of larger industrial wave solderers but in a footprint suitable for limited spaces, typically processing boards up to 300mm wide. The machine includes a flux applicator, preheat zone, and solder pot that generates a laminar wave for components to pass over. For hobbyists, this matters because hand soldering dozens of pins becomes tedious and inconsistent, especially on multi-layer boards. These machines speed up assembly while promoting uniform solder joints, reducing defects like bridges or cold joints. They bridge the gap between prototyping and small-scale manufacturing, empowering makers to produce reliable boards without outsourcing.
In hobbyist circles, reliability is key for iterative designs. Wave soldering ensures better hole fill compared to selective soldering pots for larger boards. Discussions among users highlight their value for batches of 10 to 100 boards, where time savings outweigh setup efforts.
Technical Principles of Benchtop Wave Soldering
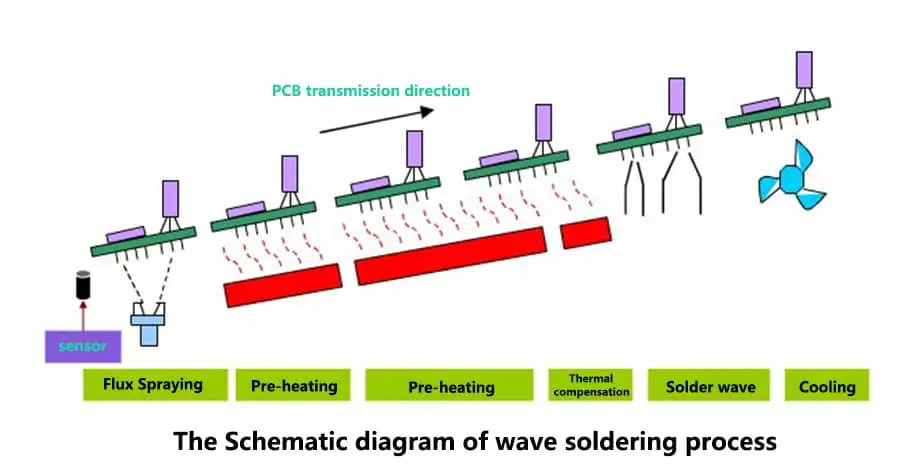
The process starts with flux application, where a spray or foam deposits activator on the board's underside to clean oxides and promote wetting. Next, a preheat zone gently raises the board temperature, typically around 100 to 150 degrees Celsius, to prevent thermal shock and activate the flux. The board then contacts the solder wave, a smooth flow of molten solder at 250 to 260 degrees Celsius for lead-free alloys, which fills vias and wets leads as capillary action draws it upward. A second turbulent wave may follow to clean excess solder. Finally, the board cools naturally or with forced air. This sequence minimizes dross formation and ensures compliance with soldering standards like J-STD-001, which outlines requirements for soldered electrical assemblies.
Gravity and surface tension play crucial roles in the mechanics. As the board tilts slightly over the wave, solder rises into holes without bridging nearby pads if the conveyor speed and angle are optimized. Hobbyists appreciate the simplicity, as parameters like wave height and flux density can be adjusted manually. Proper alignment prevents skewing, a common issue in compact setups.
Factors to Consider When Buying: Price, Reviews, and Features
When evaluating a benchtop wave soldering machine price, hobbyists should weigh board width capacity, solder pot volume, and lead-free compatibility against budget. Entry-level models suit basic through-hole work, while advanced ones add dual waves or auto-conveyors for mixed tech. Prices vary widely based on these features, power rating, and build quality, often starting from economical options for prototypes. User reviews emphasize reliability over flash; consistent temperature control and ease of cleaning score high, while frequent dross buildup draws criticism. Look for machines with stable pumps to maintain laminar flow, as erratic waves lead to defects.
In benchtop wave soldering machine reviews, practical users praise time savings for 50-board runs but note ventilation needs due to flux fumes. Energy efficiency and footprint also factor in, especially for home use. Prioritize stainless steel pots for durability and quick nozzle changes if experimenting with pallet fixturing.
Benchtop Wave Soldering Machine Setup Guide
Setting up a benchtop wave soldering machine requires a stable, level surface to avoid wave turbulence. Place it in a well-ventilated area, ideally with exhaust for flux vapors, and ensure access to 220V power. Level the unit using adjustable feet and a bubble level, then fill the solder pot to the marked line with clean alloy, heating gradually over 1 to 2 hours. Calibrate the fluxer spray pattern on scrap board and set preheat to match your PCB thickness per J-STD-001 guidelines. Test-run with an empty pallet to verify conveyor speed and wave contact.
Prime the system by running flux and solder cycles until stable. Adjust tilt angle for optimal hole fill, starting at 5 to 7 degrees. Load boards bottom-side up, securing with pallets if needed for double-sided assemblies. Monitor the first few runs for bridging, tweaking speed downward if necessary.
Best Practices for Operation and Maintenance
Daily checks include inspecting flux nozzles for clogs and wiping dross from the wave edges with a moistened rag while hot. Preheat the machine fully before use to stabilize temperatures, avoiding flux splatter. Use pallets for irregular boards to protect top-side components and ensure even exposure. After sessions, drain excess flux and clean filters to prevent buildup.
For benchtop wave soldering machine maintenance, weekly routines involve disassembling the pump for residue removal and checking conveyor belts for wear. Monthly, empty and skim the solder pot, replacing oxidized alloy. Follow IPC-A-610 criteria to inspect joints for acceptability, focusing on fillet shape and wetting. Proper upkeep extends life and maintains joint integrity.
Common troubleshooting covers solder balls from excessive flux, fixed by reducing spray volume, or incomplete fills from fast conveyors, solved by slowing to 1-2 meters per minute. Uneven preheating warps thin boards, so use fixtures.
Conclusion
Benchtop wave soldering machines empower electronic hobbyists with professional-grade through-hole assembly in compact form. From setup to maintenance, they demand attention to details like leveling and cleaning for optimal results. Weighing price, features from reviews ensures a fit for small-scale needs. Standards like J-STD-001 and IPC-A-610 guide quality, making hobby projects production-ready. Invest time in practice for defect-free boards and efficient workflows.
FAQs
Q1: What factors influence benchtop wave soldering machine price?
A1: Benchtop wave soldering machine price depends on board processing width, solder pot capacity, preheat length, and extras like auto-conveyors or lead-free pumps. Hobbyists find value in models handling 250-350mm boards with basic fluxing. Durability features like stainless components add cost but reduce long-term upkeep. Reviews suggest balancing upfront spend with reliability for low-volume use. Always check power needs for your space.
Q2: How do benchtop wave soldering machine reviews compare hand soldering?
A2: Benchtop wave soldering machine reviews often favor them for batches over 20 boards, citing faster cycles and uniform joints versus hand work. Users note less bridging with proper flux but highlight cleaning time as a drawback. For hobbyists, they excel in consistency on dense pin headers. Ventilation setup is key, per common feedback. Overall, they suit prototyping escalation.
Q3: What is involved in benchtop wave soldering machine setup?
A3: Benchtop wave soldering machine setup starts with a level bench and ventilation hookup. Fill and heat the solder pot slowly, calibrate flux spray, and test conveyor speed. Preheat fully before trials, adjusting tilt for your boards. Use pallets for protection. Follow J-STD-001 for parameter baselines to avoid defects from the start.
Q4: How to perform benchtop wave soldering machine maintenance?
A4: Benchtop wave soldering machine maintenance includes daily dross skimming and flux filter wipes. Weekly, clean pumps and nozzles with approved solvents. Monthly pot drains prevent oxidation. Inspect per IPC-A-610 for process drift. Good habits minimize downtime and ensure reliable joints for hobbyist runs.
References
J-STD-001G — Requirements for Soldered Electrical and Electronic Assemblies. IPC, 2017
IPC-A-610H — Acceptability of Electronic Assemblies. IPC, 2019


