 ALLPCB


Introduction
Cleaning rigid printed circuit boards after assembly stands as a critical step in ensuring long-term reliability and performance. During surface mount technology and through-hole soldering processes, flux residues accumulate on board surfaces, under components, and within tight spaces. These residues, if left unaddressed, can lead to issues such as electrochemical migration, corrosion, and reduced insulation resistance. Electrical engineers often face challenges in selecting the right PCB cleaning methods to balance thoroughness with component safety. This guide explores practical approaches to removing solder flux residues, evaluates cleaning agents for PCBs, and details ultrasonic cleaning for PCBs while emphasizing preventing corrosion after PCB assembly. By following established practices, engineers can minimize defects and extend assembly lifespan.

Why Cleaning After Assembly Matters
Flux serves an essential role in soldering by removing oxides and promoting wetting, but its residues pose significant risks post-assembly. Activated fluxes leave behind ionic contaminants that, in humid environments, facilitate corrosion and dendritic growth between conductors. Even no-clean fluxes, designed for minimal intervention, may require cleaning in high-reliability applications like aerospace or medical devices. Poor cleanliness contributes to field failures, including intermittent shorts and signal degradation. Preventing corrosion after PCB assembly demands proactive residue removal to maintain surface insulation resistance levels. Engineers must assess assembly class per standards like IPC J-STD-001 to determine cleaning necessity.
Residues vary by flux type: rosin mildly activated, water-soluble highly aggressive, and low-solids no-clean benign yet potentially hygroscopic. Visual inspection alone misses microscopic contaminants, underscoring the need for systematic cleaning. In high-density assemblies, trapped residues under low-clearance components exacerbate risks. Thorough cleaning enhances conformal coating adhesion and supports compliance with reliability testing. Ultimately, investing time in post-assembly cleaning prevents costly rework and ensures operational integrity.
Common Contaminants and Their Effects
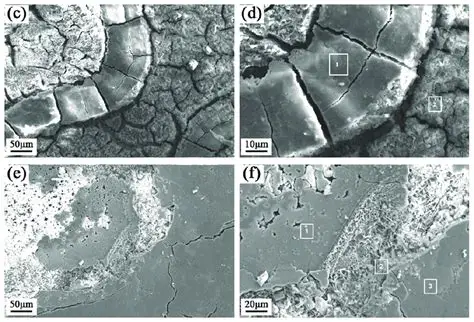
Solder flux residues dominate post-assembly contaminants, comprising activators, rosins, and solvents that polymerize during reflow. These form sticky films or crystalline deposits, attracting dust and moisture. Handling introduces fingerprints, oils, and particulates, compounding issues. Under components like BGAs or QFNs, residues promote electromigration, leading to opens or shorts over time. Corrosion manifests as green patina on copper or pitting on soldermask, accelerated by ionic residues in biased humidity tests.
Other contaminants include solder balls, excess paste, and machining debris from fabrication. These not only affect electrical performance but also mechanical integrity during vibration or thermal cycling. Engineers troubleshooting failures often trace issues to unclean assemblies via ionic chromatography or surface resistivity probes. Understanding residue chemistry guides effective PCB cleaning methods selection. Proactive management here directly impacts yield and mean time between failures.
PCB Cleaning Methods Overview
Several PCB cleaning methods suit rigid board post-assembly needs, categorized by process type and scale. Manual cleaning involves solvents applied via swabs or brushes for prototypes or spot rework. Immersion methods submerge boards in agitated baths, ideal for batch processing. Spray systems deliver pressurized solutions for uniform coverage, penetrating tight gaps effectively. Ultrasonic cleaning for PCBs leverages cavitation for superior residue dislodging without mechanical abrasion. Each method's efficacy depends on residue tenacity and component sensitivity.
Vapor degreasing uses solvent vapors to condense and dissolve contaminants, followed by drying. Inline conveyorized systems integrate cleaning into production lines for high volume. Selection hinges on flux type: water-soluble demands rinsing, while no-clean tolerates milder approaches. Engineers prioritize methods minimizing handling to avoid electrostatic discharge. Combining methods, like ultrasonic followed by spray rinse, optimizes results. Always validate process via cleanliness testing per industry guidelines.
Cleaning Agents for PCBs: Selection and Application
Cleaning agents for PCBs fall into solvent-based, water-based, and semi-aqueous categories, each targeting specific residue profiles. Solvent agents like alcohols dissolve organic fluxes rapidly but require ventilation due to flammability. Water-based cleaners employ detergents and deionized water for eco-friendly removal of water-soluble fluxes, necessitating thorough rinsing to prevent mineral deposits. Semi-aqueous blends combine solvents with water for balanced performance on mixed residues.
Agent compatibility with materials matters: aggressive alkalis etch soldermask or aluminum. pH-neutral formulations suit sensitive assemblies. Pre-mixed solutions ensure consistency, while dilution controls strength. Application involves immersion, spraying, or wiping, with dwell times allowing penetration. Post-clean rinsing with deionized water removes agent traces, critical for preventing corrosion after PCB assembly. Drying via forced air or baking completes the cycle, ensuring no moisture traps.
Engineers test agent efficacy on coupons mimicking production residues. Residue analysis via rosin flux tests or ion chromatography confirms acceptability. Overly aggressive agents risk component delamination, so start conservative.
Ultrasonic Cleaning for PCBs: Principles and Best Practices
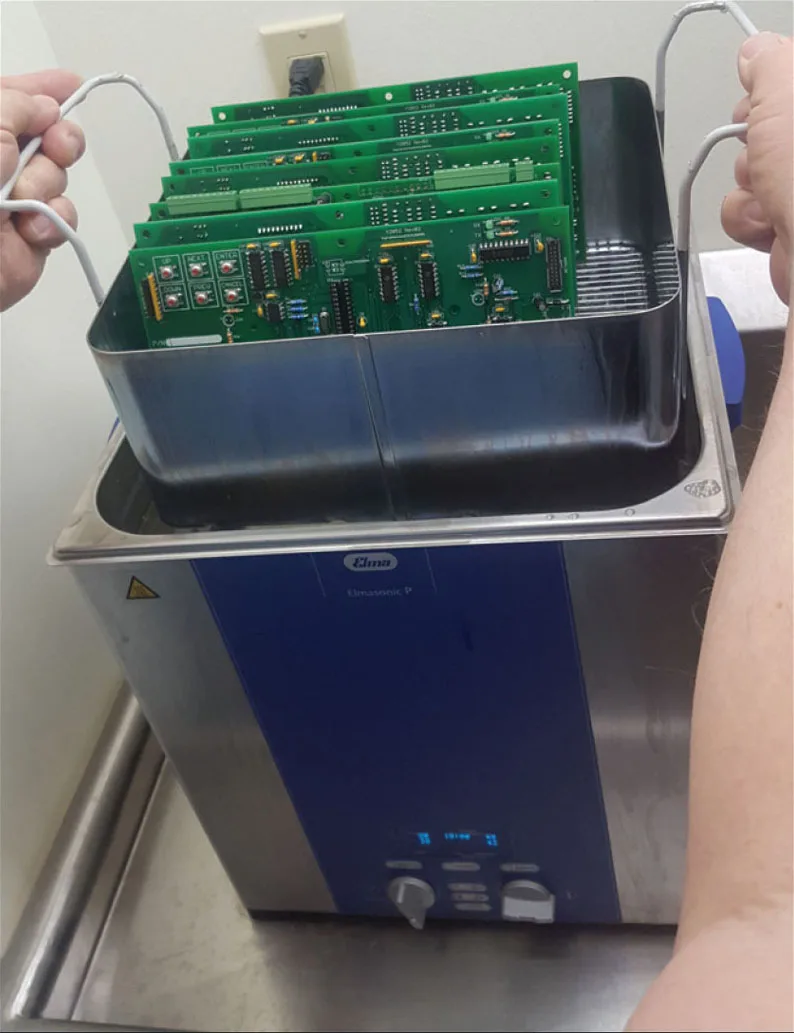
Ultrasonic cleaning for PCBs generates high-frequency sound waves in a liquid medium, creating cavitation bubbles that implode to scrub surfaces. This method excels at removing solder flux residues from under components and in vias, where manual access proves challenging. Frequencies around 25-40 kHz balance cleaning power with delicacy, avoiding damage to fine-pitch leads. Solution heaters maintain optimal temperatures, enhancing solubility without boiling.
Best practices include discharging capacitors, securing loose parts, and limiting cycle times to prevent fatigue. Use dedicated electronics cleaners to inhibit corrosion. Rack boards vertically for drainage, and follow with cascade rinsing. Ultrasonic agitation penetrates shields standoff heights, addressing IPC J-STD-001 cleanliness for high-reliability classes. Monitor cavitation uniformity via foil tests.
Potential pitfalls involve overexposure stressing crystals or MEMS, so profile processes per assembly. For rigid boards, this method boosts throughput while upholding quality. Validation through surface insulation resistance confirms efficacy.
Removing Solder Flux Residues: Step-by-Step Guidance
Effective removing solder flux residues begins with flux selection aligned to cleaning capability. Post-reflow, inspect visually for heavy buildup, prioritizing no-clean or rosin fluxes. Pre-clean with vapor or spray to loosen gross residues. Immerse in chosen agent, agitating via ultrasonics or air sparging for 3-10 minutes based on trials.
Scrub inaccessible areas with soft nylon brushes, avoiding metal that scratches. Rinse copiously with deionized water or fresh solvent to displace solubilized contaminants. Dry immediately using low-pressure air, lint-free wipes, or convection ovens at moderate temperatures. Inspect under magnification and black light for remnants. Test ionic cleanliness if required by J-STD-001.
Troubleshooting stubborn residues involves agent reformulation or extended cycles, always verifying material compatibility. Document parameters for repeatability. This regimen ensures residues below thresholds, preventing corrosion after PCB assembly.
Standards and Quality Assurance in PCB Cleaning
Industry standards like IPC-A-610 outline visual acceptability criteria, flagging residues causing bridging or corrosion potentials. IPC J-STD-001 mandates cleanliness documentation, including process identifiers and testing for critical applications. These guide engineers in verifying assemblies meet class-specific thresholds.
Residue testing employs resistivity of solvent extract (ROSE), ion chromatography, or surface insulation resistance under bias. Acceptable levels vary by class: Class 3 demands rigorous verification. Cleaning process controls include agent qualification and equipment maintenance. Audits ensure compliance, mitigating liability.
Troubleshooting Common Cleaning Challenges
Persistent residues signal incompatible agents or insufficient dwell. Whitish haze post-water cleaning indicates rinsing shortfalls; extend cascades. Component damage from ultrasonics prompts frequency adjustments or shorter bursts. Corrosion spots post-dry trace to trapped moisture; enhance evacuation.
Flux bleed under heat challenges no-clean types; preheat gently before cleaning. High-volume lines suffer drag-out; install recovery systems. Log failures to refine processes iteratively.
Conclusion
Mastering post-assembly cleaning safeguards rigid board reliability against flux-induced failures. Selecting PCB cleaning methods, agents, and ultrasonics tailored to residues optimizes outcomes. Prioritizing preventing corrosion after PCB assembly through thorough processes and standards adherence yields robust electronics. Engineers benefit from methodical validation, ensuring assemblies withstand environmental stresses. Implement these practices to elevate quality and reduce field issues.
FAQs
Q1: What are the most effective PCB cleaning methods for removing solder flux residues?
A1: Manual wiping with solvents suits prototypes, while ultrasonic cleaning for PCBs handles complex assemblies best. Spray or immersion follows for rinsing. Tailor to flux type per IPC J-STD-001 guidelines, ensuring complete drying to avoid recontamination. Test cleanliness post-process for verification.
Q2: Which cleaning agents for PCBs are suitable after soldering rigid boards?
A2: Isopropyl alcohol dissolves no-clean fluxes quickly, water-based detergents tackle water-soluble types. Semi-aqueous options balance both. Verify compatibility to prevent soldermask degradation. Rinse with deionized water and dry thoroughly, aligning with preventing corrosion after PCB assembly practices.
Q3: Is ultrasonic cleaning for PCBs safe for all components during flux removal?
A3: It safely removes residues via cavitation but avoid sealed relays or charged capacitors. Limit cycles to short durations at proper frequencies. Rack securely and rinse afterward. Follow troubleshooting to prevent stress, ensuring compliance with assembly standards.
Q4: How can engineers prevent corrosion after PCB assembly through cleaning?
A4: Remove all flux residues promptly using validated PCB cleaning methods. Dry completely to eliminate moisture traps. Ionic testing confirms low contaminants. Apply protective coatings if specified. Consistent processes per industry standards minimize risks effectively.
References
IPC J-STD-001H — Requirements for Soldered Electrical and Electronic Assemblies. IPC, 2018
IPC-CH-65B — Guidelines for Cleaning of Printed Boards and Assemblies. IPC, 2011
IPC-A-610H — Acceptability of Electronic Assemblies. IPC, 2019


