 ALLPCB


Are you passionate about retro gaming and eager to build your own portable gaming device from scratch? Designing a custom PCB (Printed Circuit Board) for a homebrew gaming console is an exciting and rewarding project. In this comprehensive guide, we’ll walk you through every step of creating a retro portable gaming device PCB, from concept to prototype. Whether you're exploring DIY PCB design software for gaming, mastering soldering techniques for gaming PCBs, or diving into PCB prototyping for retro gaming, this post covers it all with practical tips and detailed insights.
Why Build a Homebrew Gaming Console PCB?
Creating a homebrew gaming console PCB allows you to customize every aspect of your retro portable gaming device. You can choose the components, layout, and features that match your vision, whether it's mimicking classic 8-bit systems or integrating modern microcontrollers for enhanced performance. Plus, designing your own PCB gives you full control over size, power efficiency, and compatibility with retro game emulators. This guide will help you navigate the process of crafting a custom PCB layout for a gaming console, ensuring a functional and nostalgic end product.
Step 1: Planning Your Retro Gaming Device Concept
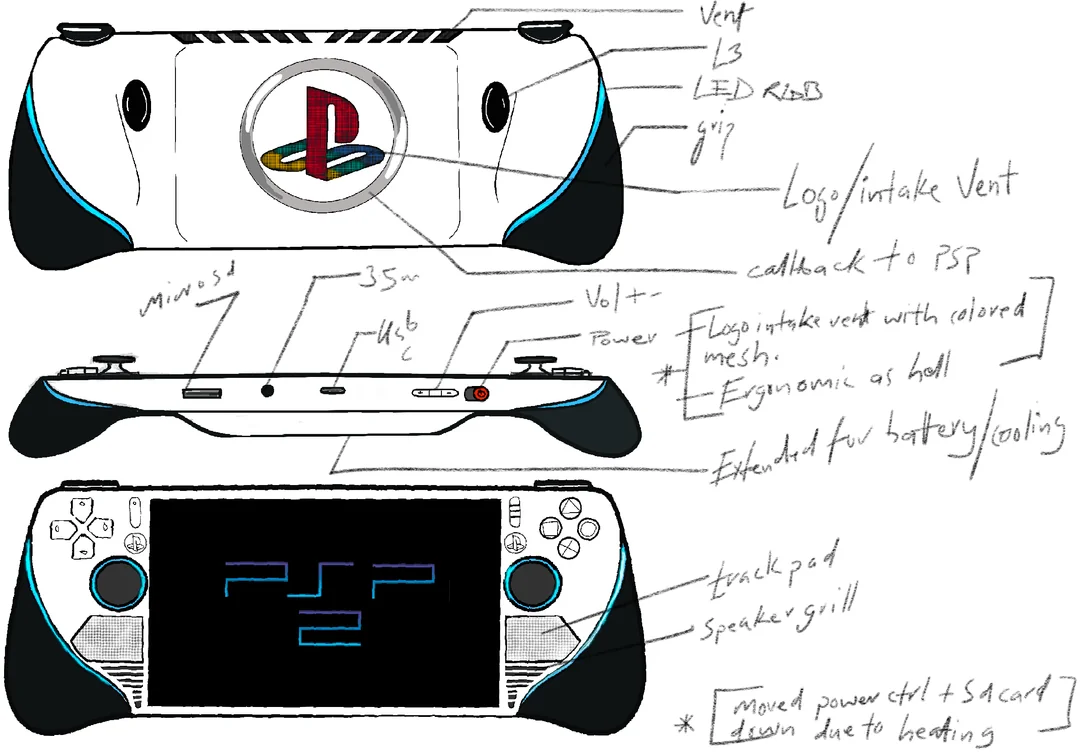
Before diving into PCB design, define the purpose and specifications of your retro portable gaming device. Consider the following:
- Target Games and Emulation: Will your device emulate classic 8-bit or 16-bit games? This determines the processing power needed, such as using a microcontroller with a clock speed of at least 80 MHz for smooth emulation of older systems.
- Portability: Aim for a compact design with a small footprint, ideally under 100mm x 60mm for the PCB, to fit comfortably in a handheld case.
- Power Source: Plan for a rechargeable battery, like a 3.7V Li-Po with at least 1000mAh capacity, to ensure hours of gameplay.
- Inputs and Outputs: Include buttons, a small LCD screen (e.g., 2.8 inches with 320x240 resolution), and audio output for an authentic retro feel.
Once you’ve outlined these specs, you’re ready to move into the design phase of your homebrew gaming console PCB.
Step 2: Choosing DIY PCB Design Software for Gaming Projects
Selecting the right DIY PCB design software for gaming projects is crucial for creating a functional and efficient layout. Look for tools that offer user-friendly interfaces, extensive component libraries, and support for multilayer designs. Popular free or open-source options often include features like schematic capture and autorouting, which are essential for beginners tackling custom PCB layouts for gaming consoles.
Here’s what to focus on when choosing software:
- Ease of Use: Opt for software with tutorials and community support to help with complex designs.
- Component Libraries: Ensure the software has libraries for microcontrollers, resistors, capacitors, and connectors commonly used in gaming devices.
- Export Options: Check if the tool can export Gerber files, which are standard for PCB manufacturing.
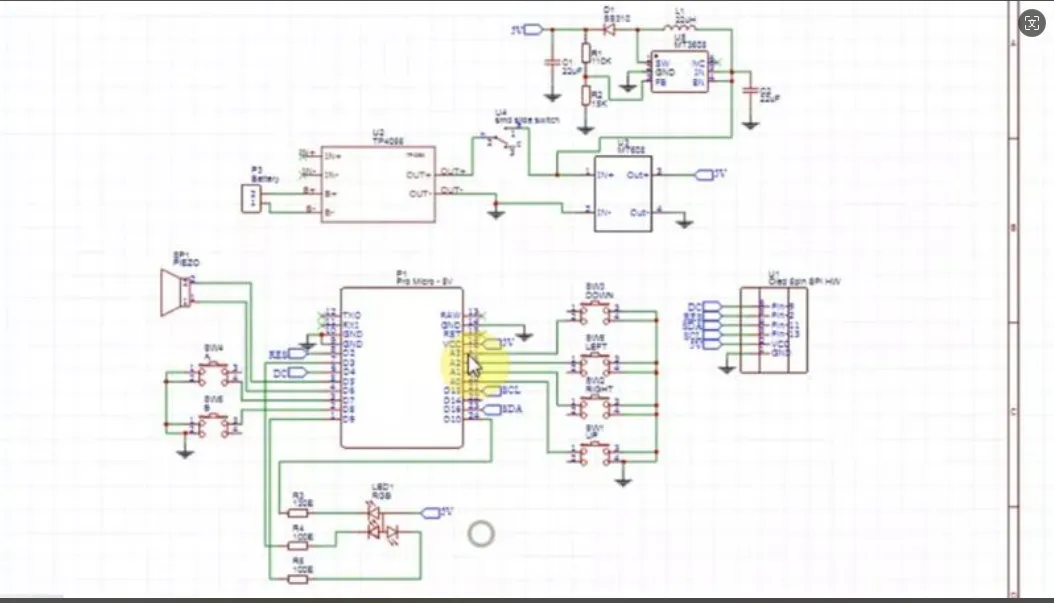
Start by drawing a schematic that maps out your circuit, including the microcontroller (e.g., one with at least 256KB of flash memory for game storage), display drivers, and power management circuits. Then, transition to the PCB layout editor to arrange components and route traces, ensuring minimal signal interference by keeping high-speed traces (like those for SPI communication at 10 MHz) short and direct.
Step 3: Designing a Custom PCB Layout for a Gaming Console
Creating a custom PCB layout for a gaming console requires careful planning to balance functionality, size, and manufacturability. Follow these steps to ensure a successful design:
3.1 Component Placement
Place critical components like the microcontroller and display connector first. Group related components, such as power management ICs and capacitors (e.g., a 10uF decoupling capacitor near the microcontroller), to reduce noise. Keep heat-generating components away from sensitive areas to prevent thermal issues.
3.2 Trace Routing
Route power and ground traces first, using wide traces (e.g., 0.5mm or thicker) to handle currents up to 1A for battery-powered devices. For signal traces, maintain consistent impedance—aim for 50 ohms for high-speed lines like USB or display data—to avoid signal degradation. Use vias sparingly to minimize manufacturing costs.
3.3 Ground Planes
Incorporate a solid ground plane on one layer to reduce electromagnetic interference (EMI), which is critical for stable gameplay performance. Split the ground plane if analog and digital signals are present to prevent cross-talk.
3.4 Design Rule Check (DRC)
Run a DRC in your software to catch errors like trace spacing violations (maintain at least 0.2mm clearance for standard manufacturing) or unconnected pins. This step ensures your design is ready for prototyping.
Step 4: PCB Prototyping for Retro Gaming Devices
Once your design is complete, it’s time to move into PCB prototyping for retro gaming. Prototyping allows you to test your design in real-world conditions before full-scale production. Here’s how to proceed:
4.1 Exporting Gerber Files
Export your design as Gerber files, which include layers for copper, solder mask, and silkscreen. Double-check that all layers align correctly to avoid manufacturing errors.
4.2 Choosing a Manufacturing Service
Select a reliable PCB manufacturing service that offers quick turnaround times and supports small-batch orders for prototypes. Look for services that provide detailed feedback on design files to catch potential issues early.
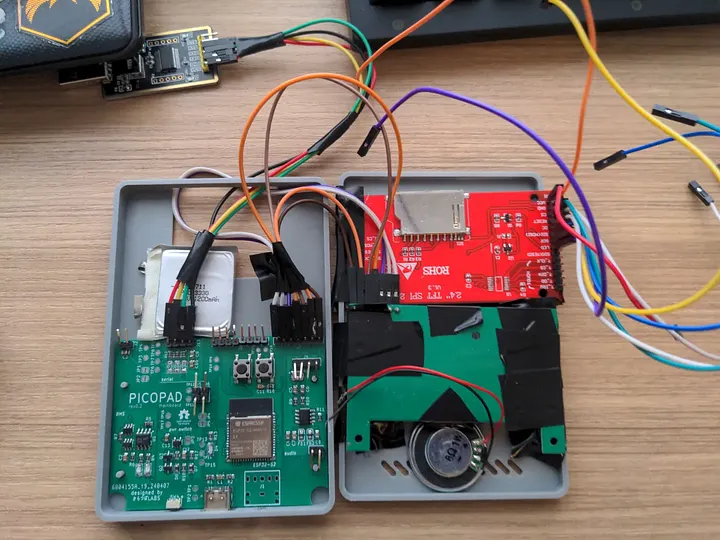
4.3 Reviewing the Prototype
After receiving your prototype, inspect it for manufacturing defects like misaligned vias or incomplete solder masks. Use a multimeter to test continuity and ensure all traces connect as intended.
Prototyping often reveals design flaws, such as insufficient power delivery (e.g., voltage drops below 3.3V under load), so be prepared to iterate. Each revision brings you closer to a polished homebrew gaming console PCB.
Step 5: Soldering Techniques for Gaming PCBs
Soldering is a critical skill when assembling your retro gaming PCB. Proper soldering techniques for gaming PCBs ensure reliable connections and prevent damage to sensitive components. Follow these tips for success:
5.1 Tools and Materials
Use a soldering iron with adjustable temperature (set to 300°C for most components), fine-tip solder (0.032-inch diameter), and flux to improve solder flow. Keep a desoldering braid handy for corrections.
5.2 Soldering Small Components
Start with surface-mount components like resistors and capacitors. Apply a small amount of solder to one pad, place the component, and reflow the solder to secure it. Then, solder the opposite pad. For ICs with fine pitches (e.g., 0.5mm), use a drag soldering technique with flux to avoid bridges.
5.3 Through-Hole Components
For buttons or connectors, insert the leads through the holes, apply solder to the pad, and ensure the joint forms a shiny, concave shape. Avoid cold joints by heating both the pad and lead simultaneously for 2-3 seconds.
5.4 Inspection and Testing
After soldering, inspect joints under magnification for cracks or excess solder. Test the board by powering it up gradually (e.g., start at 3.3V and monitor current draw, which should not exceed 500mA for a small gaming device) to catch shorts or faults.
Step 6: Assembling and Testing Your Retro Portable Gaming Device
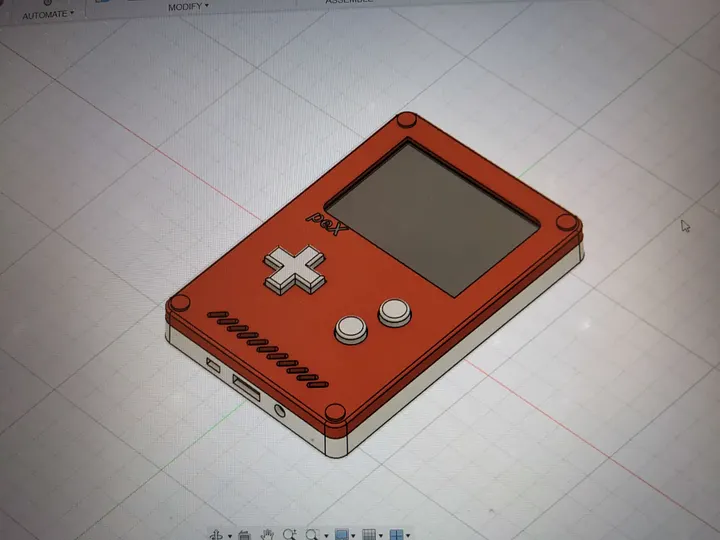
With the PCB soldered, assemble your retro portable gaming device by connecting the display, buttons, and battery. Secure everything in a custom enclosure, ensuring proper alignment for button presses and screen visibility.
Test the device by loading retro game ROMs or emulators. Check for:
- Power Stability: Verify the voltage remains steady at 3.3V or 5V under load.
- Input Response: Ensure buttons register inputs without delay (response time should be under 10ms for a smooth experience).
- Display and Audio: Confirm the screen refreshes at least at 30 FPS and audio plays without distortion.
If issues arise, such as flickering displays due to poor grounding, revisit your PCB layout or soldering to address them.
Step 7: Iterating and Improving Your Design
Rarely does a first prototype work perfectly. Use testing feedback to refine your design. Common improvements include:
- Reducing power consumption by optimizing trace widths or switching to low-power components (e.g., a microcontroller with sleep mode drawing under 1mA).
- Enhancing signal integrity by shortening high-speed traces or adding shielding.
- Adjusting component placement for better heat dissipation or user ergonomics.
Each iteration of PCB prototyping for retro gaming brings you closer to a final product that’s both functional and nostalgic.
Tips for Success in DIY Retro Gaming PCB Design
Here are some additional pointers to ensure your project thrives:
- Start Small: Begin with a basic design focusing on core functionality before adding complex features like Wi-Fi or advanced graphics.
- Document Everything: Keep notes on design choices, soldering challenges, and test results to streamline future revisions.
- Join Communities: Engage with online forums or local maker groups focused on retro gaming and PCB design for advice and inspiration.
Conclusion: Bringing Retro Gaming to Life with Custom PCBs
Designing your own retro portable gaming device PCB is a fulfilling journey that blends creativity, technical skill, and a love for classic games. By following this guide, you’ve learned how to plan a homebrew gaming console PCB, use DIY PCB design software for gaming, apply soldering techniques for gaming PCBs, and iterate through PCB prototyping for retro gaming. With a well-thought-out custom PCB layout for a gaming console, you’re on your way to creating a unique device that revives the magic of retro gaming in a portable form.
Take the first step today by sketching your concept and exploring design tools. With patience and practice, your vision of a handheld retro gaming masterpiece will become a reality, powered by a PCB you crafted yourself.


