 ALLPCB


If you're an electronic hobbyist looking to master surface mount soldering for beginners, you're in the right place. Soldering surface mount devices (SMD) can seem tricky at first, but with the right techniques and tools, it becomes a manageable and even enjoyable task. In this comprehensive guide, we'll walk you through hand soldering SMD components, soldering paste application, DIY reflow soldering, and SMD rework techniques. Whether you're building a custom circuit board or repairing a device, these easy-to-follow methods will help you achieve professional results at home.
Let’s dive into the world of SMD soldering and explore step-by-step processes, essential tools, and practical tips to ensure your projects succeed. By the end of this post, you'll have the confidence to tackle any SMD soldering task, no matter how small the components.
What Is SMD Soldering and Why Does It Matter?
SMD soldering refers to the process of attaching surface mount devices—tiny electronic components without wire leads—to a printed circuit board (PCB). Unlike traditional through-hole components, SMD parts are mounted directly onto the surface of the board, making them smaller, lighter, and ideal for compact, modern electronics like smartphones, laptops, and IoT devices.
For hobbyists, learning surface mount soldering for beginners is essential because most new designs rely on SMD components. They save space, reduce manufacturing costs, and allow for automated assembly in mass production. However, soldering these tiny parts by hand can be intimidating due to their small size—some resistors or capacitors are as small as 0.4mm x 0.2mm (0402 package). With the right approach, though, anyone can master this skill.

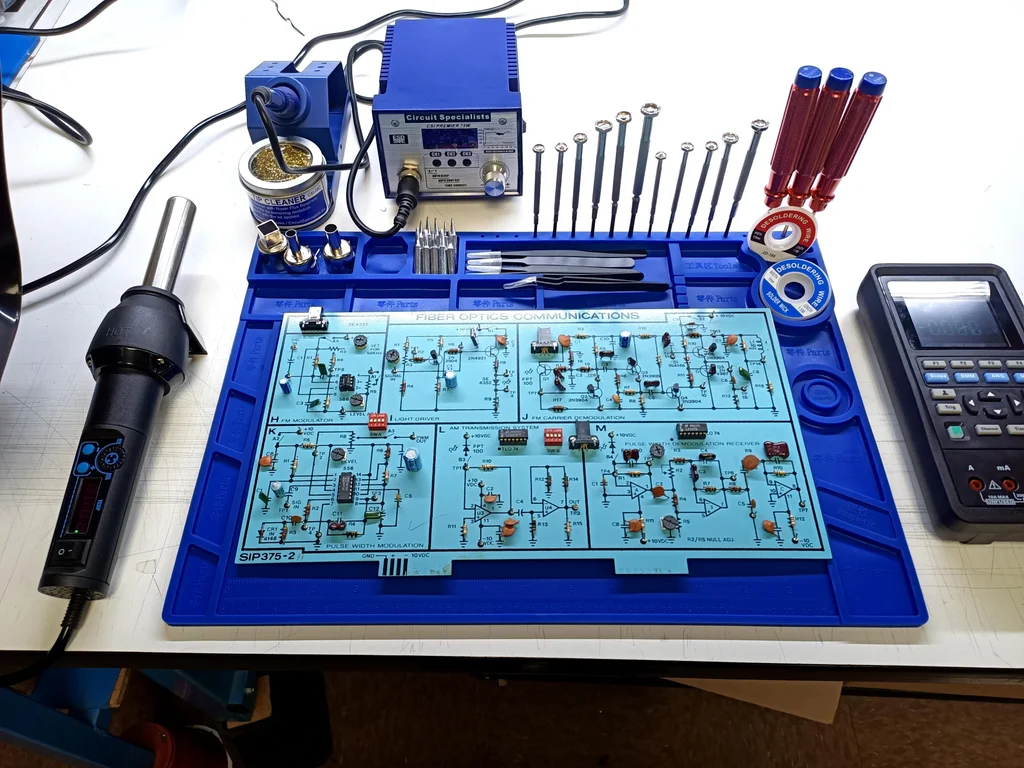
Essential Tools for Hand Soldering SMD Components
Before you start hand soldering SMD components, gather the right tools. Having the proper equipment makes the process smoother and prevents damage to delicate parts. Here’s what you’ll need:
- Soldering Iron: Use a fine-tipped soldering iron (1mm or smaller tip) with adjustable temperature control. Set it between 260°C (500°F) and 300°C (572°F) for most SMD work to avoid overheating components.
- Solder Wire: Opt for thin solder wire (0.5mm to 0.8mm diameter) with a rosin flux core for better flow and adhesion.
- Flux: Liquid or paste flux helps clean the pads and improves solder wetting, especially for tiny SMD pads.
- Tweezers: Precision tweezers are crucial for placing and positioning small components.
- Magnifying Glass or Microscope: A magnifying tool helps you see tiny pads and ensure proper alignment.
- Desoldering Wick: Useful for removing excess solder or correcting mistakes.
- Isopropyl Alcohol and Brush: Clean the board after soldering to remove flux residue.
With these tools in hand, you're ready to start soldering. Investing in quality equipment pays off by reducing frustration and improving results.
Step-by-Step Guide to Hand Soldering SMD Components
Hand soldering SMD components requires patience and precision, but it’s a skill you can develop with practice. Follow these steps for clean, reliable solder joints:
- Prepare Your Workspace: Work in a well-lit, ventilated area. Secure your PCB in a holder or vise to keep it steady.
- Clean the PCB: Use isopropyl alcohol and a brush to remove dust or residue from the board’s surface.
- Apply Flux: Dab a small amount of flux on the pads where the component will be placed. This helps the solder flow evenly.
- Tin One Pad: Heat one of the component’s pads with your soldering iron and apply a small amount of solder to create a tiny bump. This acts as an anchor for the component.
- Position the Component: Using tweezers, place the SMD component onto the pads, aligning it with the tinned pad.
- Solder the First Pad: Reheat the tinned pad and press the component’s lead into the molten solder. Hold it in place until the solder cools (2-3 seconds).
- Solder the Remaining Pads: Apply solder to the other pads, ensuring a smooth, shiny joint. Avoid excess solder to prevent bridges between pads.
- Inspect the Joints: Use a magnifying glass to check for cold solder joints (dull appearance) or bridges. Fix any issues with a desoldering wick if needed.
- Clean the Board: Wipe away flux residue with isopropyl alcohol for a professional finish.
Practice on a scrap board with larger SMD components (like 1206 or 0805 packages) before moving to smaller ones like 0402. With time, your hands will get steadier, and the process will feel natural.
Related Reading: Easy SMD Soldering Techniques for Electronic Hobbyists
Soldering Paste Application: A Game-Changer for SMD Work
When dealing with multiple components or finer pitches, soldering paste application is a powerful technique. Solder paste is a mixture of tiny solder particles and flux, applied to pads before placing components. It’s commonly used in professional assembly but can be adapted for hobbyists. Here’s how to do it:
- Choose the Right Paste: Use lead-free solder paste with a no-clean flux formula for easier cleanup. Check the expiration date, as old paste can lose effectiveness.
- Apply Paste to Pads: Use a small syringe or stencil to apply a thin, even layer of paste to each pad. Avoid overuse, as too much paste can cause solder bridges.
- Place Components: Position the SMD components onto the paste-covered pads using tweezers. The sticky paste holds them in place.
- Heat the Board: Use a hot air rework station or a reflow oven to melt the solder paste. Heat gradually to around 220°C-250°C (428°F-482°F) depending on the paste’s specifications, ensuring even melting without thermal shock to components.
- Cool and Inspect: Let the board cool naturally, then inspect the joints for proper adhesion and alignment.
Soldering paste application is ideal for batch soldering multiple components at once, saving time compared to hand soldering each pad. It’s especially useful for ICs with many pins, like QFN or TSSOP packages.

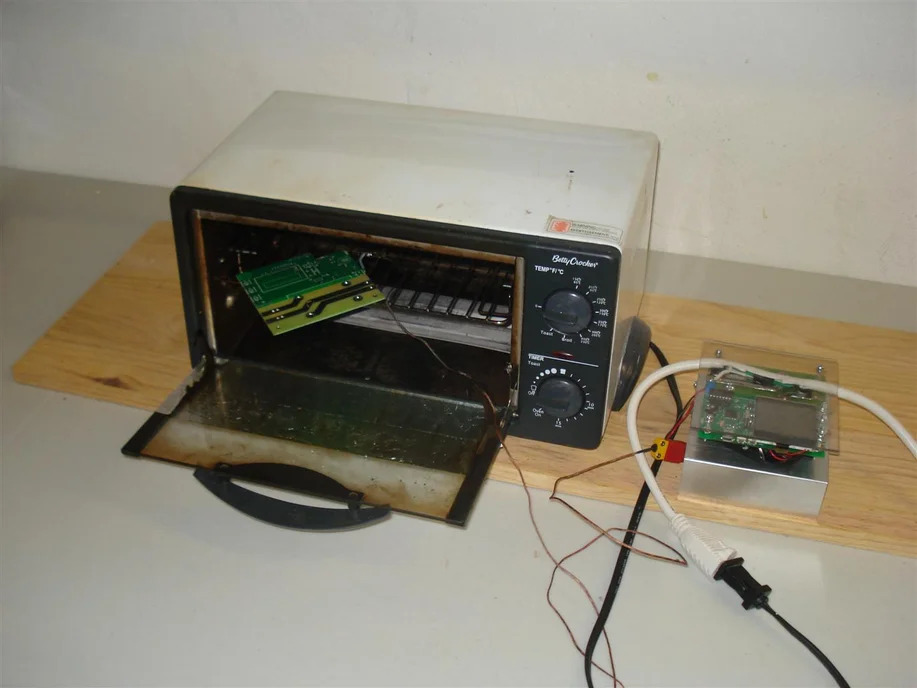
DIY Reflow Soldering: Affordable and Effective
For hobbyists without access to a professional reflow oven, DIY reflow soldering offers a budget-friendly alternative to solder multiple components at once. Reflow soldering involves heating the entire board to melt solder paste and form joints. Here’s how to do it at home:
- Gather Equipment: You’ll need solder paste, a hot plate or toaster oven, and a thermometer to monitor temperature. Avoid using ovens for food after soldering due to potential contamination.
- Apply Solder Paste: As described earlier, apply paste to the pads and place components.
- Preheat the Oven: Set your hot plate or toaster oven to a low temperature (around 150°C or 302°F) for preheating. This prevents thermal shock to components.
- Reflow Phase: Gradually increase the temperature to the reflow point (220°C-250°C or 428°F-482°F) for 1-2 minutes. Watch for the solder paste to melt into shiny joints.
- Cool Down: Turn off the heat and allow the board to cool slowly. Rapid cooling can cause cracks in solder joints.
While a professional reflow oven offers precise temperature profiles, a DIY reflow soldering setup with a toaster oven can achieve decent results for small projects. Always prioritize safety by working in a well-ventilated area and wearing protective gear.
SMD Rework Techniques: Fixing Mistakes Like a Pro
Mistakes happen, especially when you’re new to SMD soldering. Luckily, SMD rework techniques allow you to correct errors without damaging your board or components. Here are two common rework methods:
Removing SMD Components
- Apply Flux: Add flux to the component’s solder joints to help loosen the solder.
- Heat the Joints: Use a hot air rework station set to 300°C-350°C (572°F-662°F) to heat all pins simultaneously. Alternatively, for two-pin components, heat each pad with a soldering iron.
- Lift the Component: Once the solder melts, use tweezers to gently lift the component off the board.
- Clean the Pads: Use desoldering wick and isopropyl alcohol to remove old solder and flux residue.
Fixing Solder Bridges
- Identify the Bridge: Look for excess solder connecting two adjacent pads or pins.
- Apply Flux: Add flux to the bridged area to help the solder flow.
- Use Desoldering Wick: Place the wick over the bridge and heat it with your soldering iron. The wick will absorb the excess solder.
- Re-solder if Needed: If the joint looks incomplete after removing the bridge, add a small amount of fresh solder.
Mastering SMD rework techniques saves time and money by allowing you to salvage components and boards. Always work patiently to avoid lifting pads or overheating parts.
Related Reading: PCB Rework Station for Beginners: A Simple Guide to Component Replacement
Tips for Success in SMD Soldering
To wrap up, here are some practical tips to elevate your SMD soldering game:
- Start with Larger Components: Practice with bigger SMD packages (like 1206 resistors) before tackling tiny 0402 or 0201 parts.
- Maintain Your Tools: Keep your soldering iron tip clean with a wet sponge or brass wire cleaner to ensure proper heat transfer.
- Use Adequate Lighting: Good lighting prevents eye strain and helps you spot soldering issues.
- Control Heat Exposure: Limit soldering time to 2-3 seconds per joint to avoid damaging components. For sensitive parts, check datasheets for maximum temperature ratings.
- Double-Check Polarity: For components like LEDs and capacitors, ensure correct orientation before soldering to avoid reverse polarity issues.
Conclusion: Build Confidence in SMD Soldering
SMD soldering doesn’t have to be intimidating for electronic hobbyists. By following these easy techniques for surface mount soldering for beginners, mastering hand soldering SMD components, perfecting soldering paste application, experimenting with DIY reflow soldering, and learning SMD rework techniques, you can achieve professional-quality results at home. Start small, practice often, and soon you’ll be soldering tiny components with ease.
At ALLPCB, we’re passionate about supporting hobbyists and engineers in bringing their electronic projects to life. Whether you’re prototyping a new design or repairing a device, these skills will open up endless possibilities in your creative journey. Keep experimenting, and enjoy the process of building something amazing!


