ALLPCB


1. Introduction
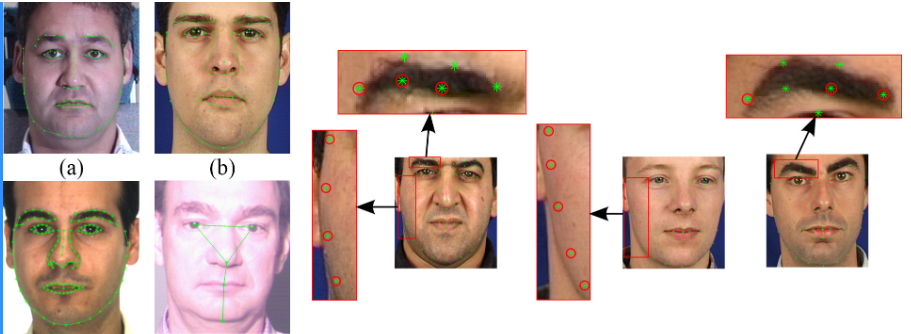
Face recognition is a biometric technique with noninvasive, contactless, and convenient properties. A typical face recognition pipeline includes face detection, face cropping, face alignment, feature extraction, and recognition. Face detection locates faces in an image and is affected by image quality, lighting, and occlusion. The diagram below shows the overall face-detection process.
2. Detection and recognition methods
Traditional approaches
(1) Face recognition based on point cloud data
(2) 3D face recognition based on facial geometry
Deep learning-based approaches
(1) Face recognition using depth maps
(2) Face recognition using RGB-3DMM
(3) Face recognition using RGB-D
3. Landmark localization overview
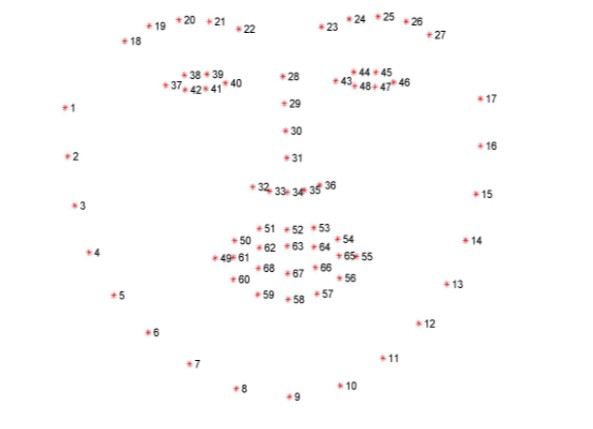
Typical landmark schemes use five points (two eyes, one nose, two mouth corners). A more detailed scheme uses 68 landmarks, which provides a more comprehensive description. This work uses 68-point landmark localization.
The ordering of the 68 landmarks must be consistent: points 1 through 68 must follow the specified sequence.
4. Project analysis
This project uses the dlib machine learning framework to locate the 68 facial landmarks. Required packages include dlib and OpenCV. The dlib pretrained shape predictor file (shape_predictor_68_face_landmarks.dat) can be downloaded from the dlib repository.
5. Example Python implementation
The code below demonstrates the main steps: argument parsing, loading the detector and predictor, preprocessing the image, detecting faces, converting dlib shapes to NumPy arrays, extracting regions of interest, and visualizing landmarks and facial regions. Chinese comments in the original code have been translated to English.
from collections import OrderedDict
import numpy as np
import argparse
import dlib
import cv2

# Argument parsing
ap = argparse.ArgumentParser()
ap.add_argument("-p", "--shape-predictor", required=True,
    help="path to facial landmark predictor")
ap.add_argument("-i", "--image", required=True,
    help="path to input image")
args = vars(ap.parse_args())

# Facial landmark index ranges for the 68-point model
FACIAL_LANDMARKS_68_IDXS = OrderedDict([
    ("mouth", (48, 68)),
    ("right_eyebrow", (17, 22)),
    ("left_eyebrow", (22, 27)),
    ("right_eye", (36, 42)),
    ("left_eye", (42, 48)),
    ("nose", (27, 36)),
    ("jaw", (0, 17))
])

# Facial landmark index ranges for a 5-point model
FACIAL_LANDMARKS_5_IDXS = OrderedDict([
    ("right_eye", (2, 3)),
    ("left_eye", (0, 1)),
    ("nose", (4))
])

# Load the frontal face detector and the landmark predictor
detector = dlib.get_frontal_face_detector()
predictor = dlib.shape_predictor(args["shape_predictor"])

# Load and preprocess the image
image = cv2.imread(args["image"])
(h, w) = image.shape[:2]
width = 500
r = width / float(w)
dim = (width, int(h * r))
image = cv2.resize(image, dim, interpolation=cv2.INTER_AREA)
gray = cv2.cvtColor(image, cv2.COLOR_BGR2GRAY)

# Detect faces in the image (1 = number of image pyramid up-samples)
rects = detector(gray, 1)

# Convert dlib shape object to a NumPy array of (x, y) coordinates
def shape_to_np(shape, dtype="int"):
    # Create an array of size num_parts x 2
    coords = np.zeros((shape.num_parts, 2), dtype=dtype)
    # Loop over each landmark and record the (x, y) coordinates
    for i in range(0, shape.num_parts):
        coords[i] = (shape.part(i).x, shape.part(i).y)
    return coords

# Loop over the detected face rectangles
for (i, rect) in enumerate(rects):
    # Facial landmark localization for the face region
    shape = predictor(gray, rect)
    shape = shape_to_np(shape)

    # Visualize and extract each facial region defined in FACIAL_LANDMARKS_68_IDXS
    for (name, (i, j)) in FACIAL_LANDMARKS_68_IDXS.items():
        clone = image.copy()
        cv2.putText(clone, name, (10, 30), cv2.FONT_HERSHEY_SIMPLEX,
            0.7, (0, 0, 255), 2)

        # Draw each landmark point for this region
        for (x, y) in shape[i:j]:
            cv2.circle(clone, (x, y), 3, (0, 0, 255), -1)

        # Extract the ROI for this region
        (x, y, w, h) = cv2.boundingRect(np.array([shape[i:j]]))
        roi = image[y:y + h, x:x + w]
        (h_roi, w_roi) = roi.shape[:2]
        width = 250
        r = width / float(w_roi)
        dim = (width, int(h_roi * r))
        roi = cv2.resize(roi, dim, interpolation=cv2.INTER_AREA)

        # Display the ROI and the annotated image
        cv2.imshow("ROI", roi)
        cv2.imshow("Image", clone)
        cv2.waitKey(0)

# Visualize all facial landmarks with colored overlays
def visualize_facial_landmarks(image, shape, colors=None, alpha=0.75):
    # Create two copies: overlay and output image
    overlay = image.copy()
    output = image.copy()

    # Default color palette for facial regions
    if colors is None:
        colors = [(19, 199, 109), (79, 76, 240), (230, 159, 23),
                  (168, 100, 168), (158, 163, 32),
                  (163, 38, 32), (180, 42, 220)]

    # Loop over the facial landmark regions
    for (i, name) in enumerate(FACIAL_LANDMARKS_68_IDXS.keys()):
        (j, k) = FACIAL_LANDMARKS_68_IDXS[name]
        pts = shape[j:k]

        # The jaw is drawn as a series of lines
        if name == "jaw":
            for l in range(1, len(pts)):
                ptA = tuple(pts[l - 1])
                ptB = tuple(pts[l])
                cv2.line(overlay, ptA, ptB, colors[i], 2)
        else:
            # Compute the convex hull for the region and draw it
            hull = cv2.convexHull(pts)
            cv2.drawContours(overlay, [hull], -1, colors[i], -1)

    # Blend the overlay with the original image
    cv2.addWeighted(overlay, alpha, output, 1 - alpha, 0, output)
    return output

# After processing, generate and display the final visualization
output = visualize_facial_landmarks(image, shape)
cv2.imshow("Image", output)
cv2.waitKey(0)
6. Notes on visualization functions
The cv2.convexHull function computes the convex hull of a set of points, which is used here to fill facial regions for visualization. The cv2.addWeighted function blends two images according to the formula:
dst = src1 * alpha + src2 * beta + gamma
Parameters:
- src1, src2: two images to be blended; they must have the same size and number of channels
- alpha: weight for src1
- beta: weight for src2
- gamma: scalar added to the weighted sum (set to 0 if no brightness adjustment is needed)
- dst: optional output variable
- dtype: optional output image depth; default is None (same as source images)