 ALLPCB


If you're dealing with PCB oxidation and corrosion, the good news is that it can often be fixed with the right techniques and tools. To fix PCB oxidation and corrosion, start by cleaning the affected areas using isopropyl alcohol, a soft brush, or specialized cleaning solutions to remove residue. For minor damage, rework processes like soldering can repair broken traces. In severe cases, replacing components or applying protective coatings may be necessary to prevent further damage. In this comprehensive guide, we'll walk you through the causes of these issues, step-by-step repair methods, and tips to prevent future problems. Whether you're a hobbyist or a professional, you'll find actionable advice to restore your printed circuit boards (PCBs) and keep them functioning reliably.
Understanding PCB Oxidation and Corrosion
Before diving into how to fix PCB oxidation and corrosion, it's important to understand what these terms mean and why they happen. Oxidation occurs when the copper traces on a PCB react with oxygen in the air, forming a layer of copper oxide that can disrupt electrical connections. Corrosion, on the other hand, is a broader term that refers to the deterioration of metal due to chemical reactions with environmental factors like moisture, salt, or pollutants. This often appears as a greenish or bluish patina on copper surfaces.
Both oxidation and corrosion can increase electrical resistance, leading to poor performance or complete failure of the board. For instance, a corroded trace might increase resistance from a typical 0.01 ohms to over 1 ohm, severely impacting signal integrity. These issues are common in environments with high humidity, temperature fluctuations, or exposure to contaminants. Understanding the root cause helps in both fixing the current damage and preventing future occurrences.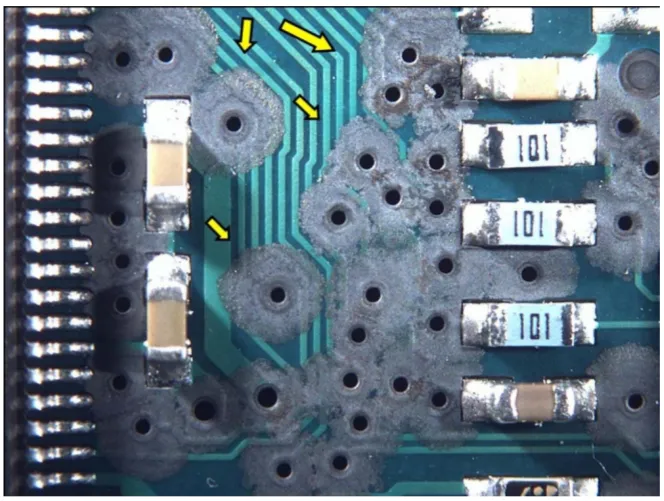
Causes of PCB Oxidation and Corrosion
Identifying the causes of PCB oxidation and corrosion is the first step to effective repair and prevention. Here are the primary factors that contribute to these issues:
- Moisture Exposure: Water or high humidity can react with copper, leading to oxidation and corrosion. For example, a PCB exposed to 80% humidity for extended periods is at high risk.
- Chemical Contaminants: Residues from flux, soldering processes, or pollutants in the air can accelerate corrosion. Sulfur compounds, often found in industrial areas, are particularly damaging.
- Temperature Fluctuations: Repeated heating and cooling cycles can cause condensation on the board, promoting oxidation.
- Poor Storage Conditions: Storing PCBs in damp or unsealed environments without protective coatings invites damage over time.
By recognizing these triggers, you can take proactive steps during repair and rework processes to minimize risks. Let’s move on to the tools and materials you'll need for fixing these issues.
Tools and Materials for Fixing PCB Oxidation and Corrosion
Having the right tools and materials is crucial for effective PCB repair. Here’s a list of essentials for tackling oxidation and corrosion:
- Isopropyl Alcohol (IPA): At least 90% concentration to clean residues without leaving moisture behind.
- Soft Brush or Toothbrush: For scrubbing away corrosion without damaging the board.
- Compressed Air or Blower: To dry the board after cleaning.
- Soldering Iron and Solder: For repairing damaged traces or components during rework processes.
- Desoldering Tools: Such as a desoldering pump or wick to remove old solder.
- Multimeter: To test continuity and resistance after repairs (aim for values below 0.05 ohms for good connections).
- Protective Coating: Like conformal coating or epoxy to seal the board post-repair.
- Microfiber Cloth: For gentle cleaning without scratching the PCB surface.
With these tools in hand, you're ready to start the repair process. Always work in a well-ventilated area and wear protective gear like gloves to avoid contact with chemicals.
Related Reading: PCB Trace Repair for Beginners: A Hobbyist's Guide to Saving Damaged Boards
Step-by-Step Guide to Fix PCB Oxidation and Corrosion
Fixing PCB oxidation and corrosion involves a systematic approach to ensure the board is restored without causing further damage. Follow these steps for effective repair:
Step 1: Inspect the Damage
Begin by closely examining the PCB under good lighting or with a magnifying glass. Look for dark, dull areas indicating oxidation or green/blue deposits signaling corrosion. Use a multimeter to check for breaks in continuity across traces. Document the affected areas to prioritize repairs.
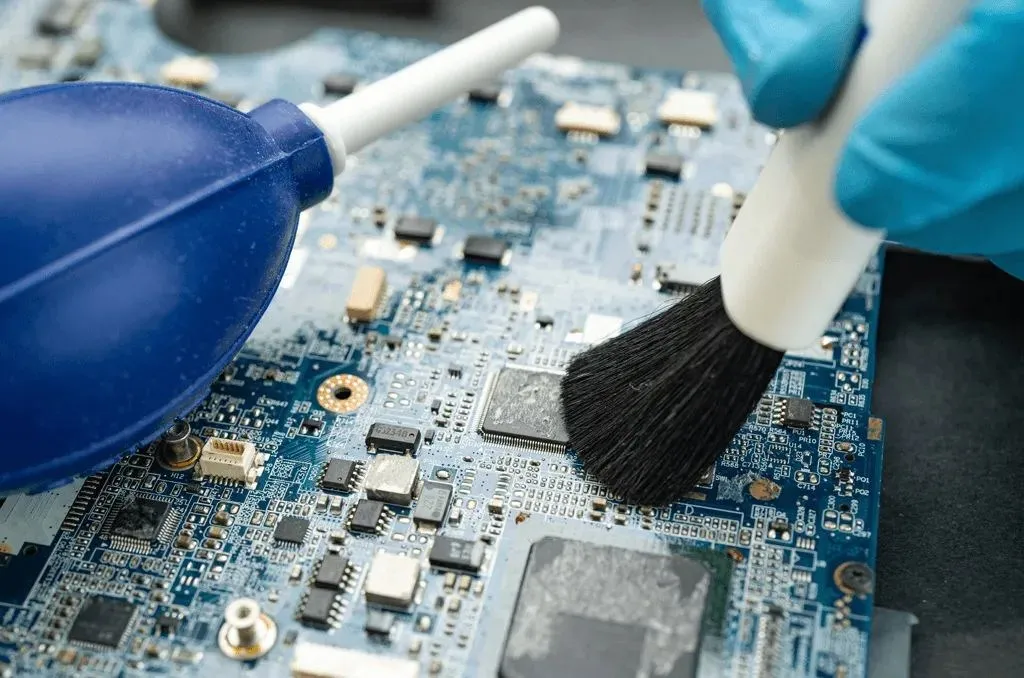
Step 2: Clean the Affected Areas
Start cleaning with isopropyl alcohol and a soft brush. Dip the brush in IPA and gently scrub the corroded or oxidized spots. For stubborn deposits, you can use a small amount of baking soda mixed with water to form a paste, but be cautious as this can be abrasive. Wipe the area with a microfiber cloth and dry it completely using compressed air. Ensure no moisture remains, as even small amounts can lead to further corrosion.
Step 3: Remove Damaged Components (If Necessary)
If components near the corroded area are affected, use a soldering iron and desoldering tools to remove them. Heat the solder joints to around 300°C (572°F) and use a desoldering pump to extract the molten solder. Handle components carefully to avoid damage to the PCB pads.
Step 4: Repair Damaged Traces with Soldering
For broken or corroded traces, rework methods involving soldering are essential. Scrape away any remaining corrosion from the trace using a fine tool, then apply fresh solder to reconnect the trace. Use a soldering iron set to approximately 350°C (662°F) for most PCBs, and ensure the solder flows evenly. Test the connection with a multimeter to confirm low resistance (ideally below 0.02 ohms).
Step 5: Replace Components
If components were removed or are irreparable due to corrosion, install new ones using proper soldering techniques. Align the component leads with the pads, apply solder, and ensure there are no cold joints. A good solder joint should be shiny and concave, indicating a strong connection.
Step 6: Apply Protective Coating
Once repairs are complete, apply a conformal coating or epoxy to shield the PCB from future oxidation and corrosion. Use a brush or spray to cover the repaired areas evenly. Allow it to dry as per the manufacturer’s instructions, typically 24 hours at room temperature.
Related Reading: Repairing Instead of Replacing: Extending the Life of Your PCBs
Advanced Rework Processes for Severe Damage
For severe cases of PCB oxidation and corrosion, basic cleaning and soldering might not be enough. Advanced rework processes can help salvage the board. Here are a few methods:
- Trace Repair with Conductive Epoxy: If soldering isn’t feasible due to extensive trace damage, conductive epoxy can bridge gaps. Apply it carefully with a fine tip and allow it to cure for the recommended time, usually 12-24 hours.
- Jumper Wires: For completely broken traces, soldering thin jumper wires can restore connections. Secure the wire with solder at both ends and route it to avoid interference with other components.
- Pad Repair: If solder pads are corroded beyond use, specialized repair kits can rebuild them. These kits often include adhesive copper foil to recreate the pad before soldering.
These rework methods require precision and patience. Always test the board after each step to ensure functionality, aiming for signal speeds and impedance values that match the original specifications (e.g., impedance around 50 ohms for standard traces).
Preventing Future PCB Oxidation and Corrosion
After fixing PCB oxidation and corrosion, taking preventive measures ensures the board remains in good condition. Here are practical tips to protect your PCBs:
- Use Conformal Coatings: Apply a protective layer right after assembly or repair to shield against moisture and contaminants.
- Store Properly: Keep unused PCBs in anti-static bags with desiccant packs in a dry, temperature-controlled environment (ideally below 50% humidity).
- Control Operating Environment: If possible, house electronics in enclosures that limit exposure to humidity and pollutants.
- Regular Maintenance: Periodically inspect and clean PCBs, especially in harsh environments, to catch early signs of oxidation or corrosion.
Implementing these strategies can significantly extend the lifespan of your boards, reducing the need for frequent repairs.
Troubleshooting Common Issues During Repair
Even with careful rework processes, challenges can arise when fixing PCB oxidation and corrosion. Here are solutions to common problems:
- Corrosion Won’t Come Off: If IPA and brushing don’t work, try a diluted vinegar solution (1:1 with water) for a few minutes, then rinse with IPA and dry thoroughly. Avoid overuse as vinegar is acidic.
- Solder Won’t Stick: Ensure the area is clean and free of oxide layers. Use flux to improve solder adhesion and maintain the iron tip at the correct temperature (around 300-350°C).
- Board Still Doesn’t Work: Recheck all connections with a multimeter. If resistance remains high (above 0.1 ohms), there might be hidden damage. Consider professional rework services for complex issues.
Patience and attention to detail are key to overcoming these hurdles during PCB repair.
Conclusion
Fixing PCB oxidation and corrosion is a manageable task with the right knowledge and tools. By cleaning affected areas, applying proper soldering techniques, and using protective coatings, you can restore your boards to full functionality. Advanced rework methods like trace repair and jumper wires offer solutions for severe damage, while preventive measures ensure long-term reliability. Whether you're dealing with minor oxidation or extensive corrosion, the steps outlined in this guide provide a clear path to success. With careful attention to detail, your PCBs can perform optimally, even after facing environmental challenges.
By following these tips and techniques, you’ll not only fix current issues but also safeguard your projects against future damage. Keep your tools ready, maintain a clean workspace, and tackle PCB oxidation and corrosion with confidence.


