 ALLPCB


If you’re an electrical engineer working on PCB assembly, choosing the right solder paste application method is critical to your project’s success. So, when it comes to stencil printing vs. jet printing, which is better for your needs? In short, stencil printing is often the go-to for high-volume production due to its speed and cost-effectiveness, while jet printing shines in prototyping and complex designs with its flexibility and stencil-free approach. In this blog, we’ll dive deep into both solder paste application methods, comparing their pros, cons, and ideal use cases to help you make an informed decision for your PCB assembly methods.
Introduction to Solder Paste Application in PCB Assembly
Solder paste application is a foundational step in surface mount technology (SMT) for PCB assembly. It involves depositing a precise amount of solder paste—a mixture of tiny solder particles and flux—onto the PCB pads where components will be placed. This paste acts as the adhesive and conductive material during the reflow soldering process. Getting this step right ensures strong, reliable connections and minimizes defects like bridging or insufficient solder.
Two primary methods dominate the industry: stencil printing and jet printing. Each has unique strengths and weaknesses, depending on factors like production volume, board complexity, and budget. Whether you’re working on a high-speed production line or a small-batch prototype, understanding these PCB assembly methods is key to optimizing your workflow. Let’s break down both techniques to see how they stack up.

What is Stencil Printing?
Stencil printing is the most widely used method for applying solder paste in PCB assembly, especially in high-volume manufacturing. It uses a thin metal or polymer stencil with cutouts that match the PCB’s pad layout. The stencil is placed over the board, and solder paste is spread across it using a squeegee, forcing the paste through the openings onto the pads below.
How Stencil Printing Works
The process is straightforward but precise:
- The stencil, typically made of stainless steel, is aligned with the PCB using fiducial marks or automated vision systems.
- Solder paste is applied to the top of the stencil.
- A squeegee blade moves across the stencil at a controlled speed and pressure (often 20-50 mm/s and 2-5 kg of force), pushing the paste into the apertures.
- The stencil is lifted, leaving precise deposits of paste on the PCB pads.
This method is highly repeatable, making it ideal for mass production where consistency is critical.
Advantages of Stencil Printing
- Speed: Stencil printing is fast, often completing a board in under 30 seconds, which is perfect for high-throughput environments.
- Cost-Effective for Volume: Once the stencil is made (costing $50-$500 depending on complexity), the per-board cost is low.
- Precision: Modern stencil printers achieve tight tolerances, with paste deposit accuracy within ±25 microns, ensuring reliable soldering for fine-pitch components (down to 0.4mm pitch).
Disadvantages of Stencil Printing
- Upfront Costs: Stencils are expensive and specific to each PCB design, making them less economical for small runs or frequent design changes.
- Limited Flexibility: Adjusting paste volume or location requires a new stencil, which can delay prototyping.
- Complex Designs: For boards with varying pad sizes or stepped surfaces, stencil printing can struggle to apply uniform paste, leading to defects.

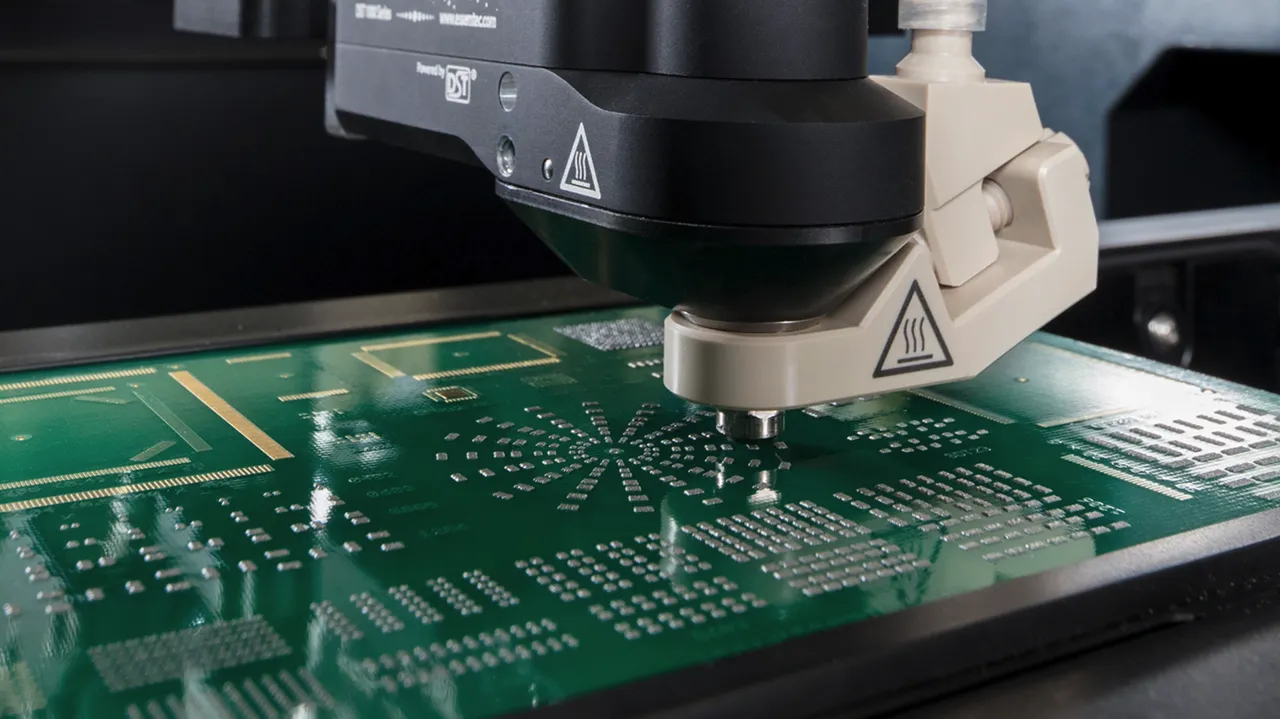
What is Jet Printing?
Jet printing, also known as solder paste jetting, is a newer, stencil-free printing method that uses a digital approach to apply solder paste. It operates similarly to an inkjet printer, where a nozzle dispenses tiny droplets of solder paste directly onto the PCB pads based on a programmed design file. This technology, pioneered by companies like Mycronic, is gaining traction for its adaptability.
How Jet Printing Works
The process eliminates the need for physical tooling:
- A jet printer uses a CAD file to map out paste application points on the PCB.
- A high-speed nozzle ejects precise micro-droplets of solder paste (as small as 0.3mm in diameter) onto the pads.
- The system adjusts paste volume dynamically, even within the same board, without requiring hardware changes.
This method excels in environments where flexibility and quick turnarounds are essential.
Advantages of Jet Printing
- Flexibility: Since it’s stencil-free, jet printing allows instant design changes via software, ideal for prototyping or mixed-product runs.
- Precision for Complex Boards: It handles 3D surfaces, varying pad sizes, and fine-pitch components (down to 0.3mm pitch) with ease, applying paste volumes as low as 1 nanoliter.
- No Tooling Costs: Eliminating stencils saves upfront costs and reduces lead times, as there’s no wait for stencil fabrication.
- Reduced Waste: Jet printing applies only the paste needed, minimizing excess compared to stencil printing.
Disadvantages of Jet Printing
- Slower Speed: Jet printing can take 2-5 minutes per board, making it less suitable for high-volume production compared to stencil printing’s seconds-per-board pace.
- Higher Equipment Cost: Jet printers are expensive, often costing $100,000 or more, though they offset this with no recurring stencil expenses.
- Maintenance: Nozzles can clog or wear out, requiring regular cleaning and calibration to maintain accuracy.
Comparing Stencil Printing vs. Jet Printing: Key Factors for PCB Assembly
Choosing between these two solder paste application methods depends on your project’s specific requirements. Let’s compare them across critical factors that matter to electrical engineers.
1. Production Volume
For high-volume production (thousands of boards per run), stencil printing is the clear winner. Its speed—often handling 100-200 boards per hour—beats jet printing’s slower pace of 20-30 boards per hour. If you’re working on a consumer electronics line producing smartphones or IoT devices, stencil printing keeps costs down and throughput high.
On the other hand, jet printing is ideal for low-volume runs or prototyping. If you’re testing a new design for a medical device with only 10-50 boards, jet printing’s lack of tooling costs and quick setup (under 10 minutes vs. hours for stencil alignment) saves time and money.
2. Design Complexity
Modern PCBs often feature dense layouts with fine-pitch components, mixed pad sizes, or 3D structures. Jet printing excels here, as it can adjust paste volume on the fly—applying 30% less paste for a 0402 resistor pad and 50% more for a QFN package on the same board. Stencil printing struggles with such variability unless you invest in stepped stencils, which cost 20-30% more than standard ones.
For simpler, uniform designs like single-layer boards for basic controllers, stencil printing provides reliable results without overcomplicating the process.
3. Cost Considerations
Budget is always a concern in PCB assembly. Stencil printing has a lower cost per board in high volumes—often under $0.10 per board for paste application after the initial stencil investment. However, for small batches, the stencil cost (e.g., $200 for a basic design) can make the per-board expense jump to $10 or more.
Jet printing, with no stencil costs, keeps expenses predictable at roughly $0.50-$1.00 per board, regardless of volume. But the high upfront cost of the machine means you need consistent low-volume or prototype work to justify the investment.
4. Speed and Turnaround Time
Time-to-market matters, especially in competitive industries. Stencil printing requires 1-3 days to fabricate and ship a stencil before production can start, delaying quick-turn projects. Jet printing, being stencil-free printing, lets you upload a design file and start printing within minutes, cutting lead times significantly.
5. Defect Rates and Reliability
Both methods can achieve low defect rates with proper setup. Stencil printing, when optimized, results in defect rates below 50 PPM (parts per million) for issues like insufficient solder or bridging, thanks to consistent paste deposits. Jet printing matches this for complex boards but may see higher variability if nozzles aren’t maintained, potentially leading to misaligned deposits or inconsistent volumes.
Real-World Applications: When to Choose Each Method
Let’s look at practical scenarios to help you decide which method aligns with your PCB assembly needs.
Scenario 1: High-Volume Consumer Electronics
If you’re producing 10,000 units of a smart home device with a standardized PCB design, stencil printing is the way to go. The initial stencil cost of $300 is negligible when spread across thousands of boards, and the process speed ensures you meet tight deadlines. Defect rates remain low with proper stencil design (e.g., aperture ratios of 0.66 for fine-pitch pads), ensuring reliability at scale.
Scenario 2: Prototyping for Aerospace Components
For a small run of 20 PCBs for an aerospace sensor with frequent design iterations, jet printing is the better choice. The ability to tweak paste application without waiting for a new stencil saves days, and the precision on complex, multi-height boards prevents soldering issues on critical components. The higher per-board cost is worth the flexibility in this R&D phase.
Scenario 3: Mixed-Volume Contract Manufacturing
If you’re a PCB manufacturer handling both high-volume and prototype orders, consider a hybrid approach. Invest in a stencil printer for large runs and a jet printer for smaller, custom jobs. While this increases capital expenditure, it positions you to handle diverse client needs efficiently.
Tips for Optimizing Your Solder Paste Application Process
Regardless of the method you choose, follow these best practices to ensure quality results:
- Material Selection: Use high-quality solder paste with consistent particle size (Type 3 or 4 for fine-pitch work) to avoid clogging in jet printers or poor release in stencils.
- Environmental Control: Maintain a cleanroom environment with temperature (20-25°C) and humidity (40-60%) control to prevent paste drying or oxidation.
- Regular Maintenance: For stencil printing, clean stencils after every 5-10 boards to prevent paste buildup. For jet printing, calibrate nozzles weekly to ensure droplet accuracy.
- Inspection: Use automated optical inspection (AOI) post-paste application to catch defects early. Look for paste height deviations beyond ±10% of the target (e.g., 100-150 microns for most SMT components).
Future Trends in Solder Paste Application Methods
The PCB assembly industry is evolving, and so are solder paste application methods. Jet printing technology is advancing with faster nozzles and AI-driven calibration, potentially closing the speed gap with stencil printing in the next 5-10 years. Meanwhile, stencil printing is seeing innovations like nano-coated stencils for better paste release on ultra-fine apertures (below 0.3mm).
Additionally, hybrid systems that combine stencil and jet printing on the same line are emerging, offering the best of both worlds for manufacturers with varied needs. Keeping an eye on these trends can help you stay ahead in optimizing your assembly process.
Conclusion: Making the Right Choice for Your PCB Assembly Needs
Deciding between stencil printing vs. jet printing boils down to your project’s specifics. If high-volume production and cost efficiency are your priorities, stencil printing remains the industry standard for most PCB assembly methods. However, if you value flexibility, quick turnarounds, and the ability to handle complex designs, the jet paste printing advantages make it a compelling choice, especially for prototypes and small batches.
As an electrical engineer, weigh factors like volume, budget, and board complexity carefully. Test both methods if possible—many assembly houses offer trial runs—to see which aligns best with your workflow. By choosing the right solder paste application method, you’ll ensure better yields, fewer defects, and a smoother path from design to finished product.


