ALLPCB


If you're a hobbyist wondering how to fix a damaged printed circuit board (PCB) without breaking the bank or needing fancy tools, you're in the right place. PCB trace repair can seem intimidating, but with the right approach, it's entirely possible to perform easy PCB trace repair at home. In this guide, we'll walk you through DIY PCB trace repair techniques that are beginner-friendly, focusing on PCB trace repair at home, PCB trace repair without special equipment, and cheap PCB trace repair methods. Whether it's a broken trace on a favorite gadget or a project board, you'll learn how to bring it back to life step by step.
Why PCB Trace Repair Matters for Hobbyists
PCBs are the backbone of almost every electronic device, from smartphones to DIY Arduino projects. The tiny copper lines, or traces, on these boards carry electrical signals between components. When a trace gets damaged—due to physical stress, overheating, or corrosion—the circuit can fail, rendering the device useless. For hobbyists, replacing a damaged board can be expensive or impractical, especially for one-off projects. Learning easy PCB trace repair saves money, extends the life of your electronics, and boosts your troubleshooting skills.
Understanding PCB Traces and Common Damage
Before diving into repair methods, let's break down what PCB traces are and how they get damaged. Traces are thin copper pathways etched onto the board's surface, typically 1-2 mils (0.001-0.002 inches) thick, though this varies by design. They connect components like resistors, capacitors, and ICs, ensuring signals flow with minimal resistance—often in the range of milliohms per inch for standard copper traces.
Common causes of trace damage include:
- Physical Damage: Scratches or cuts from mishandling or tools.
- Overheating: Excessive current can burn traces, especially if the trace width isn't suited for the load (e.g., a 10-mil trace carrying over 1 amp).
- Corrosion: Moisture or chemicals can erode copper over time.
- Manufacturing Defects: Poor soldering or weak traces can fail under stress.
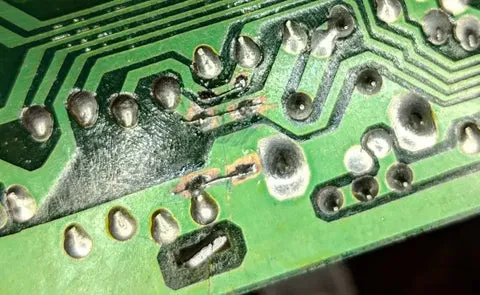
Identifying the type of damage is the first step in DIY PCB trace repair. A visual inspection often reveals cracks, burns, or complete breaks in the copper line.
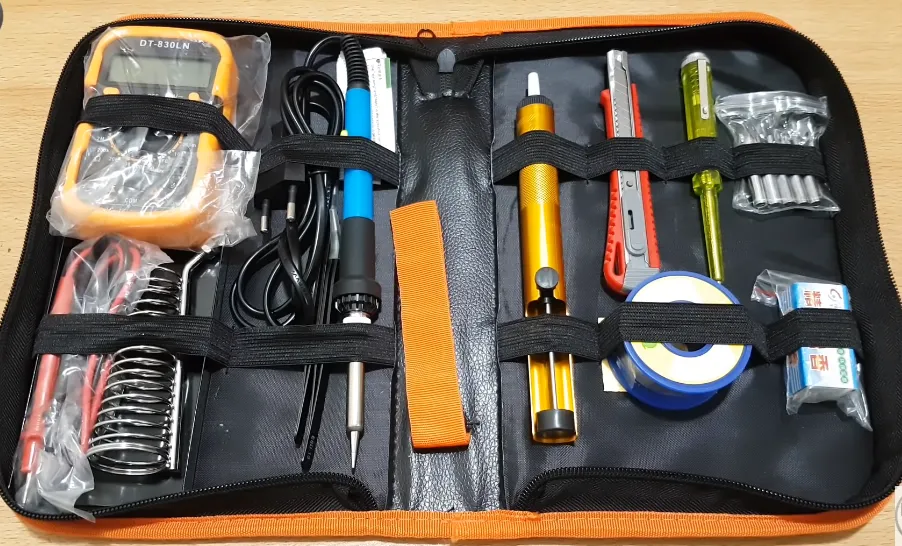
Tools and Materials for PCB Trace Repair at Home
One of the best parts about PCB trace repair without special equipment is that you likely already have most of the tools needed. Here's a list of basic items for cheap PCB trace repair methods:
- Soldering Iron: A basic 25-40 watt iron with a fine tip works for most repairs.
- Solder Wire: Use rosin-core solder, 0.031-inch diameter, for precision.
- Wire Cutters and Strippers: For cutting and preparing jumper wires.
- Thin Copper Wire: 30 AWG (American Wire Gauge) enameled wire is ideal for bridging traces.
- Conductive Ink Pen: An affordable option (around $5-10) for minor trace repairs.
- Multimeter: To test continuity after repairs (optional but helpful).
- Utility Knife or X-Acto Knife: For scraping off solder mask to expose copper.
- Isopropyl Alcohol and Cotton Swabs: For cleaning the board.
- Magnifying Glass or Loupe: To see tiny traces clearly.
These tools keep costs low and make PCB trace repair at home accessible to beginners. No need for expensive rework stations or professional gear!
Step-by-Step Guide to Easy PCB Trace Repair
Now, let's get into the practical steps for DIY PCB trace repair. We'll cover two main methods that cater to beginners using minimal tools: repairing with a jumper wire and using conductive ink. Follow these steps carefully for the best results.
Step 1: Safety First
Always work on a powered-off device. Unplug the board from any power source and discharge any capacitors by shorting their leads with an insulated tool. Work in a well-ventilated area when soldering to avoid inhaling fumes.
Step 2: Inspect and Identify Damage
Use a magnifying glass to locate the broken trace. Look for visible cracks, burns, or areas where the copper is missing. If the trace is covered by a green solder mask, gently scrape it away with a utility knife to expose the copper. Be careful not to cut too deep and damage nearby traces.
Step 3: Clean the Area
Dip a cotton swab in isopropyl alcohol (at least 90% concentration) and clean the damaged area. Remove dirt, flux residue, or oxidation from the copper to ensure a good connection during repair. Let the board dry completely before proceeding.
Method 1: Repairing with a Jumper Wire (For Larger Breaks)
This is one of the most reliable cheap PCB trace repair methods for complete breaks or wide gaps in traces. Here's how to do it:
- Prepare the Wire: Cut a small piece of 30 AWG enameled wire, slightly longer than the damaged section. Strip the enamel coating from both ends using a knife or sandpaper to expose the bare copper.
- Expose Copper on the Trace: Scrape the solder mask off both ends of the broken trace to reveal shiny copper. Aim for a small area, about 2-3 mm on each side of the break.
- Tin the Trace Ends: Heat your soldering iron to around 300°C (570°F) and apply a thin layer of solder to the exposed copper on both ends of the trace. This process, called tinning, helps the wire bond better.
- Attach the Wire: Place one end of the prepared wire on one tinned spot. Heat the spot with the iron and press the wire into the solder until it sticks. Repeat for the other end, ensuring the wire lies flat and doesn't cross other traces.
- Secure and Insulate: If the wire is near other traces, apply a small dab of hot glue or electrical tape to prevent short circuits.
This method works well for traces carrying up to 1-2 amps, as 30 AWG wire can handle that current with minimal resistance (about 0.1 ohms per foot).
Related Reading: How to Repair Damaged PCB Traces: A Step-by-Step Tutorial
Method 2: Using Conductive Ink (For Minor Damage)
For hairline cracks or very small breaks, a conductive ink pen offers an easy PCB trace repair solution. These pens contain silver or carbon-based ink that conducts electricity. Here's the process:
- Shake the Pen: Shake the conductive ink pen for 20-30 seconds to mix the contents.
- Draw Over the Break: Carefully draw a line over the damaged trace, connecting both ends of the break. Apply 2-3 layers for better conductivity, letting each layer dry for 10-15 minutes.
- Cure the Ink: Some pens require heat to set the ink. Use a hairdryer on low heat for 5 minutes or let it air-dry for 24 hours, depending on the product's instructions.
- Test the Repair: Once dry, the resistance across the repaired trace should be low (under 10 ohms for short repairs). If it's higher, apply another layer of ink.
Conductive ink is less durable than soldering and typically handles lower currents (under 0.5 amps), so use it for signal traces rather than power lines.
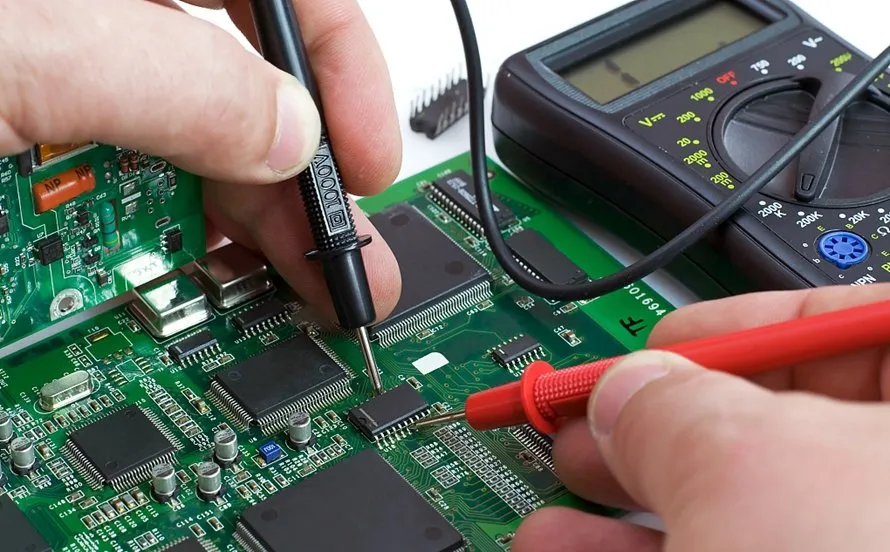
Step 4: Test the Repair
After completing the repair, use a multimeter set to continuity mode to check if the trace is conducting properly. Place the probes on either side of the repaired section. A beep or low resistance reading (under 1 ohm for short traces) indicates success. If there's no continuity, recheck your connections or apply more solder/ink as needed.
Related Reading: How to Repair a Damaged PCB Trace: A Step-by-Step Guide
Tips for Successful PCB Trace Repair Without Special Equipment
To ensure your PCB trace repair at home goes smoothly, keep these pointers in mind:
- Work Slowly: Rushing can lead to mistakes like shorting nearby traces. Take your time with each step.
- Use Minimal Solder: Too much solder can create blobs that bridge to other traces, causing shorts.
- Check Trace Ratings: If a trace burned out due to high current, consider using a thicker wire for the jumper to prevent future failures. For example, a 10-mil trace might only handle 0.5 amps, while a 20 AWG wire can handle 5 amps or more.
- Protect the Board: After repair, apply a thin layer of clear nail polish or conformal coating over the fixed area to protect against moisture and corrosion.
- Practice First: If you're new to soldering, practice on a scrap board before working on your valuable project.
Common Mistakes to Avoid in DIY PCB Trace Repair
Even with cheap PCB trace repair methods, beginners can run into pitfalls. Here's what to watch out for:
- Overheating the Board: Holding the soldering iron on a spot for too long (over 3-5 seconds) can lift pads or damage components. Work quickly and let the board cool if needed.
- Short Circuits: Ensure jumper wires or solder don't touch adjacent traces. Use a multimeter to check for unintended connections.
- Ignoring Signal Integrity: For high-speed signals (above 1 MHz), long jumper wires can introduce noise or delay. Keep repairs as short as possible for these traces.
- Using Low-Quality Materials: Cheap conductive pens or wires might fail over time. Invest in decent supplies for lasting repairs.
When to Seek Professional Help
While PCB trace repair without special equipment works for many scenarios, some damages are beyond a hobbyist's scope. If the board has multiple layers (common in modern electronics) and the broken trace is internal, home repair won't cut it. Similarly, if the damage affects critical components or high-voltage circuits, it's safer to consult a professional to avoid risks like electrical hazards or further damage.
Conclusion: Mastering Easy PCB Trace Repair
Repairing a damaged PCB doesn't have to be daunting or expensive. With the techniques outlined in this guide, you can tackle easy PCB trace repair using everyday tools and minimal investment. Whether you opt for a jumper wire or conductive ink, DIY PCB trace repair empowers you to save your projects and learn valuable skills along the way. By following these steps for PCB trace repair at home, using cheap PCB trace repair methods, and avoiding common mistakes, you'll be well on your way to reviving broken boards like a pro.
Remember, practice makes perfect. Start with small repairs, build your confidence, and soon you'll handle even trickier fixes with ease. Your wallet—and your gadgets—will thank you for mastering PCB trace repair without special equipment.