 ALLPCB


If you're looking to master SMD rework, you've come to the right place. Whether you're a hobbyist or a professional technician, replacing surface mount components on a PCB can seem daunting. But with the right SMD rework tools, a reliable hot air rework station, and proven SMD removal techniques, the process becomes manageable. In this guide, we'll walk you through every step—from removing old components like replacing SMD resistors to cleaning PCB after rework. Let's dive into the detailed process to help you achieve flawless results on your next electronics repair or prototyping project.
What Is SMD Rework and Why Is It Important?
SMD rework refers to the process of removing and replacing surface mount devices (SMDs) on a printed circuit board (PCB). These components, such as resistors, capacitors, and IC chips, are soldered directly onto the board's surface, making them trickier to handle compared to through-hole components. Rework is essential for repairing faulty boards, upgrading components, or salvaging parts from old PCBs.
With electronics becoming smaller and more compact, SMDs dominate modern PCB designs. Knowing how to handle them is a critical skill for anyone in electronics. A single mistake during rework can damage the board or surrounding components, leading to costly repairs. That's why using the correct tools and techniques is non-negotiable.
Essential SMD Rework Tools You’ll Need
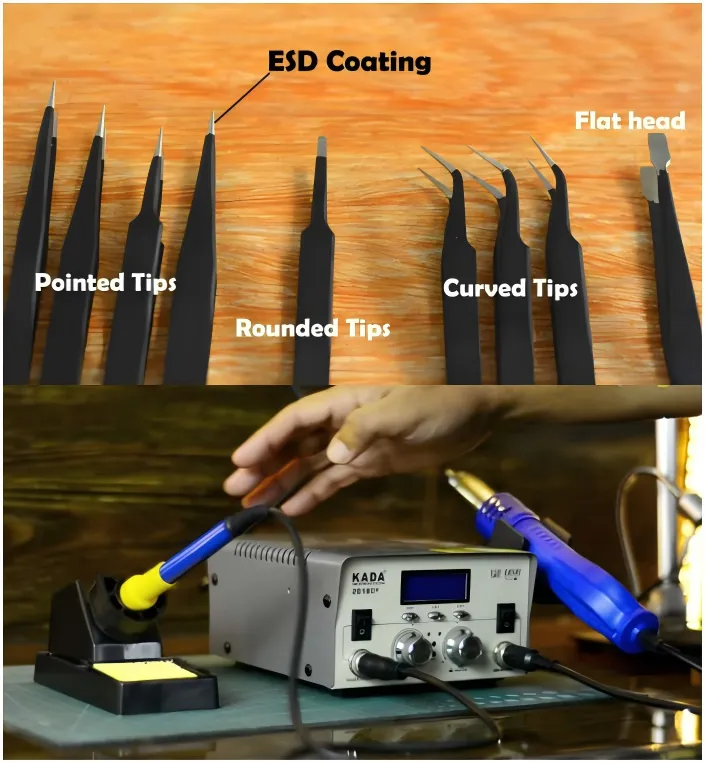
Before starting, gather the right SMD rework tools. Having the proper equipment ensures precision and prevents damage to the PCB or components. Here's a list of must-have tools:
- Hot Air Rework Station: This tool is the backbone of SMD rework. It uses controlled hot air to melt solder, allowing you to remove or place components without direct contact. Look for a station with adjustable temperature (typically 200°C to 450°C) and airflow settings for versatility.
- Soldering Iron (Fine Tip): Useful for smaller components or touch-ups after using hot air. A tip size of 0.5mm to 1mm works best for SMDs.
- Tweezers: Precision tweezers help handle tiny components during removal and placement.
- Flux: Flux cleans the soldering area and improves solder flow, making the process smoother and reducing the risk of cold joints.
- Solder Wick or Desoldering Braid: This absorbs excess solder during cleanup.
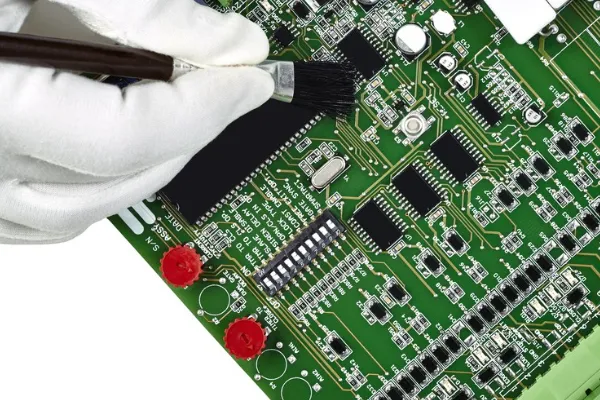
- Isopropyl Alcohol and Brush: Essential for cleaning PCB after rework to remove flux residue and contaminants.
- Magnifying Glass or Microscope: SMDs are tiny, so magnification helps with precision.
Investing in quality tools pays off. For instance, a hot air rework station with precise temperature control can prevent overheating delicate components, which might otherwise crack or fail.
Step-by-Step Guide to SMD Rework
Now that you have your tools ready, let’s break down the process of replacing surface mount components. Follow these steps for a successful rework, focusing on SMD removal techniques and replacing SMD resistors as an example.
Step 1: Prepare Your Workspace
Start by setting up a clean, well-lit workspace. Ensure your PCB is secured on a non-conductive surface or in a PCB holder to prevent movement. Wear an anti-static wrist strap to avoid electrostatic discharge (ESD), which can damage sensitive components. Keep all tools within reach to streamline the process.
Step 2: Assess the Component and PCB
Identify the component to be replaced, such as an SMD resistor. Check its value (e.g., 1kΩ) using a multimeter if needed, and ensure you have the correct replacement part. Inspect the PCB for nearby components that might be affected by heat, and consider using heat-resistant tape to protect them.
Step 3: Set Up the Hot Air Rework Station
Configure your hot air rework station based on the component size and PCB material. For most SMD resistors, a temperature of 300°C to 350°C and medium airflow works well. Use a nozzle that matches the component's size to focus the heat precisely. Test the settings on a scrap board if you're unsure to avoid overheating.
Step 4: Apply Flux for Easier Removal
Using a flux pen or syringe, apply a small amount of flux around the SMD resistor’s pads. Flux reduces oxidation and helps the solder melt evenly, making removal smoother. Avoid over-applying, as excess flux can create a mess during cleaning PCB after rework.
Step 5: Remove the Component Using Hot Air
Hold the hot air nozzle about 2-3 cm above the component and move it in a circular motion to evenly heat the solder joints. After 10-15 seconds, the solder should melt. Use tweezers to gently lift the SMD resistor off the board. If it doesn’t come off easily, avoid forcing it—reapply heat for a few more seconds. This is one of the most effective SMD removal techniques for small components.
Step 6: Clean the Pads
Once the component is removed, clean the pads to prepare for the new part. Use a soldering iron and solder wick to remove excess solder. Apply flux again if needed to ensure a clean surface. Then, use isopropyl alcohol (at least 90% concentration) and a brush for cleaning PCB after rework. This step prevents poor connections when soldering the new component.
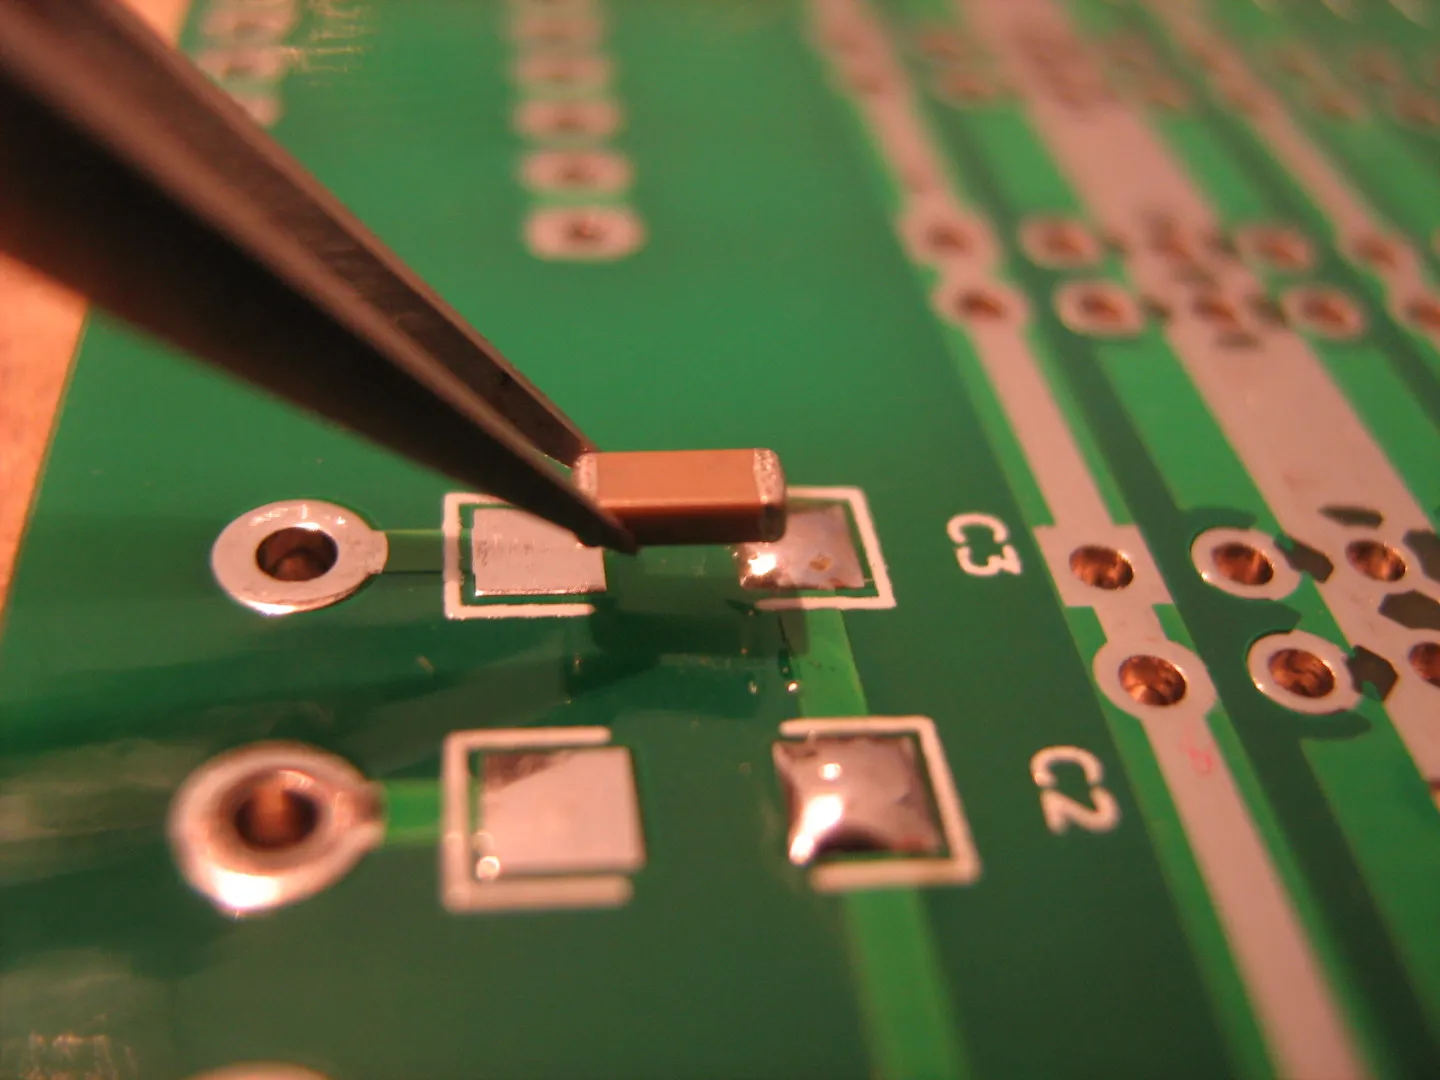
Step 7: Place the New Component
Align the replacement SMD resistor with the cleaned pads using tweezers. Ensure the orientation is correct, especially for polarized components. Apply a small amount of flux to the pads to aid soldering.
Step 8: Solder the New Component
You can use either the hot air rework station or a fine-tip soldering iron for this step. If using hot air, set the temperature slightly lower (around 300°C) to avoid thermal shock. Heat the pads and place the component, allowing the solder to reflow naturally. If using a soldering iron, apply a small amount of fresh solder to one pad, position the component, and solder the other side. Double-check for cold joints or bridges under magnification.
Step 9: Final Cleaning and Inspection
After soldering, clean the area again with isopropyl alcohol and a brush to remove flux residue. Inspect the solder joints under a magnifying glass or microscope to ensure they are shiny and well-formed. Test the circuit to confirm the new component works as expected.
Advanced Tips for Replacing SMD Components
While the basic steps cover most scenarios, here are some advanced tips to elevate your SMD rework skills:
- Protect Nearby Components: For densely populated boards, use heat shields or aluminum foil to protect adjacent components from hot air. This is especially crucial when working near sensitive ICs.
- Practice on Scrap Boards: If you're new to using a hot air rework station, practice on old or damaged PCBs. This builds confidence and helps you fine-tune temperature and airflow settings.
- Handle BGA Components with Care: Ball Grid Array (BGA) chips require precise heat distribution. Use a rework station with a preheater to warm the board evenly, reducing the risk of warping.
- Monitor Temperature Closely: Overheating can delaminate PCB layers or damage pads. If your rework station lacks a built-in thermometer, consider using an infrared thermometer to monitor the board’s temperature (keep it below 150°C for safety).
Common Mistakes to Avoid During SMD Rework
Even with the best SMD rework tools, mistakes can happen. Here are common pitfalls and how to avoid them:
- Excessive Heat: Applying too much heat can lift pads or burn the board. Stick to recommended temperatures and limit heat exposure to short bursts.
- Poor Cleaning: Skipping cleaning PCB after rework can leave flux residue, leading to corrosion or poor electrical connections over time.
- Forcing Components: If an SMD doesn’t come off easily during removal, don’t force it with tweezers. Reapply heat and flux instead to avoid damaging the board.
- Ignoring ESD Precautions: Static electricity can fry sensitive components. Always use an anti-static mat and wrist strap.
Why Cleaning PCB After Rework Matters
Cleaning PCB after rework is a step that’s often overlooked but critical for long-term reliability. Flux residue, if left on the board, can attract moisture and cause corrosion, leading to circuit failure. Additionally, leftover solder particles can create shorts between pads.
To clean effectively, use a soft brush dipped in isopropyl alcohol to scrub the area gently. For stubborn residue, a cotton swab works well for precision. Dry the board with compressed air or let it air-dry completely before powering it on. This simple step can extend the life of your PCB and ensure consistent performance.
Choosing the Right Hot Air Rework Station
Not all hot air rework stations are created equal. When selecting one for SMD rework, consider these factors:
- Temperature Range: A range of 100°C to 500°C covers most SMD components.
- Airflow Control: Adjustable airflow prevents blowing small components off the board.
- Nozzle Variety: Different nozzle sizes accommodate various component dimensions.
- Digital Display: A clear display for temperature and airflow settings ensures precision.
A good rework station can handle everything from tiny 0402 resistors to larger QFP packages, making it a versatile investment for any electronics workbench.
Conclusion: Mastering SMD Rework with Confidence
SMD rework doesn’t have to be intimidating. With the right SMD rework tools, a dependable hot air rework station, and effective SMD removal techniques, you can tackle tasks like replacing SMD resistors with ease. Remember to prioritize cleaning PCB after rework to ensure your board remains in top condition. By following the step-by-step guide and tips outlined above, you’ll build the skills needed to handle surface mount components like a pro.
Whether you're repairing a mobile device, prototyping a new design, or salvaging components, mastering SMD rework opens up endless possibilities in electronics. Keep practicing, stay patient, and watch your confidence grow with every successful project.


