 ALLPCB


When it comes to protecting printed circuit boards (PCBs) with conformal coating, preparation is everything. The key to ensuring a strong, reliable coating lies in thorough PCB cleaning before application. Without proper surface preparation, contaminants like dust, oils, or flux residues can weaken adhesion, leading to coating failure and reduced board longevity. In this comprehensive guide, we’ll dive into the importance of cleaning PCBs before conformal coating, explore techniques for removing contaminants for coating, and share surface preparation methods to ensure optimal conformal coating adhesion.
Why Cleaning PCBs Before Conformal Coating Matters
Cleaning PCBs before applying conformal coating is a critical step that directly impacts the performance and reliability of electronic assemblies. Conformal coatings are thin protective layers designed to shield PCBs from moisture, dust, chemicals, and temperature extremes. However, if the surface isn’t clean, the coating may not adhere properly, leading to issues like delamination, cracking, or even complete failure of the protective barrier.
Contaminants such as fingerprint oils, flux residues, and airborne particles can create a barrier between the PCB surface and the coating material. This barrier reduces adhesion, allowing moisture or corrosive elements to seep under the coating, potentially causing short circuits or corrosion. Studies have shown that improperly cleaned boards can experience up to a 30% reduction in dielectric strength, which compromises the board’s ability to resist electrical breakdown. For industries like aerospace or automotive, where reliability is non-negotiable, skipping this step is simply not an option.
By prioritizing PCB cleaning, you ensure that the coating forms a strong bond with the surface, providing long-lasting protection and maintaining the board’s operational integrity. Let’s explore how to achieve this through effective cleaning and surface preparation techniques.
Common Contaminants on PCBs and Their Impact
Before diving into cleaning methods, it’s important to understand the types of contaminants that can affect conformal coating adhesion. These contaminants often originate from the manufacturing process or handling and can significantly degrade the coating’s effectiveness if not removed.
- Fingerprint Oils and Salts: Human skin leaves behind oils and salts that act as a barrier to coating adhesion. These residues can also attract moisture, increasing the risk of corrosion.
- Flux Residues: Leftover flux from soldering processes can create an uneven surface, preventing the coating from bonding uniformly. Some flux residues are also hygroscopic, meaning they absorb moisture over time.
- Dust and Airborne Particles: Tiny particles from the environment can settle on the PCB, creating weak spots in the coating layer.
- Adhesive or Tape Residues: Temporary masking materials or adhesives used during assembly can leave sticky residues that interfere with coating adhesion.
Each of these contaminants poses a unique challenge, but the end result is the same: reduced coating performance and potential failure of the electronic device. Removing contaminants for coating is not just a recommendation—it’s a necessity for ensuring reliability.
Step-by-Step Guide to Cleaning PCBs Before Conformal Coating
Cleaning PCBs is a multi-step process that requires attention to detail. The goal is to achieve a surface free of contaminants without damaging the board or its components. Below, we outline a proven approach to prepare your PCBs for conformal coating.
1. Initial Inspection and Assessment
Start by visually inspecting the PCB under good lighting or with a magnifying tool to identify visible contaminants like dust, flux residues, or smudges. This step helps determine the level of cleaning required and whether specific areas need extra attention. For high-reliability applications, consider using cleanliness testing methods like ion chromatography to detect ionic residues that are invisible to the naked eye. These residues can cause dendritic growth, leading to short circuits over time.
2. Dry Cleaning for Loose Particles
Use compressed air or a soft brush to remove loose debris like dust or small particles. This step prevents scratching the PCB surface during wet cleaning. Be cautious with compressed air, as excessive pressure can damage delicate components or dislodge soldered parts. Aim for a pressure range of 20-30 psi for safe cleaning.
3. Wet Cleaning for Stubborn Residues
For tougher contaminants like flux residues or oils, wet cleaning is necessary. Use a specialized PCB cleaning solvent, such as isopropyl alcohol (IPA) with a purity of at least 99%, or a water-based cleaner designed for electronics. Apply the solvent with a soft, lint-free cloth or a brush with non-abrasive bristles to avoid damaging the board.
For automated processes, consider using an ultrasonic cleaning system. These systems use high-frequency sound waves (typically 20-40 kHz) to agitate the cleaning solution, effectively dislodging contaminants from tight spaces. Ensure the cleaning solution is compatible with the PCB materials and components to prevent damage.
4. Rinsing to Remove Cleaning Residues
After wet cleaning, rinse the PCB with deionized water or a clean batch of solvent to remove any leftover cleaning agents. Residual solvents or cleaners can themselves act as contaminants, so this step is crucial. For water-based cleaning, use deionized water with a resistivity of at least 18 MΩ·cm to avoid introducing ionic contaminants.
5. Drying for a Moisture-Free Surface
Thorough drying is essential before applying conformal coating. Any residual moisture can trap under the coating, leading to bubbles or adhesion issues. Use a drying oven set to a temperature of 60-80°C for 30-60 minutes, depending on the board’s complexity and component specifications. Alternatively, air drying with filtered, low-humidity air can work for less sensitive assemblies.

Surface Preparation Techniques for Optimal Conformal Coating Adhesion
Cleaning is just the first part of preparing a PCB for conformal coating. Additional surface preparation techniques can further enhance adhesion, ensuring the coating bonds tightly to the board. Here are some effective methods to consider.
1. Plasma Treatment for Surface Activation
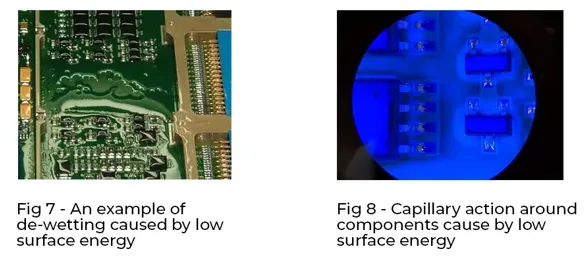
Plasma treatment is a cutting-edge technique that uses ionized gas to modify the PCB surface at a molecular level. This process removes microscopic contaminants and increases surface energy, improving wettability and adhesion. Plasma treatment is especially useful for boards with low-energy surfaces, such as those made of certain plastics or coatings. It can boost adhesion strength by up to 50%, based on industry studies, making it a go-to method for high-reliability applications.
2. Abrasion for Roughening the Surface
For some PCB materials, light abrasion with a fine-grit material or micro-abrasive blasting can create a slightly rougher surface, enhancing mechanical bonding of the coating. This method must be used cautiously, as excessive abrasion can damage the board or expose underlying layers. Always test on a sample board first to determine the appropriate level of abrasion.
3. Priming for Enhanced Bonding
In cases where adhesion remains a challenge, applying a primer can act as an intermediary layer between the PCB and the conformal coating. Primers are formulated to improve chemical bonding and are particularly effective for silicone or urethane coatings, which may struggle to adhere to certain substrates. Ensure the primer is compatible with both the PCB material and the coating type for best results.
Best Practices for Ensuring Conformal Coating Adhesion
Beyond cleaning and surface preparation, following best practices during the entire process can make a significant difference in the quality of the conformal coating. Here are some tips to keep in mind:
- Handle with Care: Always wear gloves when handling PCBs to avoid introducing fingerprint oils after cleaning. Use cleanroom protocols for high-stakes projects to minimize contamination.
- Control Environmental Conditions: Apply coatings in a controlled environment with low humidity (below 50% relative humidity) and minimal dust. Temperature should be maintained between 20-25°C for consistent curing.
- Test for Cleanliness: Use cleanliness testing methods like surface insulation resistance (SIR) testing to verify that no ionic residues remain. SIR values should ideally exceed 10^10 ohms for most applications to ensure reliability.
- Choose the Right Coating: Match the conformal coating material to the PCB’s operating environment and material properties. For example, acrylic coatings offer good moisture resistance, while silicone coatings excel in high-temperature settings.
Common Mistakes to Avoid During PCB Cleaning and Preparation
Even with the best intentions, mistakes during PCB cleaning and preparation can undermine the effectiveness of conformal coating. Here are some pitfalls to watch out for:
- Skipping Cleaning Steps: Rushing through or omitting cleaning steps can leave contaminants behind, leading to adhesion failure.
- Using Incompatible Cleaners: Harsh chemicals or solvents not designed for electronics can damage components or leave harmful residues.
- Inadequate Drying: Applying coating to a damp board traps moisture, causing bubbles or delamination over time.
- Ignoring Component Sensitivity: Some components may not withstand certain cleaning methods, like ultrasonic cleaning or high-temperature drying. Always check component datasheets for compatibility.
The Long-Term Benefits of Proper PCB Cleaning and Preparation
Investing time and effort into cleaning PCBs before conformal coating pays off in the long run. A well-prepared surface ensures that the coating adheres properly, providing robust protection against environmental stressors. This translates to fewer field failures, reduced rework costs, and enhanced product reliability—key factors for industries where downtime or failure can have serious consequences.
For example, in automotive electronics, where PCBs are exposed to vibration, humidity, and temperature swings, a properly applied conformal coating can extend the lifespan of critical systems by years. Similarly, in medical devices, where precision and reliability are paramount, thorough preparation prevents failures that could compromise patient safety.
Conclusion: Make PCB Cleaning a Priority for Conformal Coating Success
Cleaning PCBs before conformal coating is not just a step in the process—it’s the foundation of a reliable, long-lasting protective layer. By removing contaminants for coating and employing effective surface preparation techniques, you can ensure strong conformal coating adhesion and safeguard your electronic assemblies from harsh conditions. Whether you’re using manual cleaning methods or advanced techniques like plasma treatment, the goal remains the same: a clean, well-prepared surface that maximizes the coating’s effectiveness.
At ALLPCB, we understand the importance of precision in every stage of PCB manufacturing and assembly. By following the steps and best practices outlined in this guide, you can achieve superior results and build electronics that stand the test of time. Prioritize PCB cleaning and preparation, and watch as your products reach new levels of durability and performance.


