 ALLPCB


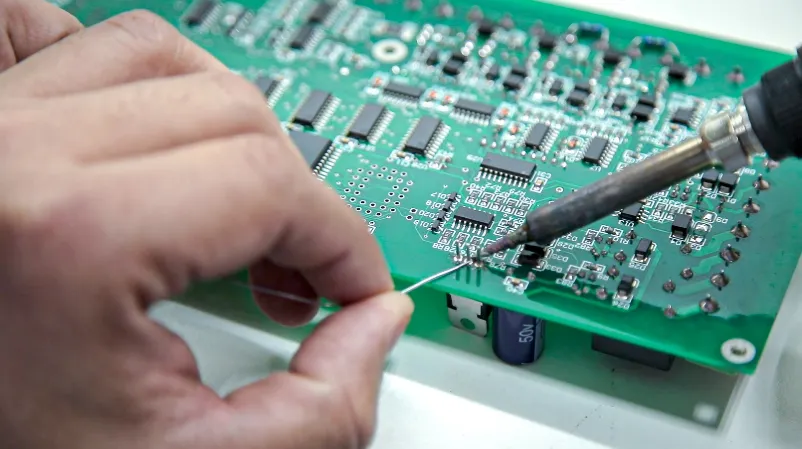
Hand soldering is a critical skill for anyone involved in electronics assembly, from hobbyists to professional engineers. Whether you're repairing a circuit board or assembling a custom project, mastering hand soldering techniques ensures reliable connections and long-lasting results. In this comprehensive guide, we’ll explore manual soldering tips, optimal soldering iron temperature, various solder types, best practices for soldering in electronics, and how to avoid common issues like cold solder joints. Let’s dive into the art of hand soldering and equip you with the knowledge to achieve perfect manual assembly.
What Is Hand Soldering and Why Does It Matter?
Hand soldering is the process of manually joining electronic components or wires using a soldering iron and solder. This technique involves melting a filler metal (solder) to create a strong, conductive bond between components on a printed circuit board (PCB) or other electronic setups. Unlike automated soldering methods, hand soldering offers precision and flexibility, making it ideal for small-scale projects, repairs, or prototyping.
The importance of mastering hand soldering lies in the quality of the connections. A well-soldered joint ensures electrical conductivity and mechanical strength, while a poor joint can lead to failures, short circuits, or unreliable performance. By learning proper manual soldering tips and techniques, you can enhance the durability and functionality of your electronic assemblies.
Essential Tools for Hand Soldering
Before diving into hand soldering techniques, it’s crucial to have the right tools. High-quality equipment can make a significant difference in the ease and outcome of your soldering tasks. Here are the must-have tools for manual soldering:
- Soldering Iron: A temperature-controlled soldering iron (25-40 watts for general electronics work) is ideal. Adjustable temperature settings allow you to match the heat to the task.
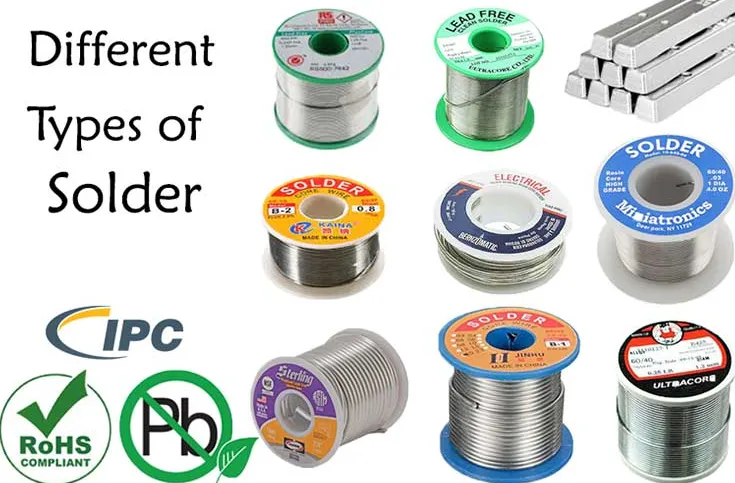
- Solder Wire: Typically made of a tin-lead alloy or lead-free alternatives, solder wire with a flux core is recommended for easier application.
- Soldering Stand: Keeps your iron safe and prevents accidental burns when not in use.
- Flux: Helps clean surfaces and improves solder flow for better adhesion.
- Solder Wick or Sucker: Useful for desoldering and removing excess solder.
- Safety Gear: Heat-resistant gloves and safety glasses protect against burns and fumes.
- Cleaning Sponge or Brass Wire: Keeps the soldering iron tip clean for consistent performance.
Investing in quality tools ensures better control and precision, which are key to achieving strong solder joints in electronics.

Choosing the Right Soldering Iron Temperature
One of the most critical factors in hand soldering is setting the correct soldering iron temperature. If the temperature is too low, the solder won’t melt properly, leading to weak or cold solder joints. If it’s too high, you risk damaging components or burning the PCB.
For most electronics work, a temperature range of 300°C to 350°C (572°F to 662°F) is ideal. However, this can vary based on the type of solder and components:
- Lead-Based Solder: Melts at around 180°C to 190°C (356°F to 374°F), so a tip temperature of 300°C is usually sufficient.
- Lead-Free Solder: Requires a slightly higher melting point of 217°C to 230°C (423°F to 446°F), so adjust the iron to around 320°C to 350°C.
- Sensitive Components: For delicate parts like LEDs or microchips, lower the temperature to around 260°C to 280°C (500°F to 536°F) to prevent heat damage.
Always start with a lower temperature and increase it gradually if needed. A temperature-controlled soldering station is highly recommended for maintaining consistent heat levels during manual soldering.
Related Reading: Optimizing Hand Soldering Temperature: A Comprehensive Guide for Electrical Engineers
Understanding Solder Types for Electronics
Choosing the right solder type is just as important as setting the correct temperature. Solder is a metal alloy used to create a permanent bond between components. Here are the common solder types used in electronics assembly:
- Tin-Lead Solder (Sn/Pb): Traditionally used due to its low melting point and ease of use. A common ratio is 60/40 (60% tin, 40% lead), which melts at around 183°C (361°F). However, due to environmental concerns, its use is declining.
- Lead-Free Solder: Made of tin, silver, and copper (e.g., SAC305 alloy with 96.5% tin, 3% silver, 0.5% copper), this type has a higher melting point (around 217°C or 423°F). It’s safer for the environment but can be harder to work with due to reduced wetting properties.
- Flux-Core Solder: Contains a flux core that cleans the surfaces as you solder, making it ideal for hand soldering. It’s available in both leaded and lead-free varieties.
- Rosin-Core Solder: A type of flux-core solder with rosin flux, commonly used for electronics due to its non-corrosive nature after soldering.
For most hobbyists and professionals working on electronics, a flux-core, lead-free solder with a diameter of 0.8mm to 1.0mm is a versatile choice for through-hole and small surface-mount components.
Hand Soldering Techniques for Perfect Joints
Now that you have the tools and materials, let’s cover the core hand soldering techniques to achieve flawless results. Follow these steps for reliable connections in electronics assembly:
1. Prepare Your Workspace and Components
Ensure your workspace is clean, well-lit, and ventilated to avoid inhaling solder fumes. Secure the PCB or components in a holder or vise to keep them steady. Tin the soldering iron tip by applying a thin layer of fresh solder—this improves heat transfer and prevents oxidation.
2. Clean the Surfaces
Dirty or oxidized surfaces can prevent proper solder adhesion. Use isopropyl alcohol and a brush to clean the PCB pads and component leads. Apply flux if necessary to remove oxidation and improve solder flow.
3. Heat the Joint, Not the Solder
Place the soldering iron tip on the joint (where the component lead meets the PCB pad) for 1-2 seconds to heat it evenly. Then, touch the solder wire to the joint, not the iron tip. The solder should melt and flow smoothly around the joint, creating a shiny, concave shape. Avoid applying too much solder, as it can create blobs or bridges.
4. Remove the Iron and Let It Cool
Once the solder flows evenly, remove the solder wire first, then the iron. Allow the joint to cool naturally without blowing on it or moving the components. A good solder joint should look smooth and shiny, not dull or grainy.
5. Inspect and Clean
After soldering, inspect the joint for cracks or insufficient solder. Use a magnifying glass if needed. Clean any flux residue with isopropyl alcohol and a brush to prevent corrosion over time.
Related Reading: Hand Soldering with Solder Paste: A Step by Step Guide for Beginners

Soldering for Electronics: Best Practices
Soldering for electronics requires attention to detail to avoid damaging sensitive components or creating unreliable connections. Here are some best practices to follow:
- Work Quickly: Limit heat exposure to 2-3 seconds per joint to prevent damage to components or PCB traces. If a joint takes longer, let it cool before retrying.
- Use the Right Tip: Choose a soldering iron tip that matches the size of the joint. A fine tip (1mm or less) works for small components, while a broader chisel tip (2-3mm) is better for larger joints.
- Avoid Overheating: Constantly monitor the temperature and avoid leaving the iron on a joint for too long. Overheating can lift PCB pads or damage components like capacitors and ICs.
- Practice on Scrap: If you’re new to soldering, practice on a scrap PCB or old components to build confidence and refine your technique.
- Keep Your Iron Clean: Wipe the tip on a damp sponge or brass wire cleaner frequently to remove oxidized solder and ensure consistent heat transfer.
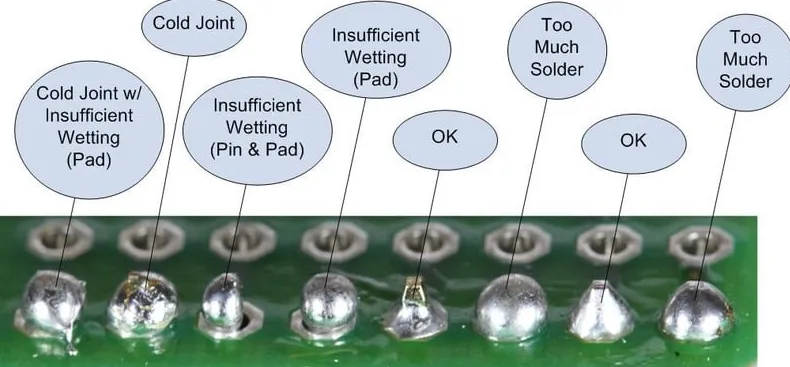
Avoiding Cold Solder Joints: Common Pitfalls and Solutions
A cold solder joint is one of the most common issues in hand soldering. It occurs when the solder doesn’t properly bond with the surfaces, resulting in a weak, unreliable connection. Cold joints often appear dull, grainy, or cracked, and they can cause intermittent electrical failures.
Here’s how to avoid cold solder joints during manual soldering:
- Ensure Proper Heating: Always heat the joint sufficiently before applying solder. If the joint isn’t hot enough, the solder won’t flow evenly, leading to a cold joint.
- Don’t Move the Joint: Avoid moving the component or PCB while the solder is cooling. Even slight movement can disrupt the bond and create a cold joint.
- Use Fresh Solder: Old or oxidized solder can lead to poor adhesion. Always use fresh solder wire and store it properly to prevent degradation.
- Check for Contamination: Dirty surfaces or insufficient flux can prevent proper bonding. Clean the joint thoroughly and apply flux if needed.
- Reheat if Necessary: If you suspect a cold joint, reheat it with the iron and add a small amount of fresh solder to ensure a proper bond.
Troubleshooting Common Soldering Issues
Even with the best hand soldering techniques, issues can arise. Here are solutions to some common problems encountered during manual soldering for electronics:
- Solder Bridges: When solder connects two adjacent pads or pins, creating a short circuit. Use a solder wick or sucker to remove excess solder, and apply flux to prevent recurrence.
- Insufficient Solder: If a joint looks incomplete or weak, reheat it and add more solder until it forms a proper concave shape.
- Lifted Pads: Overheating can cause PCB pads to lift off the board. Work quickly, use the correct temperature, and avoid excessive force on the joint.
- Dry Joints: Similar to cold joints, dry joints occur when there’s not enough solder or heat. Reheat the joint and apply additional solder as needed.
Advanced Manual Soldering Tips for Professionals
For those looking to take their hand soldering skills to the next level, consider these advanced manual soldering tips:
- Soldering Small Surface-Mount Components: Use a fine tip and low temperature (around 260°C or 500°F) for surface-mount devices (SMDs). Apply solder to one pad first, place the component, then solder the other side.
- Drag Soldering: For multi-pin components like ICs, apply flux, add solder to the tip, and drag it across the pins to create even joints. Clean up any bridges with a solder wick.
- Thermal Management: Use a heat sink or alligator clip on component leads to dissipate heat and protect sensitive parts during soldering.
- Custom Tips: For specialized tasks, consider custom or interchangeable tips to match the component size and shape for better precision.
Safety Precautions for Hand Soldering
Soldering involves heat and potentially harmful fumes, so safety is paramount. Follow these precautions to protect yourself during manual soldering:
- Work in a well-ventilated area or use a fume extractor to avoid inhaling solder fumes, especially when using lead-based solder.
- Wear safety glasses to protect your eyes from solder splashes or debris.
- Use heat-resistant gloves if handling hot components or boards.
- Keep the soldering iron in a stand when not in use to prevent accidental burns.
- Unplug the iron after use and let it cool completely before storing.
Conclusion: Mastering the Art of Hand Soldering
Hand soldering is both a skill and an art that requires practice, patience, and the right techniques. By understanding the importance of soldering iron temperature, selecting appropriate solder types, and applying proven hand soldering techniques, you can achieve perfect manual assembly for any electronics project. Avoiding issues like cold solder joints and following safety practices will further enhance the quality and reliability of your work.
Whether you’re a beginner learning the basics or a seasoned professional refining your craft, the tips and methods shared in this guide can help elevate your soldering game. With consistent practice and attention to detail, you’ll be creating strong, reliable solder joints that stand the test of time. Start soldering with confidence and take pride in every connection you make!


