 ALLPCB


If you're dealing with a solder bridge on your PCB, don’t worry—there are proven ways to fix it! Solder bridges, those unwanted connections between pads or traces caused by excess solder, can short-circuit your board and ruin functionality. In this guide, we'll dive into expert techniques using tools like a solder bridge rework station, desoldering methods, and advanced PCB repair methods to help you rescue your project quickly and effectively.
Whether you're a hobbyist or a seasoned engineer, this comprehensive blog will walk you through the steps to remove solder bridges with precision. We'll cover everything from basic tools to advanced hot air rework for PCBs, and even compare popular desoldering tools like solder sucker vs solder wick. Let’s get started on saving your PCB!
What Are Solder Bridges and Why Do They Happen?
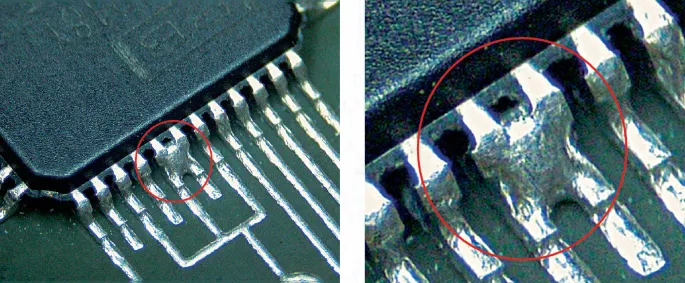
Solder bridges occur when excess solder forms an unintended connection between two or more adjacent pads, pins, or traces on a printed circuit board (PCB). These tiny mishaps can create electrical shorts, disrupting the circuit's performance or rendering it completely unusable.
Common causes of solder bridges include:
- Excess Solder: Applying too much solder during manual soldering or reflow processes.
- Poor Pad Spacing: Working on densely populated boards with tight pin spacing (e.g., 0.5mm pitch on QFN packages) increases the risk.
- Inadequate Flux: Insufficient flux can cause solder to spread unevenly, leading to bridges.
- Improper Technique: Incorrect soldering iron angles or rushed work can drag solder across pads.
Understanding why solder bridges happen is the first step to preventing them, but when they do occur, having the right rework techniques and tools is essential for a quick fix.
Essential Tools for Solder Bridge Removal
Before diving into specific desoldering techniques, let’s go over the must-have tools for tackling solder bridges. Having the right equipment can make the difference between a clean rework and a damaged board.
- Soldering Iron: A fine-tip iron (15-30W for precision work) is ideal for small bridges on through-hole or surface-mount components.
- Solder Bridge Rework Station: A dedicated rework station with adjustable temperature and airflow is perfect for complex boards with SMD components.
- Desoldering Tools: Options like a solder sucker (desoldering pump) or solder wick (desoldering braid) for removing excess solder.
- Hot Air Gun: Essential for hot air rework for PCBs, especially when dealing with multi-pin components or large solder areas.
- Flux: Helps solder flow and prevents oxidation during rework.
- Tweezers and Brushes: For precise handling of components and cleaning up residue.
With these tools in your arsenal, you’re ready to tackle any solder bridge, no matter the complexity of the PCB.
Basic Desoldering Techniques for Solder Bridges
Let’s start with the fundamental desoldering techniques that work well for simple solder bridges on less complex boards. These methods are accessible to beginners and require minimal equipment.
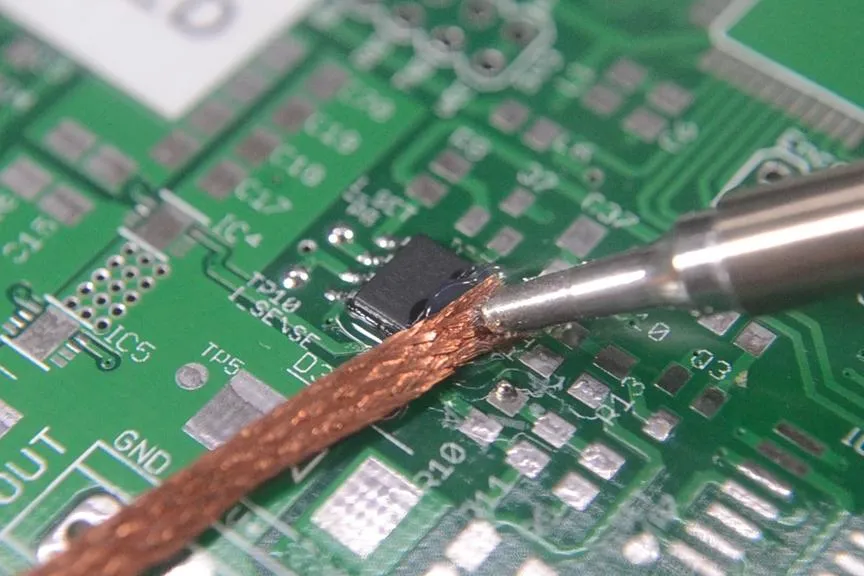
1. Using a Soldering Iron and Solder Wick
Solder wick, also known as desoldering braid, is a copper mesh that absorbs molten solder. Here’s how to use it:
- Apply flux to the solder bridge to improve flow.
- Place the solder wick over the bridge.
- Heat the wick with a soldering iron set to around 300°C (adjust based on solder type—lead-free solder may require up to 350°C).
- Watch as the wick absorbs the excess solder, breaking the bridge.
- Clean the area with isopropyl alcohol and a brush to remove flux residue.
This method is ideal for small bridges between two pins or pads and works best on through-hole components or larger SMDs.
2. Using a Solder Sucker (Desoldering Pump)
A solder sucker is a manual vacuum tool that pulls molten solder away from the board. Here’s the process:
- Add flux to the solder bridge.
- Melt the solder with your iron (set to 300-350°C depending on solder type).
- Quickly place the tip of the solder sucker over the molten solder and press the release button to suck it up.
- Repeat if necessary and clean the area afterward.
This technique is fast and effective for larger amounts of solder but requires practice to avoid damaging pads with excessive heat or force.
Solder Sucker vs Solder Wick: Which Is Better?
Both tools are popular for desoldering, but which one should you choose for removing solder bridges? Let’s break down the pros and cons:
- Solder Sucker:
- Pros: Faster for large solder blobs; reusable with no additional cost per use.
- Cons: Can be messy if not used correctly; less precise for tight spaces (e.g., 0.8mm pitch components).
- Solder Wick:
- Pros: Highly precise, ideal for small bridges in tight spaces; less risk of damaging pads.
- Cons: Slower process; consumes wick material, adding to costs over time.
For most solder bridge issues on densely packed boards, solder wick is the safer and more precise choice. However, for larger bridges or through-hole components, a solder sucker can save time. Keep both in your toolkit for flexibility.
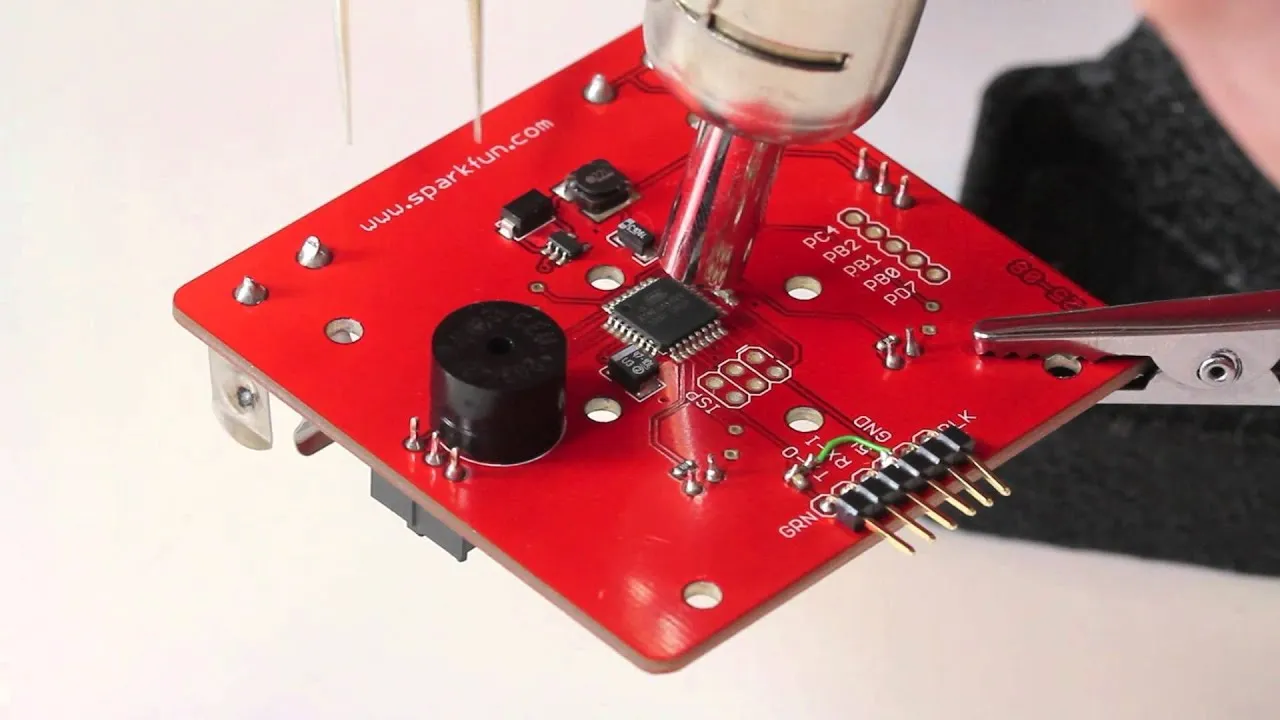
Advanced PCB Repair Methods with Hot Air Rework
For complex boards with surface-mount devices (SMDs) or multi-layer designs, basic tools might not cut it. This is where advanced PCB repair methods, like hot air rework for PCBs, come into play. A solder bridge rework station with hot air capabilities offers precision and control for delicate tasks.
Why Use Hot Air Rework for PCBs?
Hot air rework stations deliver a controlled stream of heated air (typically 100-480°C) to melt solder without direct contact. This is crucial for:
- Removing solder bridges on tiny SMD components (e.g., 0402 resistors or QFP packages with 0.4mm pin spacing).
- Reflowing entire areas of a board without risking damage to adjacent components.
- Working on multilayer boards where thermal stress must be minimized.
Steps for Hot Air Rework to Remove Solder Bridges
- Prepare the Board: Apply flux to the solder bridge area to aid in solder flow and prevent oxidation.
- Preheat the Board: For multilayer PCBs, preheat the entire board to 100-120°C using a preheating plate to reduce thermal shock.
- Set the Hot Air Station: Adjust the temperature to 300-350°C (based on solder type) and use a low airflow setting (around 20-30 L/min) to avoid blowing components off the board.
- Target the Bridge: Use a small nozzle (2-5mm) to focus hot air on the solder bridge for 5-10 seconds until the solder melts.
- Remove Excess Solder: Use tweezers or solder wick to clear the molten solder, breaking the bridge.
- Inspect and Clean: Check the area under magnification for residue or remaining bridges, then clean with isopropyl alcohol.
Hot air rework is a game-changer for intricate repairs, but it requires practice to avoid overheating components or warping the board. Always start with lower temperatures and increase gradually if needed.
Tips for Preventing Solder Bridges During Rework
While removing solder bridges is a valuable skill, preventing them in the first place saves time and effort. Here are some practical tips to minimize the risk during soldering or rework:
- Use the Right Amount of Solder: Apply just enough solder to form a concave fillet—typically 0.1-0.2mm thickness for SMD pads.
- Apply Flux Generously: Flux ensures even solder flow and reduces the chance of bridging.
- Choose the Correct Iron Tip: Use a fine tip (0.5-1mm) for tight spaces to avoid dragging solder across pads.
- Work at the Right Temperature: Stick to 300°C for leaded solder and 350°C for lead-free to prevent excessive melting.
- Inspect Under Magnification: Use a magnifying glass or microscope to check for tiny bridges after soldering.
Troubleshooting Common Issues During Solder Bridge Removal
Even with the best techniques, rework can sometimes go wrong. Here are solutions to common problems:
- Damaged Pads: If a pad lifts during desoldering, stop immediately. Use conductive epoxy or a jumper wire to reconnect the trace as a last resort.
- Residual Solder: If small amounts of solder remain after using a sucker or wick, add fresh solder to the area and retry desoldering—it’s often easier to remove a larger blob.
- Overheating Components: If nearby components are affected during hot air rework, use heat-resistant tape or shields to protect them.
Choosing the Right Solder Bridge Rework Station
Investing in a quality solder bridge rework station can elevate your PCB repair game. When selecting one, consider these factors:
- Temperature Control: Look for a station with precise settings (range of 100-480°C) to handle different solder types.
- Airflow Adjustment: Variable airflow (10-50 L/min) prevents blowing small components off the board.
- Nozzle Variety: Multiple nozzle sizes (2-10mm) allow focused heat for various component sizes.
- Digital Display: A clear interface for monitoring temperature and airflow ensures accuracy during rework.
A good rework station is an investment that pays off in cleaner, faster repairs, especially for advanced PCB repair methods.
Final Thoughts on Mastering Solder Bridge Removal
Removing solder bridges doesn’t have to be a daunting task. With the right tools, desoldering techniques, and a bit of practice, you can rescue any PCB from pesky shorts. Whether you’re using a simple soldering iron with solder wick, comparing solder sucker vs solder wick for the job, or employing hot air rework for PCBs on complex designs, the key is precision and patience.
Start with the basics for small fixes, and as your skills grow, incorporate advanced PCB repair methods using a solder bridge rework station. By following the steps and tips in this guide, you’ll not only fix current issues but also prevent future solder bridges, ensuring your projects run smoothly.
Armed with these expert techniques, you’re now ready to tackle any solder bridge challenge. Keep your workspace organized, your tools calibrated, and your focus sharp—your PCBs will thank you!


