 ALLPCB


Wave soldering is a critical process in electronics manufacturing, especially for assembling through-hole components on printed circuit boards (PCBs). However, even with the best equipment and setup, issues can arise that affect the quality of solder joints and overall board performance. If you're an engineer looking for a reliable wave soldering troubleshooting guide, this blog offers practical solutions to common problems, along with tips on wave soldering process control, wave soldering machine maintenance, and wave soldering equipment calibration. Whether you're dealing with solder bridging or insufficient hole fill, we've got you covered with actionable advice to optimize your process.
In the detailed sections below, we'll dive into the most frequent wave soldering defects, their causes, and step-by-step fixes. We'll also explore how to maintain and calibrate your equipment to prevent issues before they start. Let's get started on improving your soldering outcomes!
What is Wave Soldering and Why Does It Matter?
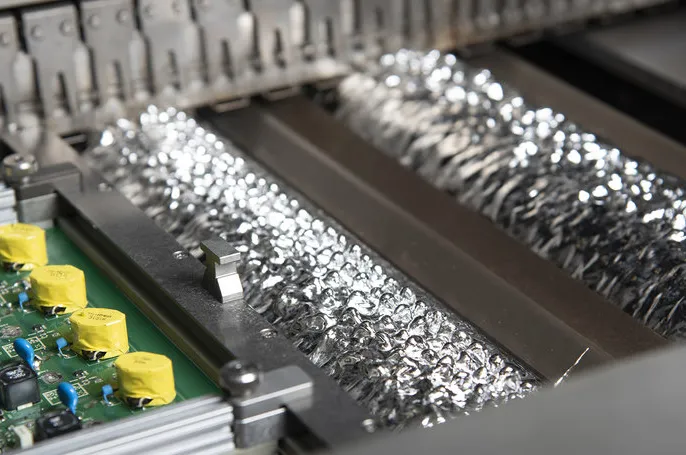
Wave soldering is a large-scale soldering method used to attach electronic components to PCBs. The process involves passing the board over a molten solder wave, which creates strong, reliable joints for through-hole components. This technique is widely used in high-volume production because of its speed and efficiency. However, when issues occur, they can lead to defective boards, increased rework costs, and production delays.
Understanding how to troubleshoot common problems is essential for engineers who aim to maintain high-quality output. By mastering wave soldering process control, you can minimize defects and ensure consistent results. Let's explore the most common issues and how to address them effectively.
Common Wave Soldering Problems and How to Fix Them
Wave soldering defects can stem from various factors, including improper machine settings, poor board design, or inadequate maintenance. Below, we break down the top issues engineers face and provide practical solutions as part of this wave soldering troubleshooting guide.
1. Insufficient Hole Fill
Insufficient hole fill happens when solder does not fully penetrate the through-hole, leaving weak or incomplete joints. This defect can cause electrical failures and reduce the board's reliability.
Causes:
- Inadequate preheat temperature, which prevents proper solder flow (ideal preheat range: 100-120°C for most boards).
- Low solder wave height, failing to reach the top of the PCB.
- Contaminated or oxidized component leads blocking solder adhesion.
Solutions:
- Adjust the preheat temperature to ensure the board reaches the optimal range before contacting the solder wave.
- Check and increase the solder wave height if necessary, ensuring it contacts the board evenly (typical wave height: 2-3 mm above the board surface).
- Clean component leads and ensure proper flux application to remove oxidation and improve wettability.
2. Solder Bridging
Solder bridging occurs when excess solder creates unintended connections between adjacent pads or leads, leading to short circuits.
Causes:
- Excessive solder wave height or pressure, causing solder to overflow (optimal wave pressure: around 0.5-1.0 bar).
- Improper board design with pads spaced too closely (minimum spacing recommendation: 2.54 mm for through-hole components).
- Insufficient or uneven flux application, leading to poor solder flow control.
Solutions:
- Reduce the solder wave height and pressure to prevent overflow while maintaining contact with the board.
- Review and adjust the PCB layout to ensure adequate spacing between pads and leads during the design phase.
- Optimize flux application to ensure even coverage, using a flux density of approximately 500-1000 μg/in2 for best results.
3. Cold Solder Joints
Cold solder joints appear dull and grainy, indicating poor bonding between the solder and the component lead or pad. These joints are unreliable and prone to cracking under stress.
Causes:
- Low solder temperature, preventing proper melting and bonding (ideal solder pot temperature: 250-260°C for lead-free solder).
- Insufficient dwell time in the solder wave, reducing heat transfer (recommended dwell time: 2-4 seconds).
- Contaminated solder or flux, interfering with proper wetting.
Solutions:
- Monitor and adjust the solder pot temperature to stay within the recommended range for your solder type.
- Increase the conveyor speed slightly to ensure adequate dwell time over the wave without overheating the board.
- Regularly test and replace contaminated solder or flux, maintaining a clean solder pot with less than 0.1% impurities.
4. Solder Balling
Solder balling refers to small, unwanted solder spheres that form on the PCB surface, potentially causing shorts or aesthetic issues.
Causes:
- Excessive moisture on the board, causing solder to splatter during heating.
- High solder wave turbulence, leading to solder droplets (ideal turbulence level: minimal, with a smooth laminar flow).
- Inadequate flux, failing to control solder spread.
Solutions:
- Pre-bake PCBs at 100°C for 1-2 hours to remove moisture before soldering.
- Adjust the wave pump speed to reduce turbulence and achieve a smooth, consistent wave.
- Ensure proper flux application with a uniform layer to minimize solder splatter.
5. Lifted Components
Lifted components occur when parts detach or shift during the soldering process, leading to misalignment or failed connections.
Causes:
- Excessive conveyor speed, causing components to dislodge (optimal speed: 1-1.5 meters per minute).
- Poor component placement or insufficient adhesive before soldering.
- Thermal shock from rapid temperature changes during the process.
Solutions:
- Slow down the conveyor speed to reduce mechanical stress on components during soldering.
- Use proper adhesives or fixtures to secure components before they enter the wave soldering machine.
- Optimize the preheat stage to minimize thermal shock, gradually increasing the temperature over 60-90 seconds.
Wave Soldering Process Control: Key Parameters to Monitor
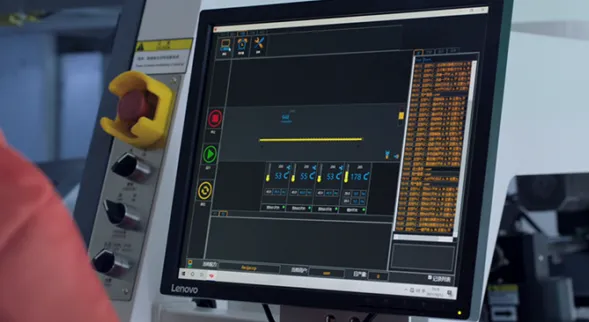
Effective wave soldering process control is the foundation of defect-free assembly. By monitoring and adjusting key parameters, you can prevent many common issues before they occur. Here are the critical factors to focus on:
- Solder Temperature: Maintain a consistent temperature in the solder pot, typically 250-260°C for lead-free alloys and 240-250°C for leaded solder. Use a digital thermometer to check this daily.
- Preheat Temperature: Ensure the board reaches 100-120°C before soldering to avoid thermal shock and promote even solder flow.
- Wave Height: Set the wave height to 2-3 mm above the board surface for optimal contact without overflow. Regularly inspect the wave for consistency.
- Conveyor Speed: Adjust the speed to 1-1.5 meters per minute to balance dwell time and production rate, avoiding rushed or overheated soldering.
- Flux Application: Apply flux evenly, targeting a density of 500-1000 μg/in2, and test coverage using a flux residue test kit if needed.
By keeping these parameters within the recommended ranges, you can significantly reduce defects and improve overall soldering quality.
Wave Soldering Machine Maintenance: Prevent Issues Before They Start
Regular wave soldering machine maintenance is essential to avoid downtime and ensure consistent performance. Neglecting maintenance can lead to contamination, uneven waves, and defective solder joints. Follow these maintenance tips to keep your equipment in top shape:
- Clean the Solder Pot: Remove dross (oxidized solder) from the pot daily to prevent contamination. Aim to keep impurities below 0.1% by skimming the surface and testing solder composition weekly.
- Inspect the Wave Nozzle: Check the nozzle for blockages or wear every week. A clogged nozzle can disrupt wave uniformity, so clean it with a non-abrasive tool as needed.
- Lubricate Moving Parts: Apply lubricant to conveyor belts and other moving components monthly to reduce wear and ensure smooth operation.
- Check Fluxing System: Clean and refill the flux applicator every shift to prevent uneven application. Inspect spray nozzles for clogs and replace them if necessary.
- Monitor Heating Elements: Test preheat and solder pot heaters bi-weekly to ensure they maintain accurate temperatures within ±5°C of the set value.
Creating a maintenance schedule and logging all activities can help track the condition of your machine and catch potential issues early.
Wave Soldering Equipment Calibration: Ensuring Precision
Proper wave soldering equipment calibration is crucial for maintaining accuracy in temperature, wave height, and conveyor speed. Over time, sensors and settings can drift, leading to inconsistent results. Here's how to keep your equipment calibrated:
- Temperature Calibration: Use a calibrated thermocouple to verify solder pot and preheat temperatures monthly. Adjust the settings if readings deviate by more than ±3°C from the target.
- Wave Height Adjustment: Measure wave height with a precision gauge every two weeks, ensuring it remains 2-3 mm above the board. Fine-tune the pump speed if adjustments are needed.
- Conveyor Speed Verification: Use a stopwatch to measure the time it takes for a board to pass through the machine. Adjust the speed to maintain 1-1.5 meters per minute if discrepancies are found.
- Flux Density Check: Test flux application density with a specialized meter quarterly, aiming for 500-1000 μg/in2. Recalibrate the fluxing system if coverage is uneven.
Calibration should be performed by trained personnel, and records of all adjustments should be kept for quality assurance purposes. Investing in regular calibration not only prevents defects but also extends the lifespan of your equipment.
Preventive Tips for Long-Term Success
Beyond troubleshooting and maintenance, adopting preventive measures can minimize wave soldering issues over time. Here are some best practices to follow:
- Train staff regularly on proper machine operation and defect identification to catch issues early.
- Use high-quality materials, including clean solder alloys and compatible flux, to avoid contamination-related defects.
- Design PCBs with wave soldering in mind, ensuring adequate pad spacing and thermal reliefs to prevent uneven heating.
- Conduct periodic audits of your process parameters and equipment condition to maintain consistency.
Conclusion: Mastering Wave Soldering for Quality Results
Wave soldering is a powerful technique for high-volume PCB assembly, but it comes with challenges that can impact quality and efficiency. By following this wave soldering troubleshooting guide, you can address common issues like insufficient hole fill, solder bridging, and cold joints with confidence. Additionally, focusing on wave soldering process control, wave soldering machine maintenance, and wave soldering equipment calibration ensures long-term reliability and fewer defects.
Implementing the solutions and preventive tips outlined in this blog will help you optimize your soldering process and achieve consistent, high-quality results. Keep monitoring your parameters, maintaining your equipment, and refining your techniques to stay ahead in electronics manufacturing.


