 ALLPCB


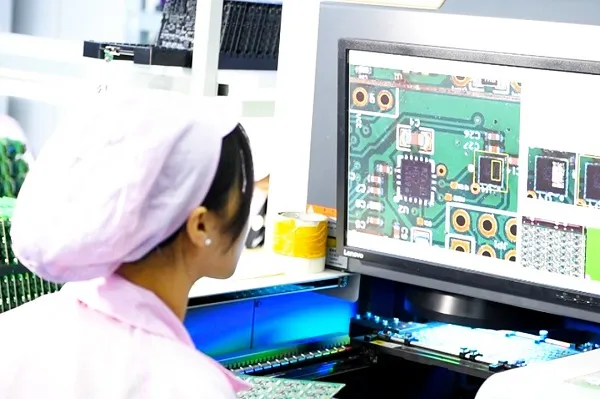
If you're looking to master SMT batch assembly, understand the surface mount assembly process, or optimize processes like reflow soldering in batch assembly, you're in the right place. This comprehensive guide from ALLPCB covers everything you need to know about assembling surface mount technology (SMT) components in batches, including tips for pick and place machine optimization and precise SMT component placement. Whether you're a beginner or a seasoned engineer, you'll find actionable insights to streamline your production and improve quality.
In the sections below, we'll dive deep into each aspect of batch assembly for SMT components. From understanding the basics to mastering advanced techniques, this guide will equip you with the knowledge to enhance efficiency and reduce errors in your PCB manufacturing process.
What is SMT Batch Assembly and Why Does It Matter?
SMT batch assembly refers to the process of assembling multiple printed circuit boards (PCBs) with surface mount components in a single production run. Unlike through-hole technology, SMT involves placing components directly onto the surface of the PCB, which allows for higher component density and faster automated assembly. This method is widely used in modern electronics manufacturing due to its efficiency and ability to support compact designs.
The importance of batch assembly lies in its ability to scale production. By assembling multiple boards at once, manufacturers can reduce setup times, lower costs, and maintain consistency across units. However, achieving success in surface mount assembly process requires a solid understanding of techniques and tools, which we’ll explore in detail.
Key Steps in the Surface Mount Assembly Process
The surface mount assembly process involves several critical steps that ensure components are accurately placed and securely soldered to the PCB. Let’s break down each stage to help you understand how to execute batch assembly effectively.
1. Solder Paste Application
The process begins with applying solder paste to the PCB. This paste, a mixture of tiny solder particles and flux, is applied to the pads where components will be placed. A stencil is typically used to ensure precision, allowing paste to be deposited only on specific areas. For batch assembly, maintaining consistent paste thickness (usually between 0.1 mm and 0.15 mm) across all boards is crucial to avoid defects like insufficient solder or bridging.
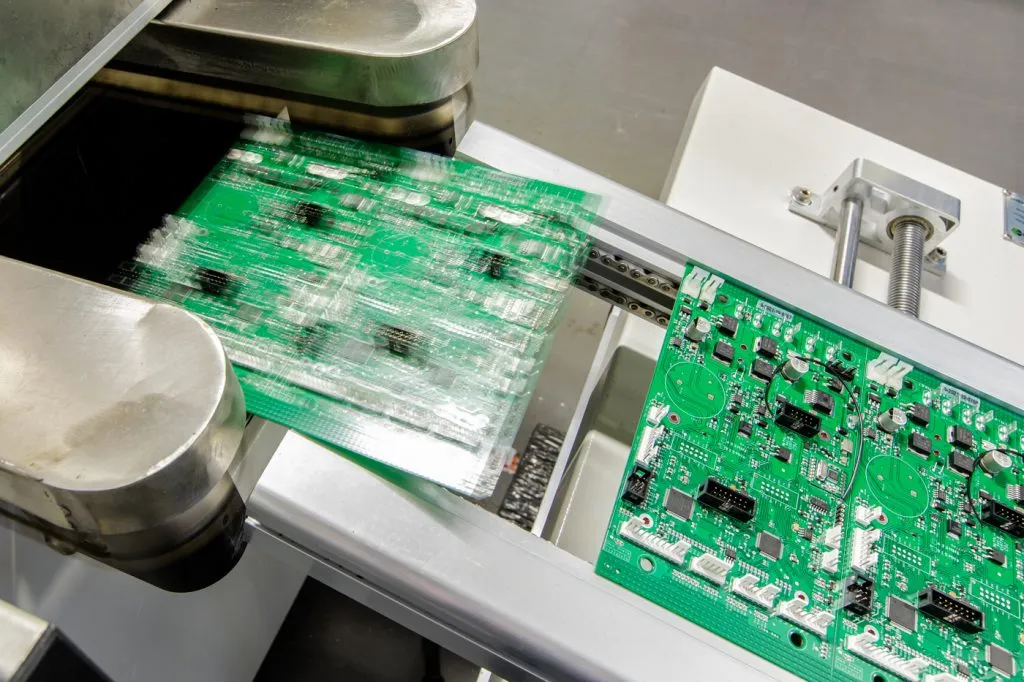
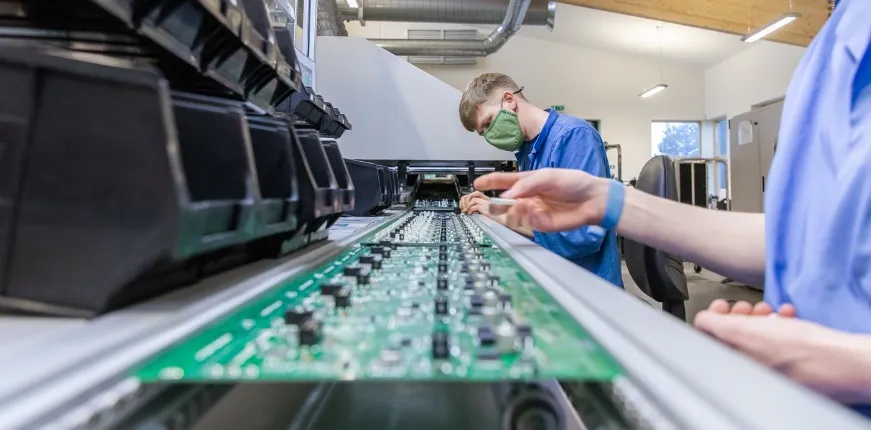
2. Component Placement with Pick and Place Machines
Once the solder paste is applied, components are placed onto the PCB using automated pick and place machines. These machines can position thousands of components per hour with precision, often exceeding 100,000 placements per hour in high-speed setups. Proper SMT component placement is vital to avoid misalignment, which can lead to connection failures. We’ll discuss pick and place machine optimization in more detail later.
3. Reflow Soldering for Secure Connections
After placement, the PCB undergoes reflow soldering in batch assembly. The board is heated in a reflow oven, melting the solder paste to form strong electrical and mechanical bonds between components and pads. A typical reflow profile includes preheating (to around 150°C), soaking, reflow (peak at 240-260°C), and cooling phases. Consistency in temperature control across the batch ensures uniform soldering quality.
4. Inspection and Quality Control
The final step involves inspecting the assembled boards for defects. Automated optical inspection (AOI) systems are commonly used to detect issues like misaligned components or solder bridging. In batch assembly, inspecting a sample from each batch can help identify systemic issues early, saving time and resources.
Techniques for Efficient SMT Batch Assembly
To achieve high-quality results in SMT batch assembly, you need to focus on proven techniques that enhance precision and efficiency. Below are some key approaches to consider during production.
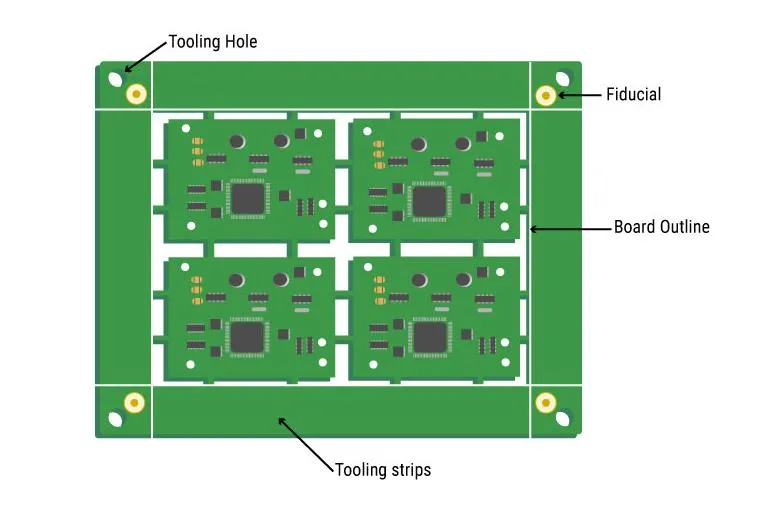
1. Optimize Your PCB Design for Batch Production
Start with a design that supports batch assembly. Ensure component spacing allows for automated placement without interference—aim for at least 0.5 mm between components for standard designs. Additionally, use fiducial marks (small reference points on the PCB) to help pick and place machines align components accurately across multiple boards in a batch.
2. Standardize Processes Across Batches
Consistency is key in batch assembly. Use the same stencil, solder paste, and machine settings for each run to minimize variations. For example, if your reflow oven profile works well for one batch, save those settings (e.g., peak temperature of 245°C for 30 seconds) and replicate them for future runs to maintain soldering quality.
3. Minimize Changeovers Between Batches
Changeovers, such as switching stencils or recalibrating machines, can slow down production. Group similar PCB designs into larger batches to reduce the frequency of changeovers. This approach can cut setup time by up to 30%, boosting overall throughput.
Tips for Pick and Place Machine Optimization
Pick and place machine optimization is a cornerstone of efficient SMT batch assembly. These machines are the heart of the surface mount assembly process, and fine-tuning their performance can significantly impact production speed and accuracy. Here are some practical tips to maximize their effectiveness.
1. Calibrate Regularly for Precision
Ensure your pick and place machine is calibrated frequently to maintain placement accuracy, ideally within ±0.01 mm. Misalignment by even 0.05 mm can cause components to fail during reflow soldering. Schedule calibration checks before each major batch run to avoid costly rework.
2. Use the Right Nozzles for Components
Different components require specific nozzles for accurate pickup and placement. For instance, smaller components like 0402 resistors need finer nozzles compared to larger IC packages. Matching nozzle size to component dimensions reduces placement errors by up to 20% in high-volume batches.
3. Optimize Feeder Setup for Speed
Arrange component feeders to minimize travel distance for the machine’s head. Place frequently used components closer to the placement area to reduce cycle time. Some systems report a 15% speed increase just by optimizing feeder layout for batch runs.
4. Update Software for Enhanced Performance
Keep your machine’s software up to date to access the latest algorithms for placement paths and error detection. Modern updates can improve placement speed by 10-25% while reducing misplacement rates, especially for complex boards with high component density.
Mastering Reflow Soldering in Batch Assembly
Reflow soldering in batch assembly is a critical step that determines the reliability of your PCB. Poor soldering can lead to weak joints or component failure, so getting this process right across an entire batch is essential. Here’s how to perfect it.
1. Develop a Consistent Reflow Profile
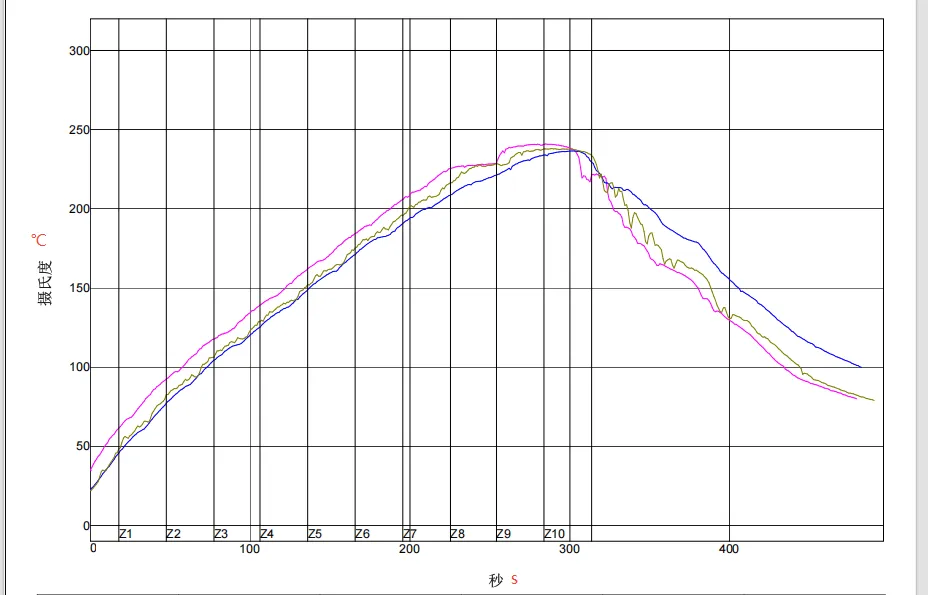
A well-defined reflow profile ensures even heating and cooling across all boards in a batch. For lead-free solder, aim for a preheat phase of 1-2 minutes at 150-180°C, a reflow peak of 240-260°C for 20-40 seconds, and a gradual cooling rate to prevent thermal shock. Test the profile on a small batch first to confirm results.
2. Monitor Oven Temperature Uniformity
Reflow ovens must maintain uniform temperature across zones to avoid hot or cold spots. Use thermal profiling tools to measure temperature variations, keeping them within ±5°C of the target. Uneven heating can cause solder defects in 10-15% of boards in a batch if not addressed.
3. Handle Multiple Board Sizes Carefully
If your batch includes boards of varying sizes or thicknesses, adjust conveyor speed to ensure all boards spend adequate time in each oven zone. Smaller boards may need slower speeds to reach peak temperatures, preventing under-soldering.
Best Practices for SMT Component Placement
Accurate SMT component placement is the foundation of a successful assembly process. Misplaced components can lead to functional failures or costly rework. Follow these best practices to ensure precision in every batch.
1. Verify Component Orientation
Double-check the orientation of polarized components like diodes and capacitors before placement. Incorrect orientation can cause circuit failure, affecting up to 5% of boards in a batch if not caught early. Use vision systems on pick and place machines to confirm orientation during setup.
2. Account for Component Tolerances
Components often have slight size variations due to manufacturing tolerances. For example, a 0603 resistor might vary by ±0.05 mm in length. Adjust machine settings to accommodate these tolerances, ensuring consistent placement across the batch.
3. Inspect Placement After Each Run
After completing a batch, use AOI systems to inspect component alignment. Look for shifts greater than 0.1 mm, which can indicate machine drift or setup issues. Catching these errors early prevents defective boards from reaching the final product stage.
Common Challenges in SMT Batch Assembly and How to Overcome Them
Even with the best techniques, challenges can arise during SMT batch assembly. Here are some common issues and solutions to keep your production on track.
1. Solder Bridging
Solder bridging occurs when excess solder connects adjacent pads, creating short circuits. This issue affects roughly 2-5% of boards in poorly controlled batches. To prevent it, reduce solder paste volume by 10% during stencil design and ensure reflow profiles avoid overheating.
2. Tombstoning of Small Components
Tombstoning happens when small components stand on end during reflow, often due to uneven heating or paste application. It can impact 1-3% of components like 0402 resistors. Balance pad sizes and ensure symmetrical paste deposits to minimize this defect.
3. Component Misalignment
Misaligned components result from machine calibration issues or incorrect feeder setup. Regular calibration and pre-run checks can reduce misalignment rates to below 0.5% per batch, improving overall yield.
Conclusion: Elevate Your SMT Batch Assembly with ALLPCB
Mastering SMT batch assembly requires attention to detail, from optimizing the surface mount assembly process to perfecting reflow soldering in batch assembly. By focusing on pick and place machine optimization and precise SMT component placement, you can achieve higher efficiency, lower defect rates, and better-quality PCBs. At ALLPCB, we’re committed to supporting your manufacturing needs with expert guidance and reliable services tailored to SMT production.
Implement the techniques and tips shared in this guide to streamline your batch assembly process. With the right approach, you’ll be well-equipped to handle high-volume production while maintaining the highest standards of quality.


