ALLPCB


When it comes to designing and manufacturing printed circuit boards (PCBs), one of the most common questions is about the standard PCB thickness. The standard PCB thickness is typically 1.57 mm (0.062 inches), which has become an industry benchmark for many applications. However, this value can vary depending on the specific requirements of a project, including the number of layers, materials used, and the intended use of the board. In this comprehensive guide, we’ll dive deep into the details of PCB thickness, board thickness considerations, copper foil thickness, and key design values to help you make informed decisions for your next project.
Understanding PCB Thickness: Why It Matters
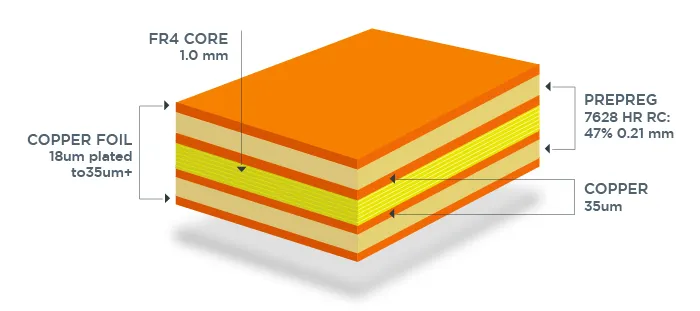
PCB thickness refers to the overall height of the board, including the substrate material (often FR-4) and the copper layers. It plays a critical role in the performance, durability, and compatibility of the board with other components. A board that is too thin may lack structural integrity, while one that is too thick could create issues with fitting into enclosures or meeting weight constraints.
Thickness impacts several aspects of PCB design, including mechanical strength, thermal management, and electrical performance. For instance, thicker boards can handle more current and provide better heat dissipation, making them ideal for high-power applications. On the other hand, thinner boards are often used in compact devices where space is limited, such as smartphones or wearable technology.
What is the Standard PCB Thickness?
As mentioned earlier, the most widely accepted standard PCB thickness is 1.57 mm (0.062 inches). This value originated from the early days of PCB manufacturing when bakelite sheets, a common material at the time, were produced in this thickness. Over the years, even as materials evolved to modern fiberglass-reinforced epoxy (FR-4), this dimension remained a standard due to its compatibility with existing manufacturing equipment and design practices.
While 1.57 mm is the default for many single-sided and double-sided boards, multilayer boards often deviate from this value. Depending on the number of layers (4, 6, 8, or more), the thickness can range from 0.8 mm to 3.2 mm or even higher. For example, a 4-layer board might have a thickness of around 1.6 mm, while a 6-layer board could be closer to 2.0 mm.
Common PCB Thickness Values
- 0.8 mm (0.031 inches): Used in ultra-thin designs for compact electronics.
- 1.0 mm (0.039 inches): Common for lightweight applications.
- 1.57 mm (0.062 inches): Industry standard for general-purpose PCBs.
- 2.0 mm (0.079 inches): Often used for multilayer or high-power boards.
- 3.2 mm (0.126 inches): Found in heavy-duty applications requiring extra durability.
These values are not set in stone, and custom thicknesses are available based on specific needs. When choosing a thickness, consider factors like the board’s mechanical requirements, the space available in the final product, and the electrical demands of the circuit.
Factors Influencing PCB Thickness
Several elements determine the ideal board thickness for a given project. Understanding these factors will help you select the right specifications during the design phase.
1. Number of Layers
The number of layers in a PCB directly affects its thickness. A single-layer or double-layer board is generally thinner, often sticking to the standard 1.57 mm. However, as the layer count increases, so does the thickness to accommodate additional copper and dielectric materials. For instance, an 8-layer board might measure around 2.4 mm or more, depending on the dielectric thickness between layers.
2. Material Choice
The substrate material also plays a role. FR-4, the most common material, has a standard thickness that contributes to the overall board height. However, alternative materials like polyimide (for flexible PCBs) or metal-core substrates (for high thermal conductivity) can result in different thicknesses. For example, flexible PCBs can be as thin as 0.2 mm, while metal-core boards might exceed 3 mm.
3. Application Requirements
The end-use of the PCB influences thickness as well. High-power applications, such as power supplies or automotive electronics, often require thicker boards to handle higher currents and provide better heat dissipation. Conversely, consumer electronics like smartwatches prioritize thinner boards to save space.
Copper Foil Thickness: A Key Design Value
While overall board thickness is important, the copper foil thickness is another critical design value that affects a PCB’s performance. Copper foil thickness is typically measured in ounces per square foot (oz/ft2), where 1 oz/ft2 corresponds to a thickness of approximately 1.37 mils (0.00137 inches or 35 micrometers).
Standard Copper Foil Thickness Values
- 0.5 oz/ft2 (17.5 μm): Used for low-power or high-density designs where minimal copper is needed.
- 1 oz/ft2 (35 μm): The most common thickness for general-purpose PCBs, suitable for most standard applications.
- 2 oz/ft2 (70 μm): Used in high-current applications where additional copper is needed to carry more power.
- 3 oz/ft2 or higher (105 μm+): Found in heavy-duty or industrial PCBs for maximum current capacity.
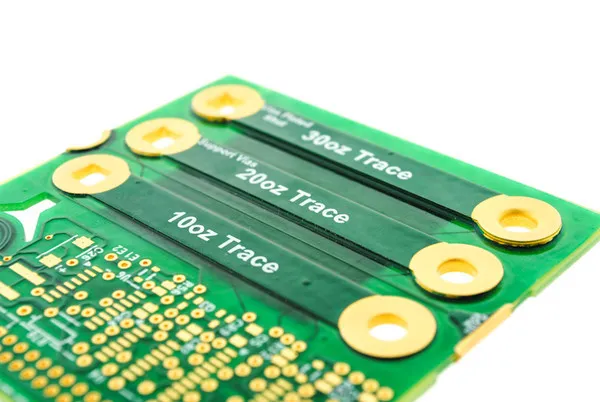
The copper thickness impacts the board’s ability to handle current and affects trace width requirements. For example, a 1 oz/ft2 copper layer can safely carry about 1.2 amps per 10 mils of trace width at a temperature rise of 10°C. If your design requires more current, you’ll need to either increase the copper thickness or widen the traces.
Balancing Copper Thickness with Cost
Thicker copper layers increase the cost of manufacturing due to the additional material and processing required. Therefore, it’s essential to balance performance needs with budget constraints. For most standard designs, 1 oz/ft2 copper is sufficient, but for power-intensive applications, opting for 2 oz/ft2 or higher may be necessary.
Related Reading: PCB Thickness in 2025: A Comprehensive Guide for Designers and Manufacturers
Design Values and Their Impact on PCB Thickness
Beyond overall board thickness and copper foil thickness, several other design values influence the final specifications of a PCB. These include dielectric thickness, trace spacing, and impedance control, all of which are interconnected with thickness considerations.
Dielectric Thickness
The dielectric layer, which separates copper layers in multilayer PCBs, contributes to the overall board thickness. Typical dielectric thicknesses range from 0.1 mm to 0.5 mm per layer, depending on the material and design requirements. Thinner dielectric layers are used in high-density interconnect (HDI) designs to reduce overall thickness, while thicker layers provide better insulation for high-voltage applications.
Impedance Control
For high-speed designs, impedance control is crucial. The thickness of the dielectric layer and copper foil directly affects the characteristic impedance of traces, which is often targeted at values like 50 ohms or 75 ohms for specific applications (e.g., RF circuits). For instance, a 50-ohm impedance trace on a 1 oz/ft2 copper layer with a 0.2 mm dielectric might require a trace width of approximately 0.3 mm. Adjusting the board thickness or dielectric material can help achieve the desired impedance.
Thermal Management
Thicker boards and copper layers improve thermal conductivity, helping to dissipate heat in high-power designs. For example, a 2 oz/ft2 copper layer on a 2.0 mm thick board can handle a higher temperature rise (e.g., 20°C) compared to a 1 oz/ft2 layer on a 1.57 mm board under the same current load.
How to Choose the Right PCB Thickness for Your Project
Selecting the appropriate PCB thickness involves evaluating the specific needs of your application. Here are some practical tips to guide your decision:
- Consider the Space Constraints: If your design must fit into a compact enclosure, opt for a thinner board (e.g., 0.8 mm or 1.0 mm).
- Assess Power Requirements: For high-current applications, choose a thicker board (e.g., 2.0 mm) and heavier copper (e.g., 2 oz/ft2).
- Evaluate Layer Count: Multilayer designs naturally increase thickness, so plan accordingly based on signal routing needs.
- Account for Mechanical Strength: Thicker boards offer better durability, which is essential for industrial or automotive applications.
- Budget Constraints: Thicker boards and copper layers cost more, so balance performance with manufacturing expenses.
Working with a trusted PCB manufacturer can also help. They can provide guidance on standard and custom thickness options to meet your design goals.
Related Reading: The Ultimate Guide to Standard PCB Thickness: Choosing the Right Fit for Your Project
Conclusion: Making Informed Decisions on PCB Thickness
Understanding the standard PCB thickness, which is typically 1.57 mm (0.062 inches), is just the starting point for effective PCB design. Factors like board thickness, copper foil thickness, and other design values such as dielectric spacing and impedance control all play a role in determining the final specifications of your board. By carefully considering the requirements of your application—whether it’s a compact consumer device or a high-power industrial system—you can select the right thickness to ensure optimal performance and reliability.
Whether you’re dealing with a simple single-layer board or a complex multilayer design, paying attention to these details will help you achieve a successful outcome. With the right balance of thickness, materials, and design values, your PCB can meet both functional and manufacturing needs efficiently.