 ALLPCB


Introduction
Stacked vias combined with via-in-pad (VIP) technology address critical challenges in high-density printed circuit board layouts. Engineers frequently encounter space constraints when routing signals from fine-pitch ball grid array (BGA) components. Placing vias directly beneath component pads frees valuable board real estate while maintaining electrical performance. Stacked via via-in-pad constructions extend this approach through multiple layers, enabling complex interconnects without increasing overall board size. This combination supports higher component density and improved signal paths in modern electronic assemblies.
What Are Stacked Vias in Via-in-Pad Designs and Why They Matter
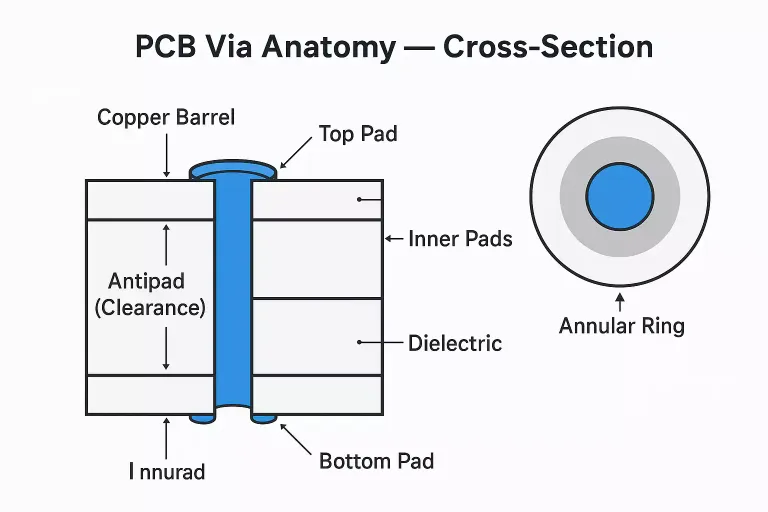
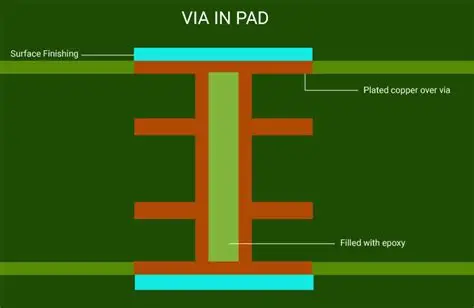
Via-in-pad refers to the placement of a via directly under a surface-mount pad, most commonly used with BGA packages. A stacked via via-in-pad builds on this by aligning multiple vias vertically through successive layers, often filled and planarized for a flat surface. The result is a compact vertical interconnect that connects inner layers without consuming additional horizontal routing channels.
Stacked via in BGA applications proves especially valuable in devices where board area is limited and signal integrity requirements are high. This approach reduces the need for fan-out routing on outer layers and helps maintain consistent impedance for high-speed signals. Manufacturing teams benefit because the filled and capped structure supports reliable soldering of components directly over the via location. Overall, the technique improves layout efficiency while supporting the performance demands of contemporary electronics.
Technical Principles of Stacked Via Implementation
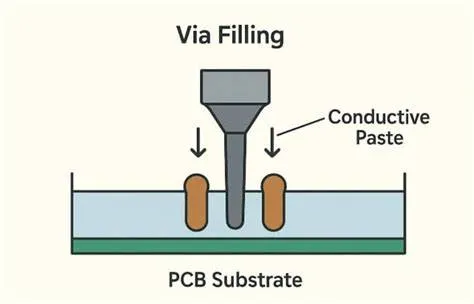
The engineering foundation of stacked via via-in-pad rests on precise layer-to-layer alignment and controlled plating processes. Each via segment must register accurately with the one above and below it to ensure continuous electrical continuity. Conductive or non-conductive fill materials occupy the via barrel after plating, followed by planarization to create a smooth pad surface suitable for component attachment.
Signal integrity benefits arise from shorter current paths and lower inductance compared with traditional dog-bone fan-out patterns. Thermal performance can also improve because the stacked structure provides a direct vertical path for heat dissipation from the component into inner copper planes. Designers must account for coefficient of thermal expansion mismatches between the fill material and surrounding laminate to prevent stress during thermal cycling.
Industry standards such as IPC-6012 guide qualification requirements for these constructions in rigid boards. Proper via aspect ratios and plating thickness specifications help ensure mechanical reliability across the stack. Engineers evaluate these parameters during the design phase to balance density gains against fabrication yield expectations.
Manufacturing Considerations for Via-in-Pad with Stacked Vias
Via-in-pad manufacturing begins with laser or mechanical drilling of each via segment, followed by electroless and electrolytic copper plating. Stacked configurations require sequential drilling and plating operations, with fill and cure steps inserted between layers. Planarization removes excess material to achieve a coplanar surface that meets solderability criteria.
Process control focuses on via fill uniformity and void elimination, because incomplete fill can lead to outgassing or weak solder joints during assembly. Surface finish selection, such as electroless nickel immersion gold or organic solderability preservative, must remain compatible with the filled via to avoid defects.
Quality acceptance follows guidelines in IPC-A-600, which defines criteria for via fill, cap coverage, and surface planarity. Manufacturers monitor these attributes through cross-section analysis and automated optical inspection at multiple stages. Consistent process parameters across production lots support the repeatability needed for high-volume builds.
Best Practices and Design Guidelines
Designers begin by confirming that the target BGA pitch and pad diameter allow sufficient space for the stacked via structure without violating minimum annular ring or spacing rules. Via diameter and stack height are selected based on layer count, required current capacity, and signal speed. Simulation tools help verify impedance and return loss before committing to layout.
Thermal relief patterns around the via pad may be necessary when connecting to large copper areas to control heat sinking during soldering. Designers also specify appropriate via fill materials that match the board's thermal and mechanical requirements. Early collaboration with the fabrication team clarifies stack-up options and any special processing steps that affect cost or lead time.
Testing protocols typically include continuity checks, thermal shock, and reflow simulation to validate the stacked via via-in-pad performance under expected operating conditions. Documentation of these design choices supports traceability and future revisions.
Conclusion
Stacked via via-in-pad technology delivers measurable improvements in routing density, signal integrity, and thermal management for BGA-based designs. Careful attention to alignment, fill quality, and adherence to established standards supports reliable manufacturing outcomes. Engineers who integrate these considerations early in the design cycle achieve compact, high-performance boards that meet both electrical and mechanical requirements.
FAQs
Q1: What are the primary advantages of stacked via via-in-pad in BGA designs?
A1: Stacked via via-in-pad reduces the horizontal space needed for fan-out routing, allowing higher component density on multilayer boards. The vertical interconnect shortens signal paths, which lowers inductance and supports better high-speed performance. Filled and planarized vias also enable direct component placement over the via location without compromising solder joint reliability.
Q2: How does via-in-pad manufacturing differ when stacked vias are used?
A2: Via-in-pad manufacturing with stacked vias requires sequential drilling, plating, and fill operations across multiple layers. Each segment must align precisely, and planarization steps ensure a flat surface for soldering. Additional process controls address void prevention and thermal expansion compatibility to maintain structural integrity through assembly and operation.
Q3: What design considerations apply to stacked via in BGA applications?
A3: Designers evaluate pad size, via diameter, and stack height against layer count and impedance targets. Thermal relief features and appropriate surface finishes help ensure reliable soldering. Early review of fabrication capabilities confirms that the chosen stack-up meets both electrical performance goals and manufacturing yield expectations.
Q4: Why do engineers choose stacked via via-in-pad over conventional routing?
A4: Conventional routing often consumes additional board layers or area for escape routing from dense BGAs. Stacked via via-in-pad provides direct vertical connections that preserve routing channels and improve signal integrity. The approach also supports thermal paths from the component into inner planes, which benefits heat management in compact assemblies.
References
IPC-6012E — Qualification and Performance Specification for Rigid Printed Boards. IPC, 2017
IPC-A-600K — Acceptability of Printed Boards. IPC, 2020
JEDEC J-STD-020E — Moisture/Reflow Sensitivity Classification. JEDEC, 2014





