 ALLPCB


If you're looking to create a winning robot for a robotics competition, designing a custom PCB (Printed Circuit Board) is a critical step. A well-designed PCB can make your robot faster, more reliable, and more efficient, giving you an edge over the competition. In this guide, we'll share essential tips and tricks for crafting high-performance, robust PCBs tailored for competition robotics. From planning your layout to choosing materials and testing your design, we've got you covered with actionable advice to help you succeed.
Why Custom PCB Design Matters for Robotics Competitions
In robotics competitions, every detail counts. A custom PCB allows you to optimize your robot's performance by tailoring the board to your specific needs. Unlike off-the-shelf boards, a custom design gives you control over size, power distribution, and signal integrity, ensuring your robot operates at its best. Whether you're competing in a speed-based challenge or a precision task, a high-performance PCB can reduce weight, improve durability, and minimize electrical issues like noise or interference.
Designing a PCB for competition robotics isn't just about functionality—it's also about reliability under stress. Robots often endure rough handling, vibrations, and tight deadlines during events. A robust PCB design can withstand these conditions and keep your robot running smoothly. Let's dive into the key steps and strategies to achieve this.
Step 1: Plan Your Robotics Competition PCB with Precision
Before you start designing, take time to plan. Understand the specific requirements of your robot and the competition rules. Are there size or weight limits? What kind of sensors, motors, or microcontrollers will you use? Mapping out these details helps you create a PCB that fits perfectly with your robot's goals.
For example, if your robot needs to move quickly, prioritize a compact design to reduce weight. If it requires multiple sensors, ensure your PCB has enough space for clean signal routing to avoid interference. Write down a list of components and their power needs—such as a microcontroller requiring 5V at 500mA or motors needing 12V at 2A—to guide your layout and power distribution strategy.
Step 2: Focus on Compact and Efficient Layout for Custom PCB Design
Space is often limited in robotics, so a compact PCB layout is essential. Use design software to arrange components logically, grouping related parts together. For instance, place power components like voltage regulators near the input source to minimize power loss, and keep sensitive analog sensors away from noisy digital circuits to reduce interference.
Pay attention to trace widths and spacing. For high-current paths, such as those powering motors, use wider traces (e.g., 50-100 mils for 2-5A currents) to handle the load without overheating. For signal traces, maintain a minimum spacing (e.g., 6-8 mils) to prevent crosstalk. A well-organized layout not only saves space but also improves the performance of your robotics competition PCB.
Step 3: Prioritize Power Management for High-Performance PCBs
Power management is a cornerstone of high-performance PCB design, especially in competition robotics where efficiency can make or break your success. Start by selecting the right voltage regulators and ensuring they can supply enough current for all components. For example, a linear regulator might drop 12V to 5V but waste energy as heat, while a switching regulator is more efficient for high-current applications.
Include decoupling capacitors (e.g., 0.1μF ceramic capacitors) near each IC to stabilize voltage and reduce noise. Also, design a robust ground plane to provide a low-impedance return path for currents, minimizing voltage drops and electromagnetic interference (EMI). A solid power strategy ensures your robot runs reliably even under heavy loads.

Step 4: Build a Robust PCB Design for Durability
Robotics competitions can be tough on hardware. Your PCB needs to withstand vibrations, impacts, and sometimes even moisture or dust. Choose a thicker board (e.g., 1.6mm or 2.0mm) for added mechanical strength, especially if your robot will face rough terrain or collisions.
Use surface-mount components (SMD) instead of through-hole parts where possible, as they are less likely to break off during impacts. Secure larger components, like capacitors or connectors, with adhesive or brackets for extra stability. Additionally, consider applying a conformal coating to protect against moisture and debris if the competition environment is harsh.
Another tip for robust PCB design is to avoid sharp corners in your traces. Rounded corners reduce stress concentration and prevent cracks during mechanical stress. These small adjustments can significantly extend the lifespan of your board during intense competitions.
Step 5: Optimize Signal Integrity for Competition Robotics
Signal integrity is crucial for a high-performance PCB, especially when dealing with fast microcontrollers or sensitive sensors. Poor signal quality can lead to data errors or erratic behavior in your robot. To avoid this, keep high-speed signal traces (e.g., SPI or I2C lines) as short and straight as possible. If a trace must cross layers, use vias strategically to maintain signal continuity.
Match impedance for critical signals, such as those in communication lines. For instance, USB or Ethernet signals often require a 90-ohm differential impedance, which you can achieve by adjusting trace width and spacing based on your board's dielectric constant. Use simulation tools in your design software to check for signal reflections or delays before manufacturing.
Step 6: Choose the Right Materials for Your Robotics Competition PCB
The materials you select for your PCB impact both performance and durability. For most robotics applications, FR-4 material is a cost-effective and reliable choice due to its good mechanical and electrical properties. However, if your robot operates in high-temperature environments or requires better thermal management, consider materials like polyimide or high-Tg FR-4, which can handle temperatures above 130°C without degrading.
For high-frequency applications, such as wireless communication modules, opt for a substrate with a lower dielectric constant to reduce signal loss. Work with your manufacturing partner to select the best stack-up and copper thickness (e.g., 1oz or 2oz copper) based on your current and thermal needs. The right materials ensure your custom PCB design performs consistently under competition stress.
Step 7: Test and Iterate Your Design Thoroughly
Testing is a non-negotiable step in creating a reliable robotics competition PCB. Once your board is manufactured, perform a series of checks to validate its functionality. Start with a visual inspection for soldering defects or misaligned components. Then, use a multimeter to verify power and ground connections, ensuring there are no shorts or open circuits.
Next, power up the board in a controlled environment and monitor for issues like overheating or voltage drops. Test your robot's performance under competition-like conditions—run motors at full speed, activate all sensors, and simulate match scenarios. If you encounter problems, such as noise affecting sensor readings, revisit your layout or add filtering components like ferrite beads or additional capacitors.
Iterate on your design based on test results. Even small tweaks, like rerouting a noisy trace or upgrading a regulator, can make a big difference. Thorough testing ensures your high-performance PCB is ready for the challenges of competition robotics.
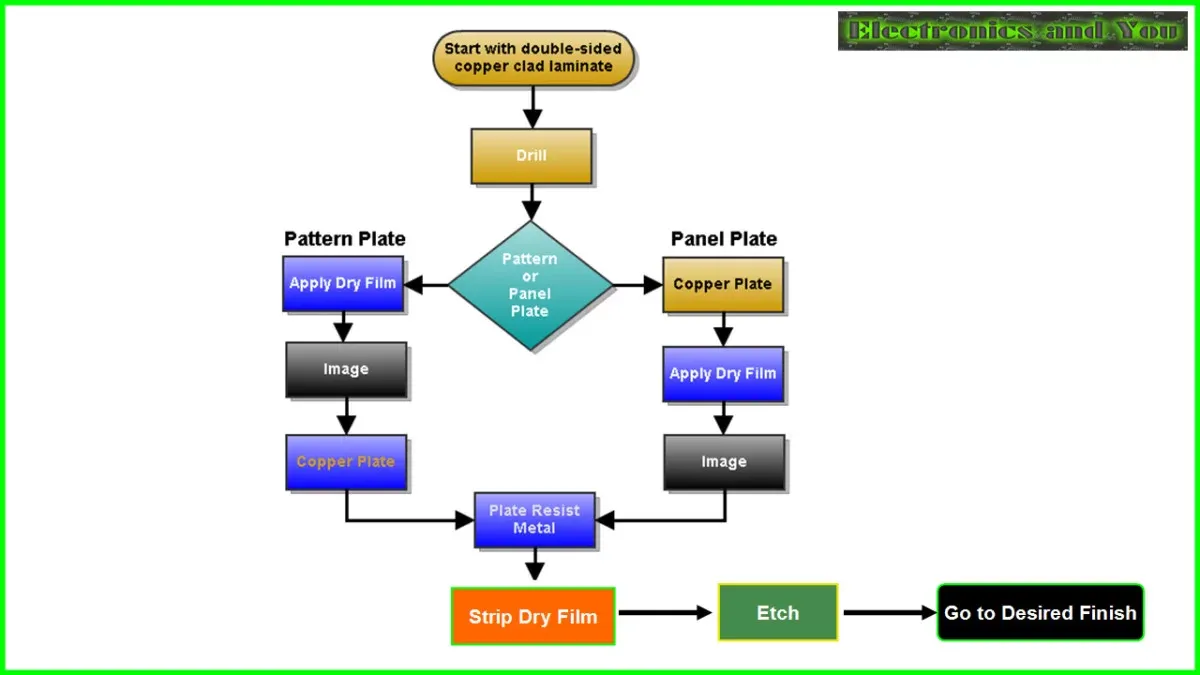
Step 8: Streamline Manufacturing for Quality and Speed
Once your design is finalized, the manufacturing process plays a big role in the quality of your PCB. Partner with a trusted manufacturer who understands the unique needs of robotics applications. Provide clear documentation, including Gerber files, a Bill of Materials (BOM), and assembly drawings, to avoid production errors.
Opt for quick-turn services if you're on a tight deadline for a competition. Many manufacturers offer expedited options to deliver boards in as little as 24-48 hours. However, always double-check the design files before submission to prevent costly delays. A smooth manufacturing process ensures you get a robust PCB design on time for testing and integration.
Additional Tips for Success in Competition Robotics PCB Design
Beyond the core steps, here are a few extra tricks to elevate your custom PCB design:
- Label Everything: Clearly label components and test points on the silkscreen layer. This makes debugging easier during crunch time at competitions.
- Modular Design: If possible, design your PCB in modules (e.g., separate power and control boards). This allows for easier repairs or upgrades without redesigning the entire system.
- Keep Spares: Order a few extra boards during manufacturing. Having backups can save the day if a PCB fails during a match.
- Document Thoroughly: Maintain detailed notes on your design choices and test results. This helps troubleshoot issues and improves future designs.
Common Pitfalls to Avoid in Robotics Competition PCB Design
Even experienced designers can make mistakes. Here are some common issues to watch out for:
- Underestimating Power Needs: Failing to account for peak current demands can cause voltage drops or component failure. Always overestimate power requirements by 10-20%.
- Ignoring Thermal Management: High-current components generate heat. Without proper heat sinks or ventilation, your PCB could overheat and shut down mid-match.
- Skipping Design Rules Check (DRC): Always run a DRC in your design software to catch errors like trace spacing violations or unconnected nets before manufacturing.
Conclusion: Build a Winning Robotics Competition PCB
Designing a custom PCB for robotics competitions is a challenging but rewarding process. By focusing on careful planning, compact layouts, robust materials, and thorough testing, you can create a high-performance PCB that gives your robot a competitive edge. Remember to prioritize power management, signal integrity, and durability to ensure your design withstands the rigors of competition.
With these tips and tricks, you're well on your way to crafting a reliable and efficient PCB tailored for competition robotics. Take the time to iterate on your design, learn from each test, and refine your approach. A well-designed PCB isn't just a component—it's the backbone of your robot's success.


