 ALLPCB


Hand soldering is a fundamental skill in PCB assembly, but it often comes with challenges. Defects like solder bridges, cold solder joints, and other issues can compromise the performance and reliability of a circuit board. If you're struggling with hand soldering defect identification, fixing solder bridges, or cold solder joint repair, this guide is for you. We'll walk you through the most common problems, how to spot them, and practical solutions to fix them—ensuring your PCB assemblies are top-notch.
In this detailed blog post, we'll break down the essentials of troubleshooting hand soldering defects. From understanding what causes these issues to step-by-step repair techniques, you'll gain actionable insights to improve your soldering skills and achieve reliable results.
Why Hand Soldering Defects Matter in PCB Assembly
Hand soldering is a critical process in PCB assembly, especially for small-scale production, prototyping, or repairs. While automated soldering methods dominate large-scale manufacturing, manual soldering remains indispensable for custom projects or fixing specific components. However, even a small mistake during hand soldering can lead to defects that cause short circuits, poor connections, or complete failure of the board.
Identifying and fixing these defects early saves time, reduces costs, and ensures the functionality of your electronic devices. Whether you're a hobbyist or a professional, mastering hand soldering defect identification is key to producing high-quality assemblies.
Common Hand Soldering Defects: Identification and Causes
Before diving into solutions, let’s explore the most common hand soldering defects, how to spot them, and what causes them. Recognizing these issues is the first step in effective troubleshooting.
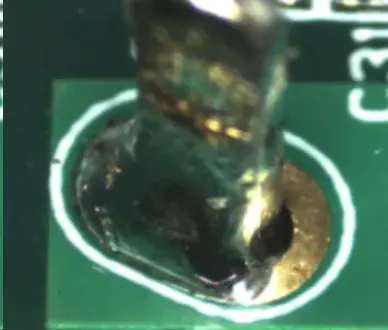
1. Solder Bridges
Identification: A solder bridge occurs when excess solder connects two adjacent pins or pads that should remain separate. This creates an unintended electrical connection, often leading to a short circuit. Visually, you’ll see a blob of solder spanning across pins or traces. These can be microscopic, requiring a magnifying glass or inspection tool to detect.
Causes:
- Using too much solder during the process.
- Operating a soldering iron with a tip that’s too large for the component spacing.
- Poor technique, such as dragging the iron across multiple pins.
- Inadequate spacing between components on densely populated boards.
2. Cold Solder Joints
Identification: A cold solder joint happens when the solder doesn’t fully melt or bond with the component lead and PCB pad. These joints look dull, grainy, or cracked instead of shiny and smooth. They often result in weak electrical connections, leading to intermittent failures. If you wiggle a component and it moves easily, you might have a cold joint.
Causes:
- Insufficient heat from the soldering iron (e.g., below 300°C for most lead-based solders).
- Moving the component or board before the solder cools and solidifies.
- Dirty or oxidized surfaces on the pad or component lead, preventing proper bonding.
- Using old or low-quality solder with poor wetting properties.
3. Insufficient Solder
Identification: This defect is visible when there’s not enough solder to form a proper joint. The connection might look incomplete, with exposed pads or leads. Electrically, this can cause high resistance or an open circuit, disrupting the flow of current.
Causes:
- Applying too little solder during the process.
- Poor wetting due to unclean surfaces or low-quality flux.
- Using a soldering iron at a temperature that’s too high, causing the solder to evaporate or burn off.
4. Excess Solder
Identification: Excess solder appears as large, bulky blobs around a joint, often covering more area than necessary. While it might not always cause immediate issues, it can hide underlying problems like cold joints and may lead to shorts if it touches nearby components.
Causes:
- Over-applying solder without proper control.
- Not removing excess solder with a desoldering tool or wick.
- Inadequate training or rushed soldering technique.

Troubleshooting and Fixing Hand Soldering Defects
Now that you can identify common defects, let’s focus on practical solutions. Below are step-by-step guides for fixing solder bridges, cold solder joint repair, and other issues. These methods are designed to be accessible even for beginners, using basic tools like a soldering iron, desoldering wick, and flux.
Fixing Solder Bridges
Solder bridges are one of the most frequent issues in hand soldering, especially on boards with tight component spacing. Here’s how to fix them:
- Gather Your Tools: You’ll need a soldering iron (with a fine tip, ideally 1mm or smaller), desoldering wick (also called solder braid), and flux. Ensure your iron is set to a moderate temperature, around 300°C for lead-based solder or 350°C for lead-free solder.
- Apply Flux: Dab a small amount of flux on the solder bridge. Flux helps the solder flow and makes removal easier by reducing surface tension.
- Use Desoldering Wick: Place the wick over the bridge and press it down with the heated soldering iron tip. The wick will absorb the excess solder as it heats up. Move the wick to a clean section if it becomes saturated.
- Inspect the Area: After removing the bridge, check the pins with a magnifying glass to ensure no solder remains connecting them. If needed, repeat the process.
- Clean the Board: Use isopropyl alcohol (90% or higher) and a brush to clean off any flux residue, which can attract dirt or cause corrosion over time.
Pro Tip: To prevent solder bridges in the future, use the right tip size for your components and avoid applying too much solder. For surface-mount components with pitches below 0.5mm, consider using a hot air rework station for better precision.
Cold Solder Joint Repair
Cold solder joints can be frustrating because they often lead to unreliable connections. Follow these steps to repair them:
- Prepare the Joint: Set your soldering iron to the correct temperature (around 300°C for lead-based solder). Clean the tip to ensure good heat transfer.
- Remove Old Solder: If the joint looks cracked or dull, use a desoldering wick or pump to remove the old solder completely. This exposes the pad and lead for a fresh connection.
- Clean the Surfaces: Use a small wire brush or sandpaper to remove oxidation from the component lead and pad. Apply a thin layer of flux to both surfaces to improve wetting.
- Re-Solder the Joint: Place the soldering iron tip on the pad and lead simultaneously to heat them evenly. After 2-3 seconds, feed fresh solder into the joint. Aim for a smooth, shiny fillet that covers the pad at a 40-70 degree angle.
- Let It Cool: Avoid moving the component or board until the solder has fully solidified, which takes about 5-10 seconds. A cold joint often forms if the joint is disturbed during cooling.
Pro Tip: If cold joints keep happening, check your soldering iron’s temperature with a thermometer. A variance of more than 10°C from the set value might indicate a faulty tool. Also, ensure your workspace is free from drafts that could cool the joint too quickly.
Addressing Insufficient and Excess Solder
For insufficient solder, the fix is straightforward: reheat the joint with your soldering iron and add more solder until it forms a proper concave fillet. Be cautious not to overdo it, as this can lead to excess solder.
For excess solder, use a desoldering wick or pump to remove the extra material. Heat the joint, place the wick over the excess, and let it absorb the solder. If using a pump, position the nozzle over the heated solder and activate the suction. Finish by cleaning the area with alcohol to remove flux residue.
Preventing Hand Soldering Defects: Best Practices
While troubleshooting is essential, preventing defects in the first place is even better. Here are some best practices to minimize issues during hand soldering for PCB assembly:
- Use the Right Tools: Choose a soldering iron with adjustable temperature control (ideally between 250-350°C) and a tip suited for the component size. Fine tips (0.5-1mm) work best for small components, while broader tips (2-3mm) are better for larger joints.
- Keep Surfaces Clean: Before soldering, clean the PCB pads and component leads with isopropyl alcohol or a dedicated PCB cleaner. Oxidation can prevent proper solder adhesion.
- Apply Flux Generously: Flux removes oxides and improves solder flow. Use a flux pen or liquid flux for precise application, especially on surface-mount components.
- Control Solder Amount: Feed solder slowly and stop once the joint forms a smooth fillet. Avoid the temptation to add “just a little more” as it often leads to bridges or excess.
- Maintain Steady Hands: Use a PCB holder or vise to secure the board, reducing movement during soldering. Rest your hand on a stable surface to minimize shaking.
- Practice Proper Technique: Heat the pad and lead together for 2-3 seconds before adding solder. Remove the solder wire first, then the iron, to avoid cold joints.
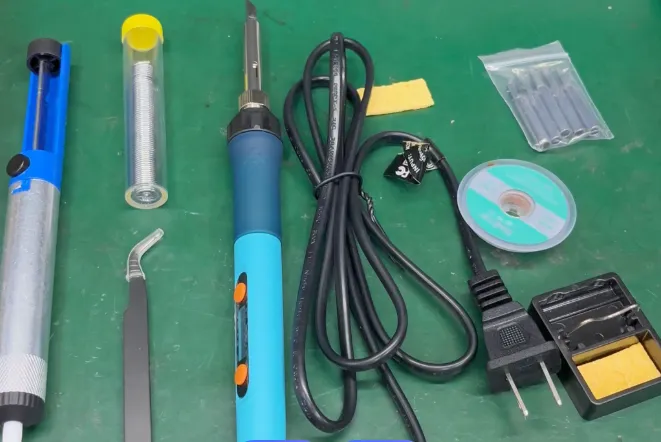
Tools and Equipment for Effective Troubleshooting
Having the right tools can make all the difference when troubleshooting hand soldering defects. Here’s a list of essentials for any PCB assembly toolkit:
- Soldering Iron: A temperature-controlled iron with interchangeable tips is ideal. Look for a model with a power rating of 25-50 watts for versatility.
- Desoldering Tools: A desoldering wick (solder braid) and a desoldering pump are crucial for removing excess solder or fixing bridges.
- Flux: Available in pens, paste, or liquid form, flux is essential for clean, reliable joints.
- Magnifying Glass or Microscope: For hand soldering defect identification, especially on small or densely packed boards, a 5x-10x magnification tool helps spot tiny bridges or cracks.
- Cleaning Supplies: Isopropyl alcohol (90% or higher) and a small brush for removing flux residue and keeping the board clean.
- Multimeter: Use this to test for continuity or shorts after soldering to confirm the integrity of your repairs.
Final Thoughts on Mastering Hand Soldering for PCB Assembly
Hand soldering is both an art and a science, requiring practice, patience, and the right techniques to avoid common defects. By focusing on hand soldering defect identification, mastering fixing solder bridges, and performing cold solder joint repair, you can significantly improve the quality of your PCB assemblies. Remember to prioritize prevention by using proper tools, maintaining clean workspaces, and refining your skills over time.
Whether you're assembling a prototype or repairing a damaged board, the tips and troubleshooting steps in this guide will help you achieve reliable, professional results. Keep experimenting with different techniques, and don’t be discouraged by initial setbacks—every soldered joint is a step toward mastery.


