 ALLPCB


If you're facing problems with your e-reader, such as no power, an E-Ink display not working, or a suspected short circuit, the issue might lie with the Printed Circuit Board (PCB). In this comprehensive guide, we'll walk you through troubleshooting common e-reader PCB issues, offering practical steps to diagnose and potentially repair your device. Whether you're searching for an E-Reader PCB repair guide or tips on E-Reader PCB troubleshooting, this post will help you identify and resolve problems like no power E-Reader PCB, E-Ink display not working, and short circuit E-Reader PCB issues.
Introduction: Why E-Reader PCB Issues Matter
E-readers have become essential tools for book lovers and professionals alike, thanks to their lightweight design and energy-efficient E-Ink displays. However, like any electronic device, e-readers can encounter hardware problems, often related to the PCB—the heart of the device's functionality. A faulty PCB can cause a range of issues, from the device not powering on to display malfunctions. Understanding how to troubleshoot these problems can save you time, money, and the frustration of a non-functional device.
In this guide, we'll break down the most common e-reader PCB issues and provide step-by-step instructions to diagnose and address them. With a focus on practical solutions, this post is designed for hobbyists, DIY enthusiasts, and technicians looking to repair their devices at home or in a workshop.
Understanding the E-Reader PCB: A Quick Overview
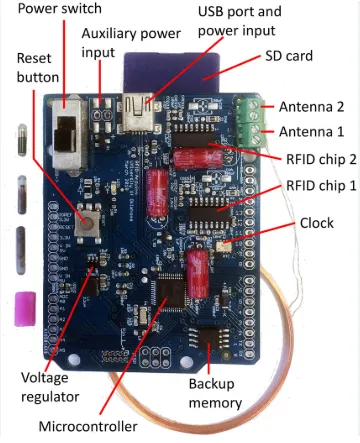
Before diving into troubleshooting, it's helpful to understand the role of the PCB in an e-reader. The PCB is a flat board that connects and supports electronic components, such as the processor, memory, power management circuits, and display drivers. In e-readers, the PCB is responsible for managing power distribution, processing user inputs, and driving the E-Ink display.
Common components on an e-reader PCB include:
- Power Management IC (PMIC): Controls power input and battery charging.
- Microcontroller Unit (MCU): Acts as the brain of the device, processing commands.
- Display Driver: Manages the E-Ink display signals.
- Connectors: Links the PCB to the battery, display, and buttons.
Damage or failure in any of these components can lead to significant issues. Let’s explore the most common problems and how to address them with an E-Reader PCB repair guide.
Common E-Reader PCB Issues and How to Troubleshoot Them
Below, we’ll cover the primary issues you might encounter with an e-reader PCB, focusing on no power E-Reader PCB, E-Ink display not working, and short circuit E-Reader PCB problems. Each section includes diagnostic steps and potential solutions.
1. No Power E-Reader PCB: Diagnosing Power Failure
One of the most frustrating issues is when your e-reader refuses to turn on. A no power E-Reader PCB problem could stem from several causes, including battery issues, damaged power circuits, or failed components.
Step-by-Step Troubleshooting for No Power Issues
- Check the Battery: Start by ensuring the battery is charged and properly connected. Use a multimeter to measure the voltage across the battery terminals. Most e-reader batteries operate at around 3.7V. If the voltage is below 3.0V, the battery might be dead or deeply discharged and may need replacement.
- Inspect the Power Connector: Examine the charging port and connector on the PCB for physical damage or loose connections. Look for bent pins or corrosion.
- Test the Power Management IC (PMIC): If the battery and connector are fine, the issue might be with the PMIC. Use a multimeter to check for output voltage from the PMIC (typically 3.3V or 5V for e-reader circuits). If there’s no output, the PMIC may be faulty and require replacement.
- Look for Blown Fuses: Some e-reader PCBs have small surface-mount fuses near the power input. A blown fuse will prevent power from reaching the rest of the circuit. Test continuity across the fuse with a multimeter; if it’s open, replace it with a fuse of the same rating (e.g., 1A or 2A, depending on the design).
Potential Fixes
If the battery is dead, replace it with a compatible model. For damaged connectors or blown fuses, soldering skills are required to replace these components. If the PMIC is faulty, it’s often more challenging to repair due to its complexity and the need for specialized equipment. In such cases, consulting a professional repair service might be necessary.
2. E-Ink Display Not Working: Identifying Display Issues
Another common problem is when the E-Ink display is not working. This could manifest as a blank screen, partial display, or ghosting (residual images that don’t refresh). Since the E-Ink display is driven by the PCB, a malfunction here often points to issues with the display driver or connectors.
Step-by-Step Troubleshooting for Display Problems
- Check the Display Connector: Inspect the ribbon cable connecting the E-Ink display to the PCB. Ensure it’s securely plugged in and free of damage. A loose or torn cable can prevent the display from functioning.
- Test the Display Driver Voltage: Use a multimeter to measure the voltage at the display driver output on the PCB. E-Ink displays typically require specific voltages (e.g., 15V to 22V for refreshing the screen). If the voltage is absent or outside the expected range, the driver circuit might be faulty.
- Inspect for Physical Damage: Look for cracks or damage on the E-Ink screen itself. Even if the PCB is fine, a physically damaged display will not work properly.
- Reset the Device: Sometimes, a software glitch can cause display issues. Perform a hard reset by holding the power button for 30-40 seconds (check your device manual for exact instructions). This may refresh the display driver.
Suggested Image Placement: Place an image here showing an e-reader with a disconnected ribbon cable for the E-Ink display, highlighting the connector on the PCB. ALT Text: "Inspecting E-Ink Display Ribbon Cable on E-Reader PCB"
Potential Fixes
If the ribbon cable is damaged, replacing it can solve the issue. For a faulty display driver, you may need to replace the specific IC or the entire PCB, depending on the design. If the E-Ink screen itself is damaged, replacement is the only option. Be sure to source a compatible screen by checking the model number on the back of the display or the ribbon cable.
3. Short Circuit E-Reader PCB: Detecting and Resolving Shorts
A short circuit E-Reader PCB issue can cause a range of problems, from no power to overheating or even permanent damage to components. Shorts occur when two points in a circuit that shouldn’t be connected come into contact, often due to damaged traces, solder bridges, or failed components.
Step-by-Step Troubleshooting for Short Circuits
- Visual Inspection: Start by carefully inspecting the PCB under good lighting or with a magnifying glass. Look for visible signs of damage, such as burnt traces, bulging capacitors, or solder blobs connecting adjacent pads.
- Use a Multimeter in Continuity Mode: Set your multimeter to continuity mode and test between power and ground lines on the PCB. If there’s a beep or low resistance reading (e.g., below 10 ohms), there’s likely a short circuit.
- Isolate the Short: To narrow down the location of the short, remove power from the device and systematically test different sections of the PCB. Start near the power input and work toward other components like the PMIC or MCU.
- Check for Failed Components: Capacitors, diodes, and transistors are common culprits in short circuits. Test these components individually with a multimeter. For example, a shorted capacitor will show continuity in both directions, indicating failure.
Potential Fixes
If a solder bridge is causing the short, carefully remove the excess solder with a desoldering wick and a soldering iron. For damaged traces, you may need to use a conductive pen or wire to repair the connection. Replace any failed components like capacitors or diodes with parts of the same specifications (e.g., a 10uF, 16V capacitor). If the short is within a multilayer PCB, professional repair or replacement might be required.
Tools You’ll Need for E-Reader PCB Troubleshooting
To effectively diagnose and repair e-reader PCB issues, having the right tools is essential. Here’s a list of commonly used equipment for E-Reader PCB troubleshooting:
- Multimeter: For measuring voltage, resistance, and continuity. A digital multimeter with a range of 0-20V DC is ideal for e-reader circuits.
- Soldering Iron and Desoldering Tools: For replacing components or fixing connections. Use a fine-tip iron (15-30W) for delicate PCB work.
- Magnifying Glass or Microscope: To inspect small components and traces for damage.
- Screwdrivers: To disassemble the e-reader and access the PCB. A set of precision screwdrivers works best.
- Isopropyl Alcohol and Brush: For cleaning the PCB and removing flux residue or corrosion.
Preventing Future E-Reader PCB Issues
While troubleshooting and repairing PCB issues is valuable, prevention is always better. Here are some tips to minimize the risk of future problems with your e-reader:
- Avoid Overcharging: Don’t leave your e-reader plugged in for extended periods, as this can stress the power management circuit and battery.
- Protect from Physical Damage: Use a protective case to prevent drops or impacts that could damage the PCB or display.
- Keep It Clean: Avoid exposing the device to dust, moisture, or liquids, which can cause corrosion or shorts on the PCB.
- Regular Software Updates: Keep the device firmware updated to prevent software-related glitches that might affect hardware performance.
When to Seek Professional Help
While many e-reader PCB issues can be resolved with the steps above, some problems are too complex for DIY repairs. If you encounter any of the following, consider seeking professional assistance:
- The PCB has multiple shorts or extensive damage.
- Specialized components like the PMIC or MCU need replacement, requiring advanced soldering skills or equipment.
- You’re unable to diagnose the issue despite thorough troubleshooting.
Professional repair services have access to advanced diagnostic tools and replacement parts, ensuring a higher chance of success for complex repairs.
Conclusion: Mastering E-Reader PCB Troubleshooting
Troubleshooting common e-reader PCB issues doesn’t have to be daunting. By following this E-Reader PCB repair guide, you can systematically diagnose and address problems like no power E-Reader PCB, E-Ink display not working, and short circuit E-Reader PCB issues. With the right tools, a bit of patience, and careful attention to detail, many of these problems can be resolved at home, saving you the cost of a replacement device.
Whether you’re a DIY enthusiast or a technician, mastering E-Reader PCB troubleshooting is a valuable skill. Start with the basics—checking connections, testing voltages, and inspecting for damage—and work your way up to more complex repairs. Remember, safety comes first, so always disconnect power before working on any electronic device.
We hope this guide has provided you with actionable insights to get your e-reader back up and running. Keep this resource handy for future reference, and don’t hesitate to revisit it whenever you face a new challenge with your device.


