 ALLPCB


In the world of electronics, understanding printed circuit boards (PCBs) is essential for students, hobbyists, and aspiring engineers. If you're searching for ways to learn about PCBs through practical, engaging methods, hands-on PCB learning modules and educational circuit board kits with components are the perfect starting points. These tools provide a direct way to explore PCB layers, practice fault finding, and master interactive assembly techniques. In this blog, we'll dive deep into how educational PCBs can transform your learning experience, offering actionable insights and practical tips to build your skills.
Why Hands-On PCB Learning Matters
Learning about electronics through textbooks or videos can only take you so far. Hands-on experience with PCBs allows you to see how theoretical concepts apply in real-world scenarios. By working directly with educational circuit board kits, you can experiment with components, troubleshoot issues, and gain a deeper understanding of circuit functionality. This practical approach bridges the gap between theory and application, making it easier to grasp complex ideas like signal flow or impedance matching.
For instance, assembling a simple circuit with a kit can reveal how a 1kΩ resistor limits current in a real circuit, or how a 0.1μF capacitor smooths voltage spikes. These tangible experiences make abstract concepts concrete, fostering confidence and problem-solving skills.

Exploring Hands-On PCB Learning Modules
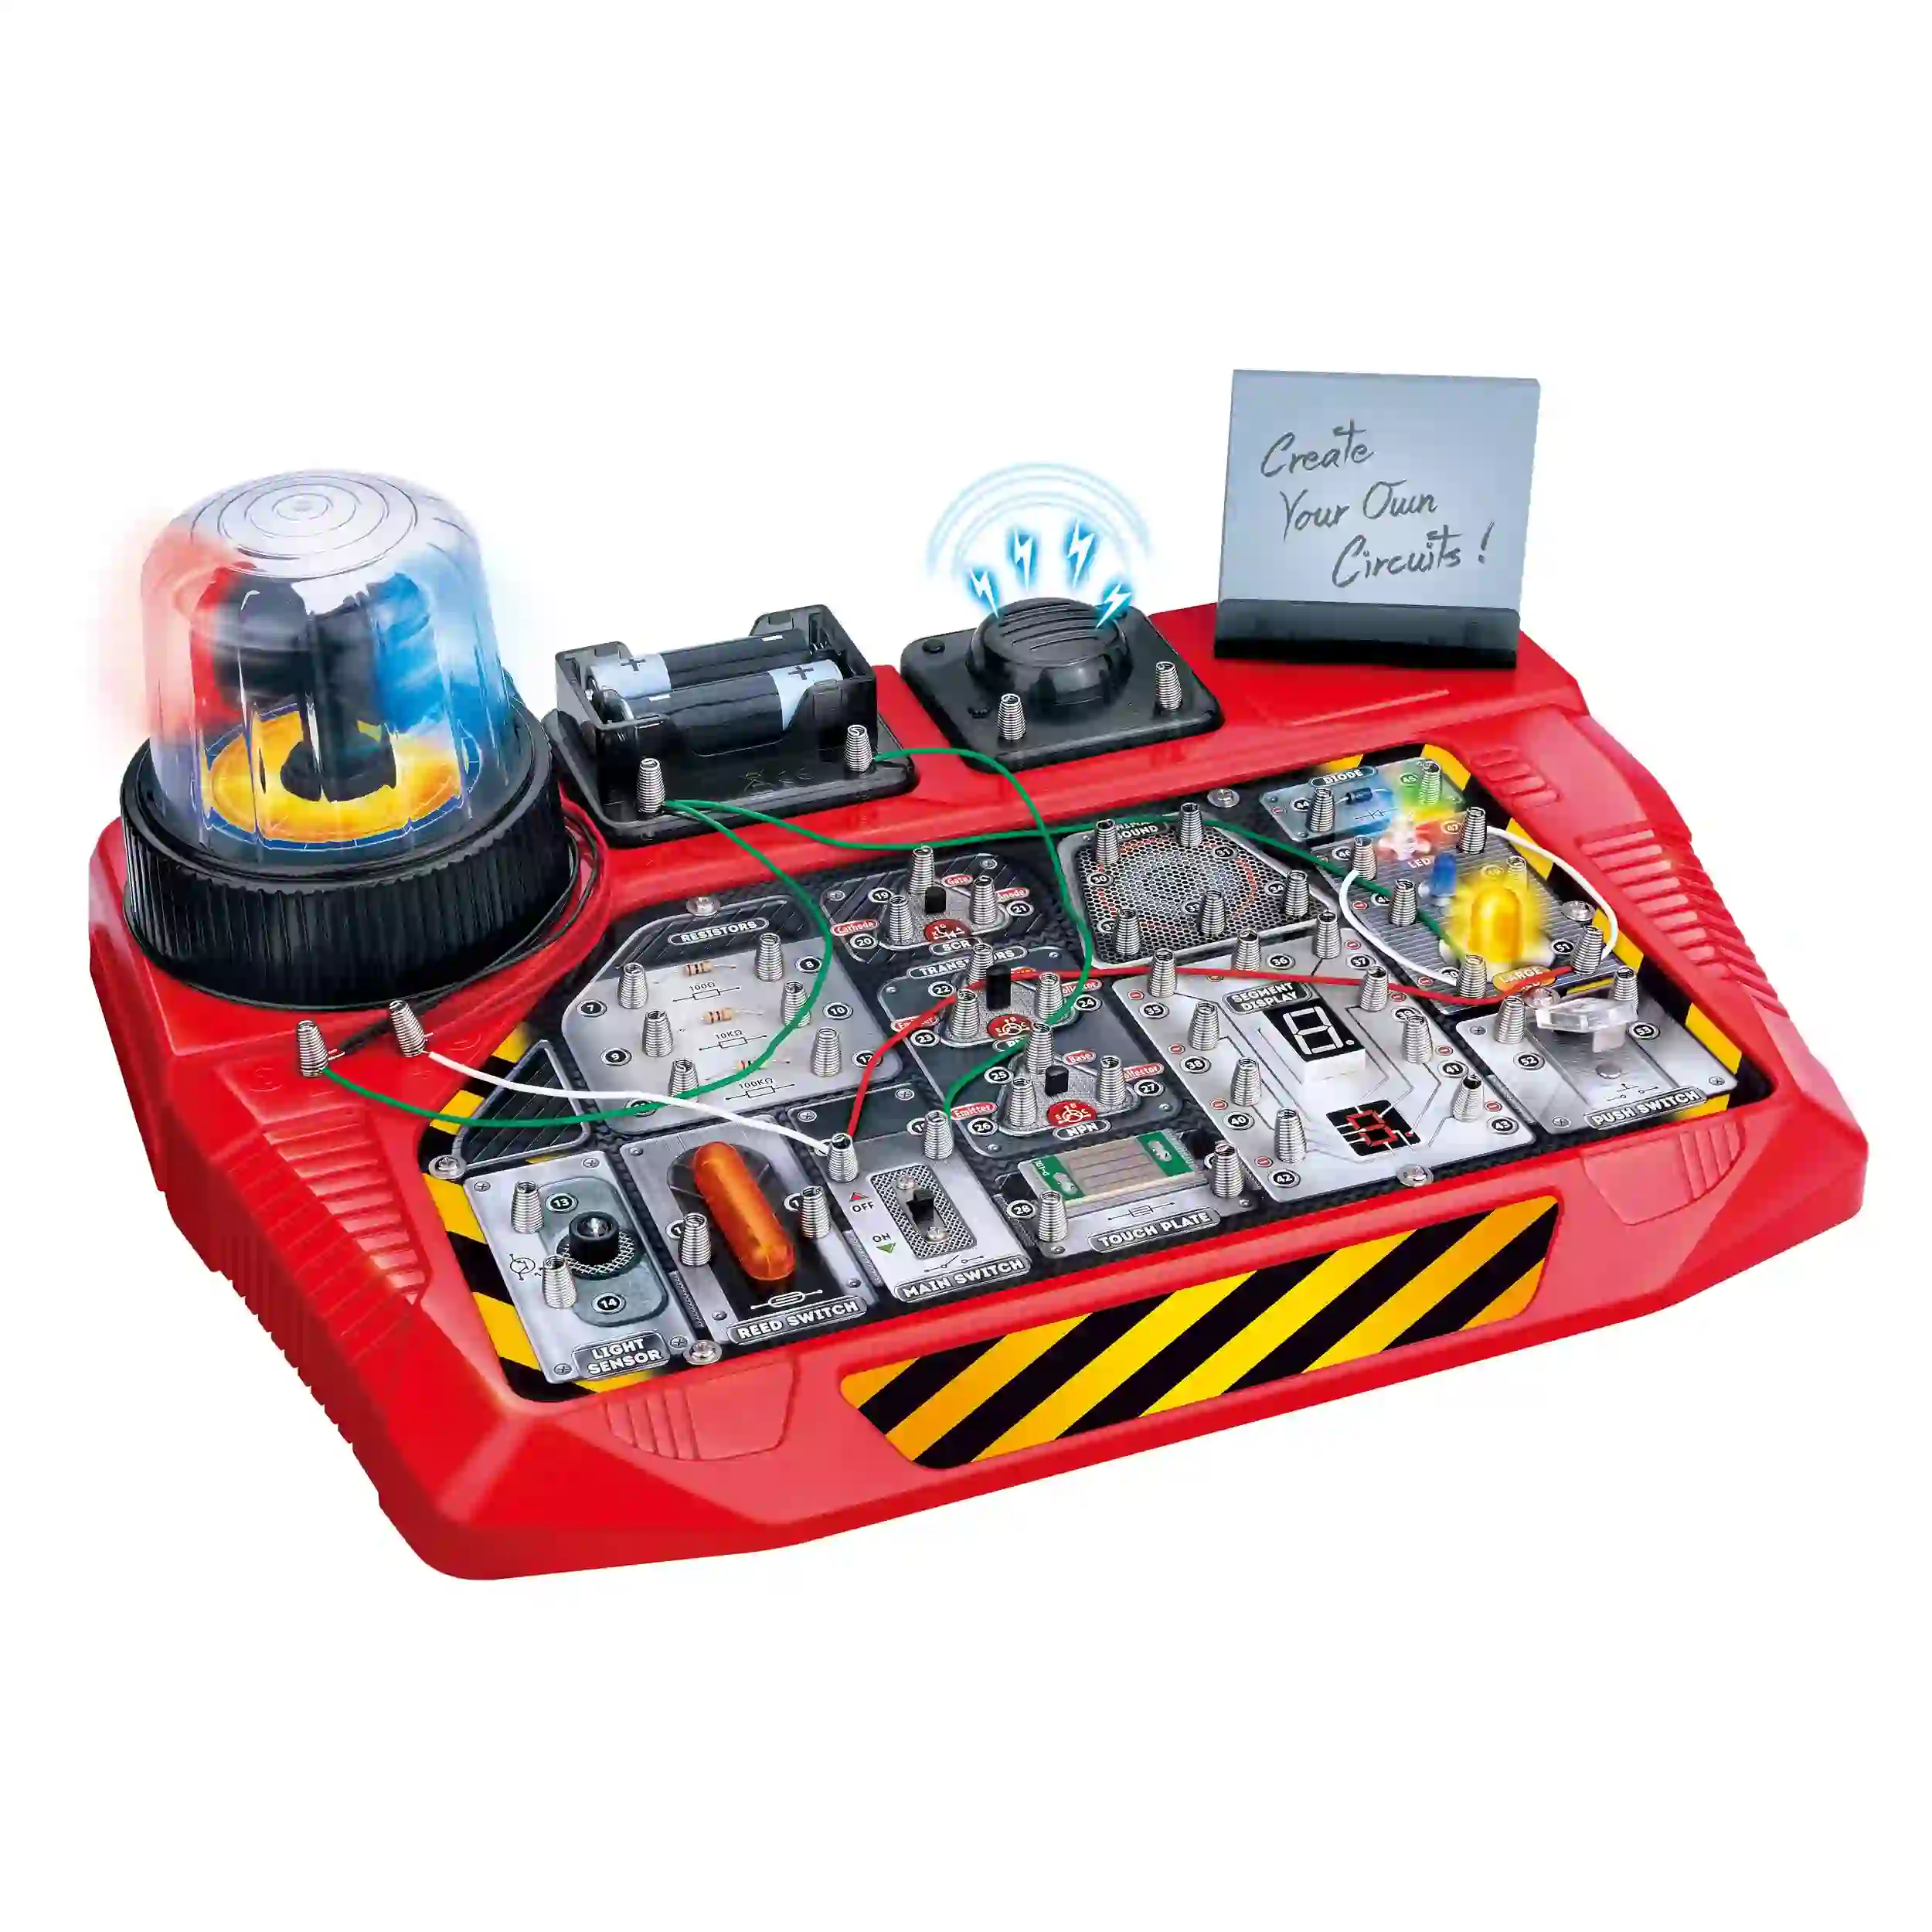
Hands-on PCB learning modules are designed to guide beginners through the fundamentals of circuit board design and functionality. These modules often include pre-designed boards, a set of components, and detailed instructions to build working circuits. They cover essential topics like soldering techniques, component placement, and basic circuit analysis.
One key benefit of these modules is their step-by-step approach. For example, a beginner module might start with a simple LED circuit, teaching you how to connect a 5V power source, a 220Ω resistor, and an LED. As you progress, advanced modules might introduce microcontrollers or multi-layer boards, helping you understand how signals travel through different layers at speeds up to 3x10^8 m/s (the speed of light in a vacuum, adjusted for dielectric materials).
These modules are perfect for classroom settings or self-study, as they provide a safe, structured way to experiment. They often come with troubleshooting guides, encouraging learners to identify and fix issues like open circuits or incorrect component values, building critical fault-finding skills.
The Value of Educational Circuit Board Kits with Components
Educational circuit board kits with components take learning a step further by providing everything you need in one package. These kits typically include a bare PCB, resistors, capacitors, diodes, transistors, and sometimes even microcontrollers or sensors. They’re ideal for understanding how individual parts work together to create a functional system.
For example, a typical kit might allow you to build a small amplifier circuit. You’d place a 10kΩ potentiometer to adjust volume, connect a 2N2222 transistor for signal amplification, and use a 4.7μF capacitor to filter noise. By assembling the circuit, you learn not only how each component functions but also how placement affects performance—such as minimizing trace length to reduce signal loss.
These kits are often paired with online resources or manuals that explain the purpose of each component. This makes them a powerful tool for both beginners and intermediate learners who want to experiment with real circuits without designing a PCB from scratch.
Understanding PCB Layers Through Educational Models
One of the more challenging aspects of PCB design is understanding how layers work together to create a functional board. Modern PCBs often have multiple layers—ranging from 2 to 16 or more in complex designs—each serving a specific purpose like power distribution, grounding, or signal routing. Understanding PCB layers through educational models simplifies this concept by breaking it down into visual, hands-on lessons.
Educational models might include transparent or cutaway PCBs that show how copper traces on different layers connect through vias (small holes filled with conductive material). For instance, a 4-layer board might have a top layer for components, an inner layer for power (3.3V or 5V), another for ground, and a bottom layer for signal routing. By studying these models, you can see how a signal travels from a microcontroller on the top layer to a sensor on the bottom, passing through vias with minimal resistance (often less than 0.1Ω per via).
Some advanced educational tools even simulate signal propagation, showing how high-frequency signals (like those at 2.4GHz for Wi-Fi) behave differently on outer versus inner layers due to dielectric properties. These models make it easier to grasp why layer stacking and material choice (like FR-4 with a dielectric constant of 4.5) are critical in PCB design.
Mastering PCB Fault Finding Training
Fault finding is a critical skill for anyone working with electronics, and PCB fault finding training through educational tools offers a practical way to develop this expertise. Fault finding involves identifying issues like short circuits, open connections, or incorrect component values that prevent a circuit from working as intended.
Educational PCBs for fault finding often come with intentional errors or diagnostic challenges. For example, a training board might have a missing solder joint on a 100Ω resistor, causing an open circuit. Using a multimeter, you’d measure continuity (expecting near 0Ω across a good joint) to locate the issue. Other exercises might involve a wrongly placed 1μF capacitor instead of a 10μF one, teaching you to read component markings and datasheets to spot discrepancies.
These training tools also introduce learners to advanced diagnostic techniques, like using an oscilloscope to check signal integrity. If a square wave output shows overshoot or ringing (unwanted oscillations), you might trace it to a long trace acting as an antenna, picking up noise at frequencies above 1MHz. By practicing with these boards, you build the analytical skills needed to troubleshoot real-world electronics.
Engaging in Interactive PCB Assembly Education
Interactive PCB assembly education takes learning to the next level by combining physical assembly with digital simulations or guided tutorials. These programs often use software to simulate circuit behavior before you build the physical board, helping you predict outcomes and avoid mistakes. Once you’re ready, you assemble the PCB using the provided components, following step-by-step guidance.
For instance, an interactive course might walk you through designing a simple timer circuit. You’d first simulate it in software, adjusting a 555 timer IC’s resistors (e.g., 10kΩ and 47kΩ) and capacitor (e.g., 100μF) to achieve a 1-second blink rate for an LED. Then, you’d assemble the real board, soldering components and testing the output frequency with a multimeter or oscilloscope. This dual approach reinforces learning by connecting virtual design with physical results.
Interactive education also emphasizes proper assembly techniques. You’ll learn to avoid cold solder joints (which can increase resistance to over 1Ω) and to place components like polarized capacitors correctly to prevent circuit failure. Many programs include video tutorials or augmented reality guides, making the process engaging and accessible for all skill levels.
Benefits of Educational PCBs for Different Learners
Educational PCBs cater to a wide range of learners, from students in school to professionals looking to upskill. Here’s how they benefit different groups:
- Students: Hands-on kits and modules make electronics fun and approachable, encouraging STEM interest. Building a small robot with a 9V battery and a dual H-bridge motor driver (like the L298N) can spark a lifelong passion.
- Hobbyists: These tools provide affordable ways to experiment with new ideas, like creating a custom 12V power supply with a 7805 regulator IC for stable 5V output.
- Educators: Ready-to-use kits and fault-finding boards simplify teaching complex topics, allowing focus on concepts like impedance (often 50Ω for RF circuits) without needing custom setups.
- Professionals: Advanced modules offer practice with real-world challenges, such as designing for high-speed signals where trace inductance (around 10nH per inch) impacts performance.
How to Choose the Right Educational PCB Tools
With so many options available, selecting the right educational PCB tools can feel overwhelming. Here are some tips to guide your decision:
- Skill Level: Beginners should start with basic kits that include components and clear instructions. Advanced learners might prefer multi-layer models or fault-finding boards.
- Learning Goals: If you’re focused on assembly, choose interactive education programs. For design, look for tools with simulation software.
- Components Included: Ensure the kit has all necessary parts, like resistors ranging from 100Ω to 1MΩ or capacitors from 1pF to 100μF, to avoid extra purchases.
- Support Resources: Opt for tools with manuals, videos, or online communities for guidance on complex topics like signal integrity or layer stacking.
Tips for Maximizing Your Learning Experience
To get the most out of educational PCBs, follow these practical tips:
- Start Small: Begin with simple circuits (like a 5V LED blinker) before tackling complex projects like a 3.3V microcontroller setup.
- Document Everything: Keep notes on each build, including component values (e.g., using a 4.7kΩ pull-up resistor) and issues faced, to track your progress.
- Experiment Safely: Always use low voltages (under 12V for beginners) and wear protective gear when soldering to avoid burns or shorts.
- Learn from Mistakes: If a circuit fails, use it as a chance to practice fault finding, checking for issues like a 0.01μF capacitor placed incorrectly.
Conclusion: Build Your Electronics Future with Hands-On Learning
Educational electronics PCBs offer a powerful, hands-on approach to understanding circuit board functionality. Whether you’re exploring hands-on PCB learning modules, assembling educational circuit board kits with components, or diving into PCB fault finding training, these tools provide the practical experience needed to master electronics. By engaging with interactive PCB assembly education and studying PCB layers through educational models, you can build skills that apply to real-world projects.
Start your journey today by choosing the right educational tools for your skill level and goals. With every circuit you build and every fault you fix, you’re one step closer to becoming a confident electronics enthusiast or professional. Let hands-on learning be your guide to unlocking the full potential of PCB design and functionality.


