 ALLPCB


If you're designing a circuit, one of the most critical aspects to consider is the resistor power rating. But what exactly is it, and why does it matter? Simply put, a resistor's power rating, often measured in watts, tells you the maximum amount of power it can handle without overheating or failing. Choosing the right resistor wattage ensures your circuit operates safely and efficiently. In this comprehensive guide, we'll dive deep into understanding power dissipation, resistor derating, and how to calculate and select the proper wattage for optimal performance. Whether you're a beginner or an experienced engineer, this post will help you master the essentials of resistor heat dissipation and more.
What Is Resistor Power Rating and Why Is It Important?
The resistor power rating defines the maximum amount of power a resistor can dissipate as heat without getting damaged. When current flows through a resistor, it generates heat due to the voltage drop across it. If this heat exceeds the resistor's rated capacity, it can overheat, change its resistance value, or even fail completely. This is why understanding resistor wattage is crucial for circuit design.
In practical terms, the power rating ensures the reliability and longevity of your electronic components. Ignoring it can lead to circuit failures, safety hazards, or unexpected performance issues. For example, a resistor rated at 0.25 watts will not survive in a circuit where it needs to handle 1 watt of power—it will likely burn out. By selecting the correct wattage, you prevent such problems and ensure your design works as intended.
How Is Power Dissipation Calculated in Resistors?
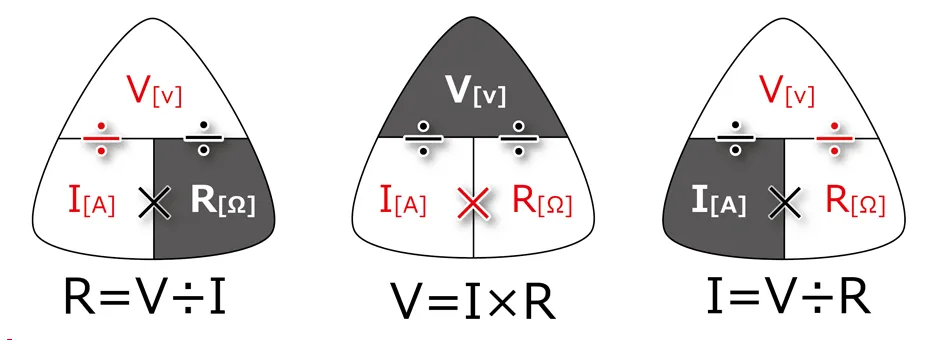
To select the right resistor wattage, you need to calculate the power dissipation in the resistor. Power dissipation is the amount of energy converted into heat as current passes through the resistor. The formula for power dissipation is derived from Ohm's Law and is quite straightforward:
P = V × I
Where:
- P is the power in watts (W)
- V is the voltage across the resistor in volts (V)
- I is the current through the resistor in amperes (A)
Alternatively, if you know the resistance value and the current or voltage, you can use these formulas:
P = I2 × R (when current and resistance are known)
P = V2 / R (when voltage and resistance are known)
Where R is the resistance in ohms (Ω).
Let’s look at a practical example. Suppose you have a resistor with a resistance of 100 ohms, and the voltage across it is 10 volts. Using the formula P = V2 / R, the power dissipation is:
P = (10)2 / 100 = 100 / 100 = 1 watt
This means the resistor must have a power rating of at least 1 watt to handle this load safely. However, as we'll discuss later under resistor derating, it’s wise to choose a resistor with a higher wattage rating for safety and reliability.
Factors Affecting Resistor Power Rating
Several factors influence a resistor's ability to handle power and its overall resistor heat dissipation. Understanding these can help you make better decisions when selecting resistor wattage.
1. Resistor Size and Construction
Larger resistors generally have higher power ratings because they can dissipate more heat due to their greater surface area. For instance, a 1-watt resistor is physically larger than a 0.25-watt resistor. The material and construction also matter—wirewound resistors can handle higher power compared to carbon film resistors of the same size.
2. Ambient Temperature
The surrounding temperature affects how much heat a resistor can dissipate. In hotter environments, a resistor’s ability to shed heat decreases, which is why resistor derating becomes essential. We'll explore derating in more detail later.
3. Mounting and Ventilation
How a resistor is mounted on a PCB and the airflow around it play a significant role in heat dissipation. A resistor placed in a confined space with poor ventilation will overheat faster than one in an open, well-ventilated area. Proper PCB layout design can improve heat management.
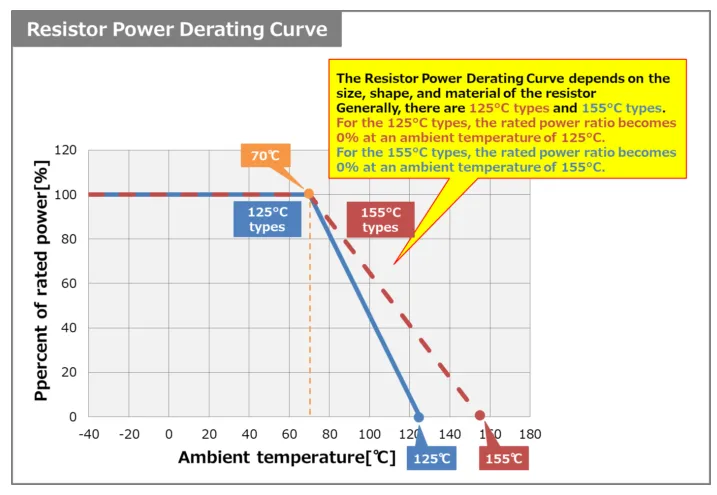
What Is Resistor Derating and Why Does It Matter?
Resistor derating is the practice of operating a resistor below its maximum power rating to ensure reliability and prevent failure. Manufacturers specify power ratings under ideal conditions (often at 25°C ambient temperature), but real-world conditions like high temperatures or poor ventilation can reduce a resistor’s capacity to handle power.
For instance, if a resistor is rated for 2 watts at 25°C, its power handling capacity might drop to 1.5 watts at 70°C. Derating involves selecting a resistor with a power rating higher than the calculated dissipation to account for these factors. A common rule of thumb is to choose a resistor with a power rating at least twice the expected dissipation. So, if your calculation shows a dissipation of 0.5 watts, opt for a 1-watt resistor.
Derating also extends the lifespan of the component. Operating a resistor near its maximum rating can cause gradual degradation, altering its resistance value over time. By derating, you reduce thermal stress and improve circuit reliability.
Steps for Selecting the Right Resistor Wattage
Now that you understand power dissipation and resistor derating, let’s walk through the practical steps for selecting resistor wattage to ensure optimal performance in your circuit.
Step 1: Calculate Power Dissipation
Use the formulas mentioned earlier (P = V × I, P = I2 × R, or P = V2 / R) to determine the power the resistor will dissipate based on your circuit’s voltage, current, or resistance values.
Step 2: Apply a Safety Margin with Derating
Multiply the calculated power dissipation by a safety factor (commonly 1.5 to 2) to account for real-world conditions like temperature rises or poor ventilation. For example, if the dissipation is 0.8 watts, choose a resistor rated for at least 1.2 to 1.6 watts.
Step 3: Consider Environmental Factors
Evaluate the operating environment of your circuit. Will the resistor be exposed to high temperatures or enclosed spaces? If so, increase the derating factor or improve heat dissipation through better PCB design or heatsinks.
Step 4: Verify Physical Size and Mounting
Ensure the resistor’s physical size fits your PCB layout. Larger power ratings often mean larger components, so balance wattage needs with space constraints. Also, check if the mounting method supports adequate resistor heat dissipation.
Common Mistakes to Avoid When Dealing with Resistor Power Rating
Even with the right calculations, mistakes can happen. Here are some common pitfalls to avoid when working with resistor power rating and power dissipation.
1. Ignoring Derating Guidelines
Using a resistor at its maximum rated power without considering derating can lead to overheating and failure. Always apply a safety margin based on temperature and environmental conditions.
2. Underestimating Power Dissipation
Inaccurate measurements of voltage or current can result in incorrect power calculations. Double-check your values to ensure they reflect real operating conditions, not just ideal scenarios.
3. Poor Heat Management
Placing resistors too close together on a PCB or in areas with limited airflow can cause heat buildup. Plan your layout to maximize resistor heat dissipation and avoid thermal hotspots.
4. Choosing the Wrong Resistor Type
Not all resistors are suited for high-power applications. For example, a thin-film resistor may not handle the same power as a wirewound resistor. Match the resistor type to your power requirements.
Related Reading: SMD Resistors Demystified: Sizes, Markings, and Practical Applications
Practical Examples of Resistor Power Rating in Action
Let’s explore two real-world scenarios to see how resistor wattage selection works in practice.
Example 1: LED Current Limiting Resistor
In an LED circuit, a resistor limits the current to prevent the LED from burning out. Suppose the supply voltage is 5V, the LED forward voltage is 2V, and the desired current is 20mA (0.02A). The voltage across the resistor is 5V - 2V = 3V. Using P = V × I, the power dissipation is:
P = 3 × 0.02 = 0.06 watts
Even though the dissipation is only 0.06 watts, applying a safety margin of 2 means selecting a resistor rated for at least 0.12 watts. A standard 0.25-watt resistor would be a safe and common choice here.
Example 2: Power Supply Load Resistor
In a power supply test, a resistor acts as a dummy load to dissipate 10 watts of power. The voltage across the resistor is 20V. Using P = V2 / R, the resistance value is:
R = V2 / P = (20)2 / 10 = 400 / 10 = 40 ohms
The resistor must handle 10 watts, but with a derating factor of 1.5, you should choose a resistor rated for at least 15 watts. Additionally, ensure proper mounting and possibly a heatsink for effective resistor heat dissipation.
Tips for Improving Resistor Heat Dissipation
Managing resistor heat dissipation is key to preventing failures and extending component life. Here are some actionable tips:
- Use Heatsinks: For high-power resistors, attach heatsinks to absorb and dissipate heat more effectively.
- Optimize PCB Layout: Space resistors apart to avoid heat buildup and place them near vents or fans if possible.
- Choose Higher Wattage Ratings: As a rule, select resistors with a power rating significantly above the calculated dissipation to reduce thermal stress.
- Monitor Operating Temperatures: Use thermal imaging or temperature sensors during testing to identify hot spots in your design.
Related Reading: The Impact of Temperature Coefficient on Resistor Stability: A Deep Dive
Conclusion: Mastering Resistor Power Rating for Reliable Designs
Understanding and calculating resistor power rating is a fundamental skill for any electronics designer. By mastering concepts like power dissipation, resistor derating, and resistor heat dissipation, you can ensure your circuits are safe, reliable, and efficient. Remember to calculate power needs accurately, apply safety margins, and consider environmental factors when selecting resistor wattage. With these practices, you'll avoid common pitfalls and build designs that perform optimally under real-world conditions.
Whether you're working on a simple LED circuit or a complex power supply, the principles of resistor wattage remain the same. Take the time to apply these guidelines, and you'll create robust, long-lasting electronic designs with confidence.


