 ALLPCB


If you're diving into electronics projects and looking for a budget-friendly way to streamline PCB prototyping, building your own stencil printer might be the perfect solution. A DIY stencil printer allows you to apply solder paste accurately for surface-mount device (SMD) assembly without breaking the bank. In this comprehensive guide, we'll walk you through the process of creating a cost-effective stencil printer for PCB prototyping, offering step-by-step instructions, practical tips, and insights to help you succeed in your electronics projects.
Why Build a Stencil Printer for PCB Prototyping?
PCB prototyping often involves placing tiny components onto boards with precision, especially when working with SMDs. A stencil printer ensures that solder paste is applied evenly and accurately to the pads of your PCB, reducing errors during assembly. While commercial stencil printers can cost hundreds or even thousands of dollars, a DIY stencil printer offers a cost-effective assembly solution that can be built for under $100 using readily available materials. By building your own, you save money, gain a deeper understanding of the process, and customize the tool to fit your specific needs.
Whether you're a hobbyist working on small-scale electronics projects or a professional testing new designs, a DIY stencil printer can significantly improve the quality and speed of your prototyping workflow. Let’s explore how to build one and why it’s a game-changer for cost-effective assembly.
Benefits of a DIY Stencil Printer for Electronics Projects
Before we dive into the building process, let’s highlight the key advantages of creating your own stencil printer:
- Cost Savings: Commercial stencil printers can range from $500 to over $5000, while a DIY version can be made for a fraction of that cost, often under $100 with basic materials.
- Customization: Building your own printer allows you to tailor the design to your specific PCB sizes and project requirements.
- Learning Opportunity: The process of constructing a stencil printer deepens your understanding of PCB assembly techniques, which is invaluable for any electronics enthusiast.
- Improved Precision: Even a simple DIY setup can provide better accuracy than manually applying solder paste with a syringe, reducing the risk of shorts or insufficient solder.
For anyone regularly working on electronics projects, these benefits make a compelling case for investing time in a DIY solution over purchasing expensive equipment.
Materials and Tools Needed to Build a Stencil Printer
To build a stencil printer for PCB prototyping, you’ll need a combination of common hardware and basic tools. Here’s a detailed list to get you started:
- Base Frame Materials: Plywood or acrylic sheet (12” x 12” or larger, depending on your PCB size), screws, and hinges to create a stable frame and lid mechanism.
- Stencil Holder: Aluminum or steel L-brackets (4 pieces, about 2-3 inches long) to secure the stencil in place over the PCB.
- PCB Holder: Small clamps or 3D-printed holders to keep the PCB steady during solder paste application.
- Squeegee: A metal or hard plastic squeegee (about 4-6 inches wide) to spread solder paste across the stencil evenly.
- Stencil: A laser-cut or etched metal stencil specific to your PCB design. Polyimide stencils can also work for smaller projects and are more affordable.
- Tools: Drill, screwdriver, measuring tape, level, and sandpaper for assembling and fine-tuning the frame.
- Optional: Adjustable screws or springs for fine-tuning the alignment and pressure between the stencil and PCB.
The total cost for these materials can range from $50 to $100, depending on what you already have at home and the quality of components you choose. Many of these items can be sourced from local hardware stores or online marketplaces.
Step-by-Step Guide to Building Your DIY Stencil Printer
Now that you have your materials ready, let’s walk through the process of building a stencil printer for cost-effective PCB assembly. Follow these steps to create a functional and reliable tool for your electronics projects.
Step 1: Design the Base Frame
The base frame is the foundation of your stencil printer. Cut a piece of plywood or acrylic to a size that accommodates your largest PCB, such as 12” x 12”. Sand the edges to ensure a smooth surface. Attach four small wooden or metal blocks (about 1” high) to the corners of the base to act as feet, providing stability and elevation. Use screws to secure them tightly.
Step 2: Create a Hinged Lid for Stencil Mounting
Cut another piece of plywood or acrylic to the same size as the base to serve as the lid. Attach two hinges to one side of the lid and connect it to the base frame. This hinged design allows you to easily lift the lid to place or remove the PCB while keeping the stencil aligned. Ensure the hinges are sturdy and aligned properly to avoid wobbling.
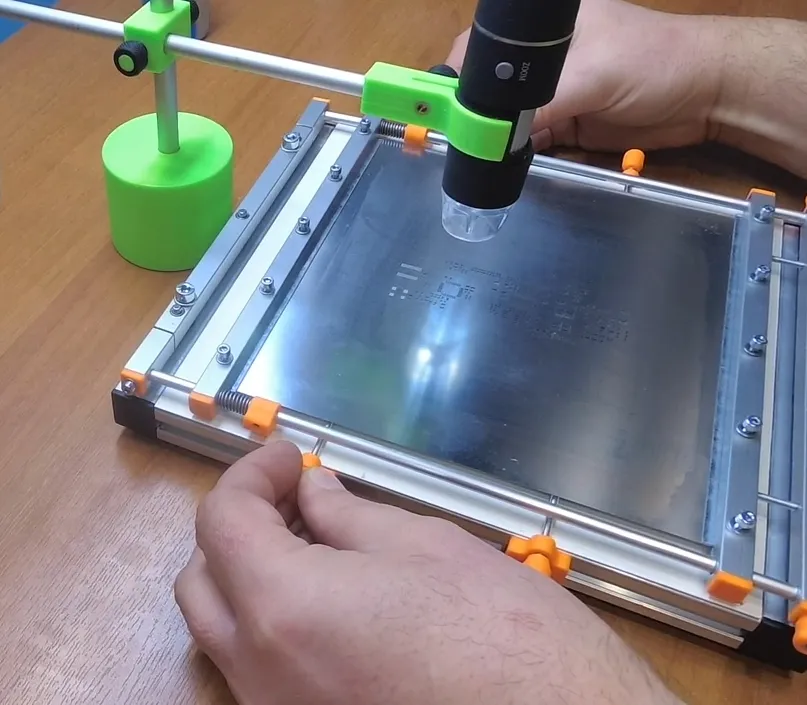
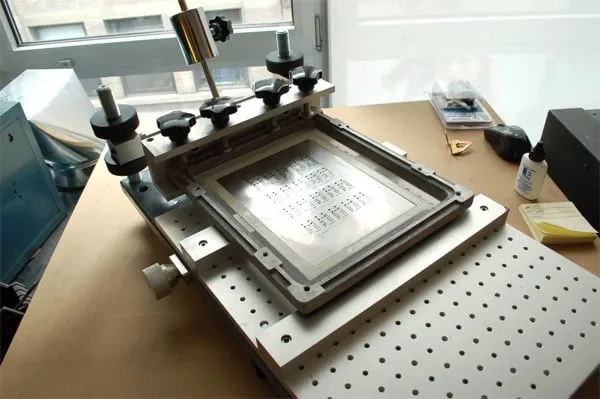
Step 3: Build the Stencil Holder
Attach four L-brackets to the underside of the lid to form a rectangular frame that holds the stencil in place. Position the brackets so they grip the edges of your stencil snugly. If your stencil size varies, consider using adjustable brackets or adding slots for flexibility. Test the fit by placing a stencil inside the holder—it should sit flat and secure.
Step 4: Add a PCB Holder to the Base
To keep the PCB steady during solder paste application, attach small clamps or 3D-printed holders to the base. Alternatively, you can drill holes and use bolts with wing nuts to create adjustable mounts. The goal is to ensure the PCB doesn’t shift while you’re working. Measure the thickness of your PCBs (commonly 1.6mm) and design the holders to match.
Step 5: Test Alignment and Adjust
Place a sample PCB on the base and lower the lid with the stencil attached. Check if the stencil aligns perfectly with the PCB pads. If there’s misalignment, adjust the position of the stencil holder or PCB clamps. You can also add small screws or shims to fine-tune the height and pressure for consistent contact. A level can help ensure everything is flat.
Step 6: Prepare for Solder Paste Application
With the printer assembled, clean all surfaces to remove dust or debris that could interfere with the solder paste. Keep your squeegee, solder paste, and cleaning supplies nearby. Practice the motion of spreading paste across the stencil with an even, steady stroke to avoid uneven application.
How to Use Your DIY Stencil Printer for PCB Prototyping
Once your stencil printer is built, using it for PCB prototyping is straightforward. Here’s a quick guide to applying solder paste effectively:
- Secure the PCB: Place your PCB into the holder on the base and tighten the clamps to prevent movement.
- Align the Stencil: Lower the lid and ensure the stencil aligns with the PCB pads. Double-check for any gaps or misalignment.
- Apply Solder Paste: Scoop a small amount of solder paste (about 5-10 grams for a small board) onto the stencil. Use the squeegee to spread the paste across the stencil with firm, even pressure at a 45-degree angle. Make 1-2 passes to ensure full coverage.
- Lift and Inspect: Carefully lift the lid to separate the stencil from the PCB. Inspect the solder paste on the pads—it should be uniform, with no excess or missing spots. Typical stencil thickness is 0.1mm to 0.15mm, which deposits about 0.05mm to 0.08mm of paste height after application.
- Clean Up: Remove the stencil and clean it with isopropyl alcohol and a lint-free cloth to prevent paste buildup. Clean the squeegee as well.
With practice, you’ll achieve consistent results, making the assembly process faster and more reliable for your electronics projects.
Tips for Optimizing Your DIY Stencil Printer
To get the most out of your DIY stencil printer and ensure cost-effective assembly, consider these practical tips:
- Use High-Quality Stencils: Invest in a well-made stencil (metal or durable polyimide) with precise cutouts matching your PCB design. A stencil thickness of 0.1mm to 0.15mm works well for most SMD components with pad sizes down to 0.5mm pitch.
- Maintain Cleanliness: Always clean the stencil and squeegee after each use to avoid contamination or clogging, which can lead to defective solder joints.
- Experiment with Pressure: Adjust the pressure between the stencil and PCB by adding shims or springs to the lid. Too much pressure can cause paste to bleed under the stencil, while too little may result in incomplete coverage.
- Store Solder Paste Properly: Keep solder paste refrigerated (around 5°C) when not in use to extend its shelf life, and let it reach room temperature (about 25°C) for 1-2 hours before application to ensure proper viscosity.
- Upgrade Over Time: As you gain experience, consider adding features like a tension adjustment mechanism or a more precise alignment system to improve accuracy for complex boards.
Common Challenges and How to Overcome Them
Building and using a DIY stencil printer for PCB prototyping can come with a few hurdles. Here are some common issues and solutions:
- Misalignment: If the stencil doesn’t align with the PCB, double-check the positioning of the holders and use a magnifying glass to fine-tune small adjustments. Adding alignment pins (1mm diameter) to the base can help.
- Uneven Paste Application: This often results from inconsistent squeegee pressure or speed. Practice maintaining a steady 45-degree angle and uniform speed across the stencil.
- Stencil Damage: Handle metal or polyimide stencils carefully to avoid bending or tearing. Store them flat in a protective case when not in use.
- Paste Smearing: If paste smears under the stencil, reduce the amount of paste used (start with 5 grams) and ensure the stencil is pressed evenly against the PCB.
By addressing these challenges, you’ll refine your technique and achieve professional-quality results with your DIY setup.
Conclusion: A Smart Investment for Electronics Projects
Building your own stencil printer is a rewarding and cost-effective solution for PCB prototyping. With a small investment of time and money—often under $100—you can create a tool that rivals the functionality of commercial options for basic to intermediate electronics projects. Not only does a DIY stencil printer save you money, but it also enhances your skills, improves assembly precision, and gives you full control over the prototyping process.
Whether you’re a hobbyist tinkering with small circuits or a professional iterating on new designs, this cost-effective assembly method can elevate your work. Follow the steps outlined in this guide to build your stencil printer, experiment with different setups, and take your PCB prototyping to the next level. With patience and practice, you’ll master the art of solder paste application and streamline your electronics projects like never before.


