 ALLPCB


If you're new to PCB assembly and wondering how to use a stencil printer, understand the solder paste printing process, or get manual stencil printing tips, you're in the right place. This guide will walk you through the essentials of stencil printing for solder paste application, breaking down each step into simple, actionable advice. Whether you're working on a small prototype or scaling up production, mastering stencil printing is key to achieving reliable solder joints for surface mount components.
In this comprehensive beginner's guide, we'll cover everything from the basics of stencil printers to detailed tips for applying solder paste manually or with a machine. Let's dive into the world of PCB assembly and help you get started with confidence.
What Is a Stencil Printer and Why Is It Important?
A stencil printer is a tool used in PCB assembly to apply solder paste onto a printed circuit board (PCB) with precision. Solder paste, a mixture of tiny solder particles and flux, acts as the adhesive that holds surface mount components in place before they are permanently bonded during the reflow soldering process. The stencil printer ensures that the right amount of paste is deposited onto the PCB pads, which is critical for creating strong and reliable electrical connections.
Without proper solder paste application, you risk issues like insufficient solder, bridging between pads, or poor component alignment. For beginners, understanding how to use a stencil printer can save time, reduce errors, and improve the quality of your assembled boards. This process is especially important in surface mount technology (SMT), where components are tiny and precision is everything.
Understanding the Solder Paste Printing Process
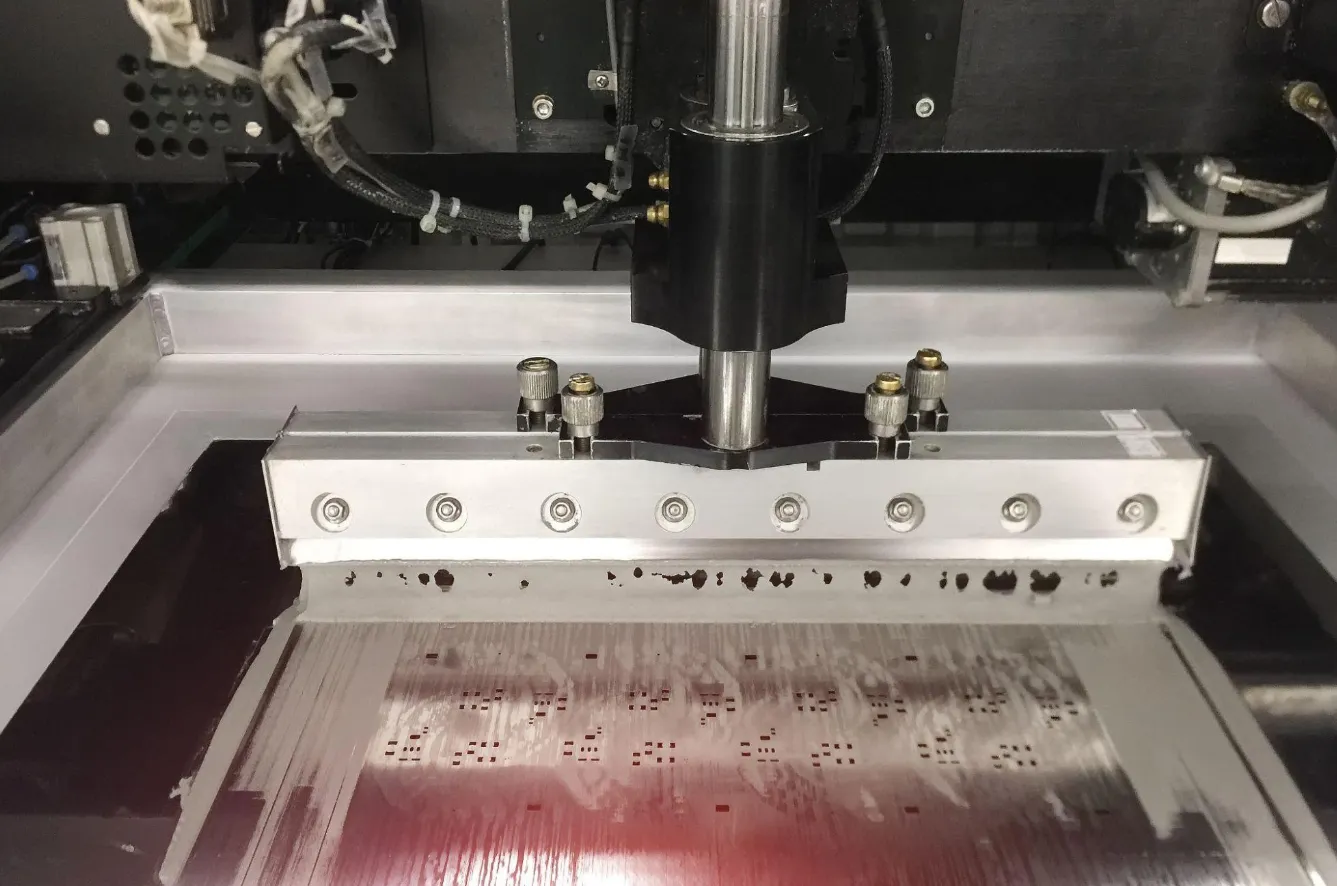
The solder paste printing process is a foundational step in SMT assembly. It involves using a stencil—a thin sheet of metal or polymer with cutouts matching the PCB pads—to deposit solder paste exactly where it's needed. Here's a step-by-step breakdown of how it works:
- Prepare the PCB and Stencil: Secure the PCB in place on the printer or work surface. Align the stencil over the PCB so that the openings (apertures) match the pads where components will be placed.
- Apply Solder Paste: Place a small amount of solder paste along one edge of the stencil. Use a squeegee (a flat blade) to spread the paste across the stencil, pushing it through the apertures onto the PCB pads.
- Lift the Stencil: Carefully remove the stencil from the PCB, leaving behind precise deposits of solder paste on the pads.
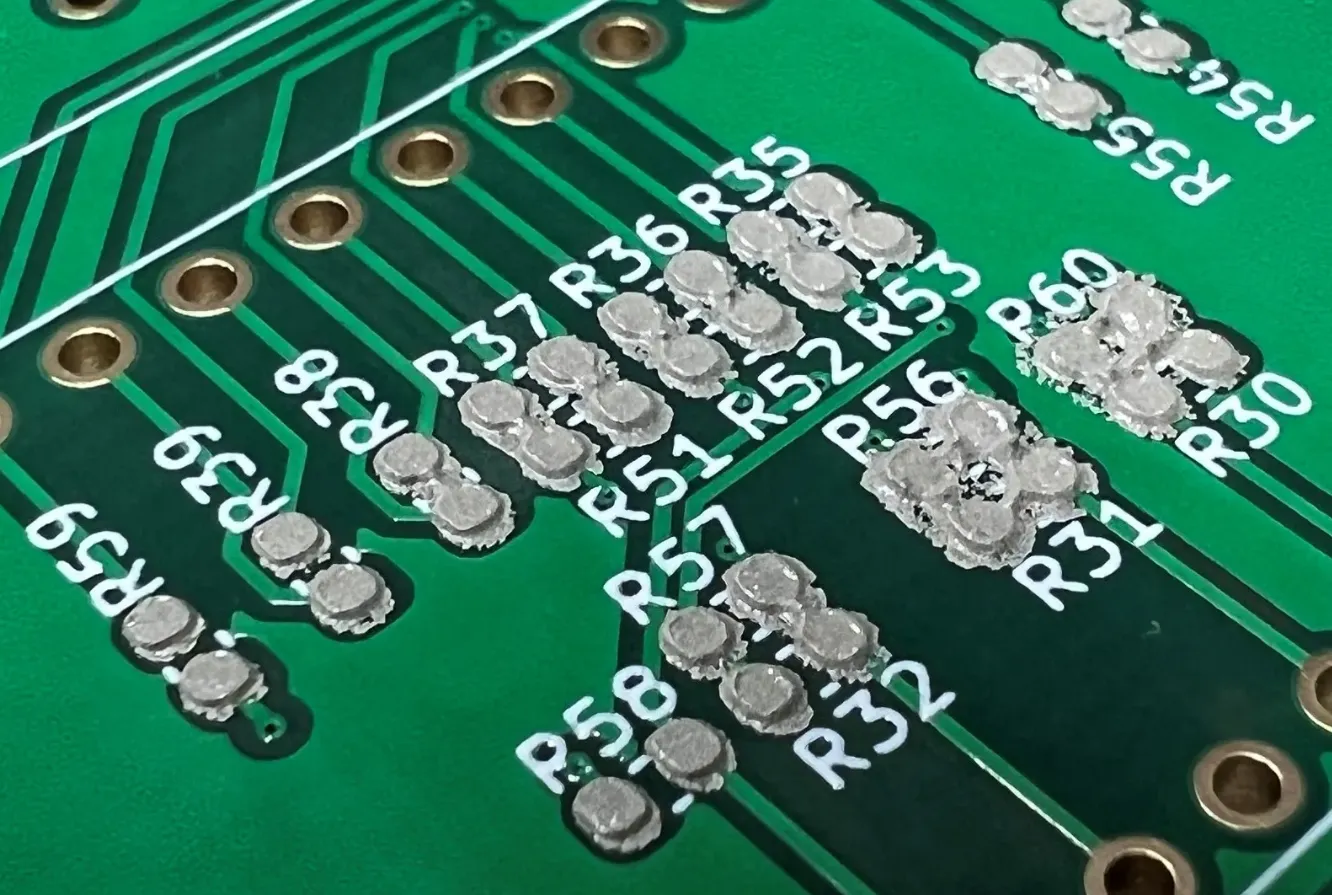
- Inspect the Paste: Check for even application and ensure there are no smudges or excess paste that could cause shorts or defects.
- Place Components: Once the paste is applied, position the surface mount components onto the paste. The tackiness of the paste will hold them in place until reflow soldering.
This process might sound simple, but precision is crucial. Even a small misalignment or uneven paste application can lead to soldering defects. For example, if too much paste is applied, it can cause solder bridges between closely spaced pads (common in fine-pitch components with pad spacing as small as 0.4mm). Too little paste, on the other hand, can result in weak joints that fail under stress.
How to Use a Stencil Printer: Step-by-Step for Beginners
Learning how to use a stencil printer is easier than it seems, even if you're just starting out. Whether you're using a manual stencil printer or a semi-automatic one, the core principles remain the same. Here's a detailed guide to help you get started:
Step 1: Gather Your Tools and Materials
- A stencil printer or a manual frame to hold the stencil.
- A stencil (metal or polymer) designed for your specific PCB layout.
- Solder paste (ensure it's fresh and stored at the recommended temperature, usually 2-10°C).
- A squeegee (metal or rubber, depending on your setup).
- Isopropyl alcohol and lint-free wipes for cleaning.
- Your bare PCB, ready for assembly.
Step 2: Set Up the Printer
If you're using a manual stencil printer, place it on a flat, stable surface. Secure the PCB in the designated holder or platform. Many manual printers have adjustable guides to ensure the board doesn't move during printing. For semi-automatic printers, follow the manufacturer's instructions to load the PCB and stencil into the machine, ensuring proper alignment in the X, Y, and rotational (Θ) axes.
Step 3: Align the Stencil
Position the stencil over the PCB. Most stencils have fiducial marks or alignment holes to help match them to the board. Take your time with this step—misalignment by even 0.1mm can lead to paste being applied off-center, causing soldering issues.
Step 4: Apply the Solder Paste
Scoop a small line of solder paste (about 1-2cm wide) along one edge of the stencil. Hold the squeegee at a 45-degree angle and drag it across the stencil with steady, even pressure. The goal is to push the paste through the apertures without leaving excess on the stencil surface. For manual printing, one or two passes are usually enough. Semi-automatic printers may handle this step for you with a built-in squeegee mechanism.
Step 5: Remove the Stencil and Inspect
Lift the stencil straight up or pivot it away from the PCB (depending on your setup) to avoid smearing the paste. Inspect the paste deposits under good lighting or with a magnifying glass. Each pad should have a uniform, brick-like shape of paste, typically 0.1-0.15mm thick, depending on the stencil thickness.
Step 6: Clean and Repeat
After printing, clean the stencil with isopropyl alcohol and a lint-free wipe to remove any leftover paste. This prevents clogs and ensures clean prints for the next board. If you're working on multiple PCBs, repeat the process, checking alignment each time.

Manual Stencil Printing Tips for Beginners
If you're just starting with manual stencil printing, a few practical tips can make a big difference in your results. Here are some proven strategies to help you achieve clean, consistent solder paste application:
- Use the Right Amount of Paste: Start with a small bead of solder paste—about the size of a pea for small boards. Too much paste can lead to messiness and bridging, while too little won't fill the apertures properly.
- Maintain Squeegee Angle and Pressure: Hold the squeegee at a consistent 45-degree angle and apply firm, even pressure. Avoid pressing too hard, as this can scoop paste out of the apertures or damage the stencil.
- Work in a Clean Environment: Dust or debris on the PCB or stencil can contaminate the paste and cause defects. Keep your workspace clean and consider wearing gloves to avoid transferring oils from your hands.
- Store Solder Paste Properly: Solder paste is sensitive to temperature and humidity. Store it in a refrigerator (2-10°C) when not in use, and let it warm to room temperature (about 25°C) for 1-2 hours before printing to ensure smooth consistency.
- Practice on Scrap Boards: If you're new to manual printing, practice on a spare or scrap PCB to get a feel for the squeegee motion and paste application before working on your actual project.
- Check Stencil Thickness: Stencil thickness (typically 0.1mm to 0.15mm for most SMT applications) affects the volume of paste deposited. For fine-pitch components, a thinner stencil (0.1mm) helps prevent excess paste, while thicker stencils (0.15mm) are better for larger pads.
- Avoid Overworking the Paste: Don’t reuse paste that has been sitting out for too long (over 4-6 hours) or has dried out. Fresh paste ensures better adhesion and flow during reflow.
Common Challenges in Solder Paste Printing and How to Fix Them
Even with careful preparation, beginners often encounter issues during stencil printing. Here are some common problems and solutions to help you troubleshoot:
Problem 1: Uneven Paste Deposits
Cause: Inconsistent squeegee pressure or angle, or a damaged stencil.
Solution: Maintain a steady 45-degree angle and even pressure during the squeegee pass. Inspect the stencil for scratches or clogs and clean or replace it if needed.
Problem 2: Solder Paste Bridging
Cause: Too much paste applied or stencil misalignment.
Solution: Use less paste and double-check stencil alignment. For fine-pitch components, consider a thinner stencil to reduce paste volume.
Problem 3: Paste Not Releasing from Stencil
Cause: Stencil apertures may be clogged, or the paste may be too old or dry.
Solution: Clean the stencil thoroughly after each use. Use fresh paste and ensure it's at the right consistency before printing.
Problem 4: Smearing During Stencil Removal
Cause: Lifting the stencil at an angle or too quickly.
Solution: Remove the stencil slowly and vertically to avoid disturbing the paste deposits.
Choosing the Right Stencil Printer for Your Needs
For beginners, selecting a stencil printer depends on your budget, production volume, and precision requirements. Here's a quick overview of the options:
- Manual Stencil Printers: Affordable and ideal for low-volume prototyping or hobbyists. They require more skill to achieve consistent results but are a great starting point. Prices typically range from $100 to $500 for basic models.
- Semi-Automatic Printers: These offer automated features like stencil alignment and squeegee control, making them suitable for small to medium production runs. They cost between $2,000 and $10,000 but improve repeatability.
- Fully Automatic Printers: Used in high-volume manufacturing, these machines handle everything from alignment to paste application with minimal user input. They are expensive (often over $20,000) and best for large-scale operations.
As a beginner, starting with a manual or entry-level semi-automatic printer is often the most practical choice. Focus on learning the process before investing in advanced equipment.
Why Precision Matters in Solder Paste Application
In SMT assembly, precision during solder paste printing directly impacts the quality of your final product. For instance, modern PCBs often feature components with lead pitches as small as 0.4mm or less. A slight deviation in paste placement can cause shorts or open circuits, leading to costly rework or failed boards. Studies show that up to 60% of SMT defects originate from poor solder paste printing, highlighting the importance of mastering this step.
By using a stencil printer and following best practices, you ensure consistent paste volume and placement, which translates to better solder joint reliability. This is especially critical for high-density designs where even a 0.05mm misalignment can be problematic.
Final Thoughts on Stencil Printing for Beginners
Mastering stencil printer basics and solder paste application is a game-changer for anyone stepping into PCB assembly. By understanding how to use a stencil printer, following the solder paste printing process, and applying manual stencil printing tips, you can achieve professional-quality results even as a beginner. Start with the right tools, practice your technique, and pay attention to details like alignment and paste consistency.
With each board you print, you'll gain confidence and refine your skills. Remember that stencil printing is as much about precision as it is about patience. Take your time, troubleshoot issues as they arise, and soon you'll be creating reliable, high-quality PCBs for your projects.
At ALLPCB, we're committed to supporting your journey in PCB assembly with resources and tools to simplify the process. Whether you're a hobbyist or a professional, mastering stencil printing is a valuable skill that will elevate your work to the next level.


