ALLPCB


If you're a hobbyist diving into the world of printed circuit boards (PCBs) and wondering how to efficiently separate multiple boards from a single panel, V-scoring might be the solution you're looking for. V-scoring is a simple and cost-effective PCB separation technique that creates V-shaped grooves on a panel, making it easy to snap apart individual boards without damaging them. In this guide, we'll walk you through the basics of PCB V-scoring for beginners, explore DIY PCB panelization, and share tips on V-scoring at home using simple PCB separation methods.
Whether you're designing small circuits for personal projects or scaling up to produce multiple boards, understanding V-scoring can save you time and effort. Let’s break down everything you need to know to get started with this practical technique.
What Is V-Scoring and Why Does It Matter for Hobbyists?
V-scoring, also known as V-grooving or V-cutting, is a method used in PCB manufacturing to create predefined breaking points on a panel of multiple circuit boards. By cutting V-shaped grooves on both the top and bottom sides of the panel, it leaves a thin layer of material that holds the boards together during assembly but allows for easy separation later. Think of it like the perforations on a sheet of stamps—snapping the boards apart is clean and straightforward.
For hobbyists, V-scoring matters because it simplifies the process of working with multiple PCBs at once. Instead of handling individual tiny boards during assembly, you can design a panel with several boards, assemble components on all of them in one go, and then separate them when you're done. This not only saves time but also reduces the risk of damaging delicate components during handling. Plus, it’s a budget-friendly option compared to more complex separation methods.
Benefits of V-Scoring for DIY Enthusiasts
- Cost-Effective: V-scoring is one of the most affordable ways to panelize and separate PCBs, making it ideal for hobbyists on a budget.
- Time-Saving: Handling a single panel instead of multiple small boards speeds up the assembly process.
- Reduced Risk: The controlled grooves minimize stress on components near the edges during separation.
- Beginner-Friendly: With the right design and tools, V-scoring can be adapted for home projects with minimal equipment.

Understanding PCB Panelization: A Key Step for V-Scoring
Before diving into V-scoring techniques, let’s talk about PCB panelization. Panelization is the process of arranging multiple individual PCB designs onto a larger single panel for manufacturing and assembly. This approach is widely used to streamline production and make handling easier, especially when dealing with small or intricate boards.
For hobbyists, panelization is a game-changer. Imagine you’ve designed a small 2 cm x 2 cm board for a microcontroller project. Handling and assembling components on such a tiny board can be tricky. By grouping several of these designs into a larger panel (say, 10 cm x 10 cm), you create a more stable surface to work on. Once assembly is complete, V-scoring allows you to separate the individual boards without hassle.
Why Panelize Your PCBs as a Hobbyist?
- Easier Assembly: Larger panels are simpler to handle during soldering or component placement, especially if you’re using automated tools or pick-and-place machines.
- Better Yield: Panelizing reduces the chances of losing or damaging small boards during production.
- Cost Efficiency: Many manufacturing services charge based on panel size, so grouping multiple designs into one panel can lower costs per board.

How V-Scoring Works: A Step-by-Step Breakdown
Now that we’ve covered the basics of panelization, let’s look at how V-scoring fits into the process. V-scoring is typically done during the manufacturing stage, where specialized machines cut precise V-shaped grooves into the panel. However, hobbyists can also mimic this process at home with some creativity and basic tools. Here’s how it works:
- Design the Panel: Using PCB design software, arrange your individual board designs on a single panel. Leave a small gap (usually 0.3 mm to 0.5 mm) between boards where the V-score lines will go. Ensure the edges of each board are straight, as V-scoring is best suited for linear cuts.
- Specify V-Scoring: If you’re sending your design to a manufacturer, indicate where you want the V-score lines in your fabrication files. Most design tools allow you to add scoring lines in the board outline layer.
- Cutting the Grooves: During manufacturing, a machine cuts V-shaped grooves on both sides of the panel, leaving a thin layer of material (often 0.2 mm to 0.4 mm thick) in the middle to hold the boards together.
- Separation: After assembly, you can snap the boards apart by hand or with a gentle press along the scored lines. The break should be clean and leave smooth edges if done correctly.

DIY PCB Panelization and V-Scoring at Home
While professional V-scoring is done with precision machines, hobbyists can experiment with DIY PCB panelization and V-scoring at home using simple tools. Keep in mind that homemade methods won’t match the accuracy of professional services, but they can work for small projects or prototypes. Here are some tips for V-scoring at home using simple PCB separation techniques:
Tools You’ll Need for DIY V-Scoring
- Rotary Tool or Dremel: A handheld rotary tool with a thin cutting wheel can mimic V-scoring by creating shallow grooves on the PCB.
- Straight Edge or Ruler: Use this as a guide to ensure straight cuts along the separation lines.
- Scoring Tool: A manual scoring tool or even a utility knife can work for thin PCBs (less than 1.6 mm thick).
- Safety Gear: Wear safety glasses and a dust mask to protect yourself from fiberglass dust when cutting PCBs.
Steps for V-Scoring at Home
- Plan Your Panel: Design your panel layout in software or manually mark where the boards will separate on a larger PCB.
- Mark the Lines: Use a permanent marker and a straight edge to draw lines where you’ll cut the grooves.
- Cut Shallow Grooves: With a rotary tool or scoring tool, carefully cut shallow grooves (about 0.2 mm deep) on both sides of the PCB along the marked lines. Don’t cut all the way through—leave enough material to hold the panel together.
- Test the Break: Once your assembly is complete, gently flex the panel along the scored lines to separate the boards. If the break isn’t clean, you may need to deepen the grooves slightly.
Important Note: DIY V-scoring at home can create rough edges or stress on components if not done carefully. Practice on scrap PCBs first to get a feel for the process, and consider professional manufacturing for critical projects.

Best Practices for PCB V-Scoring in Design and Separation
To achieve the best results with V-scoring, whether at home or through a manufacturer, follow these best practices during design and separation. These tips will help ensure clean breaks and protect your boards from damage.
Design Tips for V-Scoring
- Keep Edges Straight: V-scoring works best with straight lines. Avoid curved or irregular edges for separation.
- Maintain Proper Spacing: Leave at least 0.3 mm between individual boards to account for the width of the scoring tool. Check with your manufacturer for specific guidelines.
- Avoid Components Near Edges: Place components at least 1 mm away from the V-score lines to prevent damage during separation.
- Panel Size: Ensure your panel size fits within the manufacturing limits (often 50 mm x 50 mm minimum for small runs). Larger panels may require additional support structures.
Separation Tips
- Use Even Pressure: When snapping the boards apart, apply even pressure along the entire length of the score line to avoid uneven breaks.
- Support the Board: Place the panel on a flat surface or use a vice to hold it steady while separating.
- Smooth Edges if Needed: After separation, use fine sandpaper (600 grit or higher) to smooth any rough edges left by the break.
Alternatives to V-Scoring for PCB Separation
While V-scoring is a great option for many hobbyists, it’s not the only method for separating PCBs from a panel. Depending on your project needs, you might consider these alternatives:
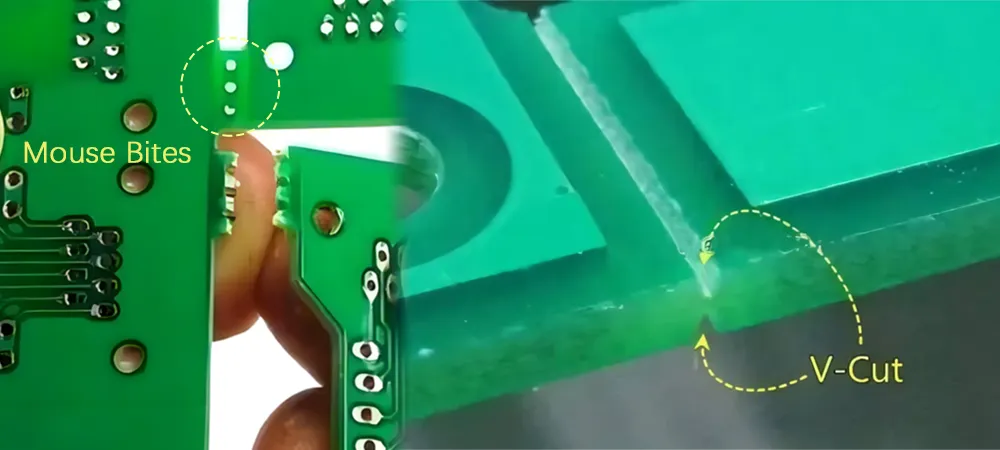
- Tab Routing: This method uses small tabs (or "mouse bites") to hold boards together, with holes drilled at intervals to weaken the connection. It’s useful for irregular shapes but can leave rougher edges compared to V-scoring.
- Manual Cutting: For very small projects, you can use a hacksaw or rotary tool to cut through the entire panel. This is time-consuming and less precise.
- Laser Cutting: A high-precision option for professional manufacturing, laser cutting is ideal for complex shapes but is often too expensive for hobbyists.
For most beginners, V-scoring strikes the right balance between cost, ease, and quality, making it a go-to choice for DIY PCB panelization.
Common Challenges with V-Scoring and How to Avoid Them
Like any technique, V-scoring comes with potential pitfalls, especially for beginners. Here are some common challenges and tips to overcome them:
- Uneven Breaks: If the grooves aren’t deep enough or are uneven, the board may not snap cleanly. Ensure consistent depth during scoring, and double-check your design files if using a manufacturer.
- Component Damage: Placing components too close to the score line can lead to cracks or stress. Always maintain a safe clearance (at least 1 mm) from the edge.
- Panel Weakness: If the remaining material after scoring is too thin, the panel might break during assembly. A typical thickness of 0.2 mm to 0.4 mm for the leftover material is recommended for standard 1.6 mm PCBs.
Conclusion: Start Your PCB V-Scoring Journey Today
V-scoring is a fantastic technique for hobbyists looking to streamline their PCB projects through efficient panelization and separation. By understanding the basics of PCB V-scoring for beginners, experimenting with DIY PCB panelization, and mastering V-scoring at home with simple PCB separation techniques, you can take your projects to the next level. Whether you’re working on a small prototype or a batch of boards for a larger project, V-scoring offers a cost-effective and practical solution.
Start by designing a simple panel for your next project, incorporating V-score lines, and testing the separation process. With practice, you’ll gain confidence in handling panelized boards and achieve cleaner, more professional results. Remember to prioritize safety and precision, especially when attempting DIY methods at home, and don’t hesitate to leverage professional manufacturing services for complex designs.
With these tips and techniques, you’re well on your way to mastering V-scoring and making the most of your PCB hobbyist journey. Happy designing!