ALLPCB


If you're a beginner in PCB design and wondering how to remove solder mask and paste mask from PCB pads, you're in the right place. This guide will walk you through the process step by step, whether you're working with through-hole or surface mount pads. In short, removing these masks involves adjusting the pad properties in your design software, often found in the solder mask expansion section or similar settings, to expose the copper underneath for soldering or other purposes. Now, let's dive into the details of solder mask, paste mask, and how to handle them effectively in your PCB projects.
What Are Solder Mask and Paste Mask in PCB Design?
Before we get into the removal process, it's important to understand what solder mask and paste mask are and their roles in PCB manufacturing. These layers are critical in ensuring your board functions as intended.
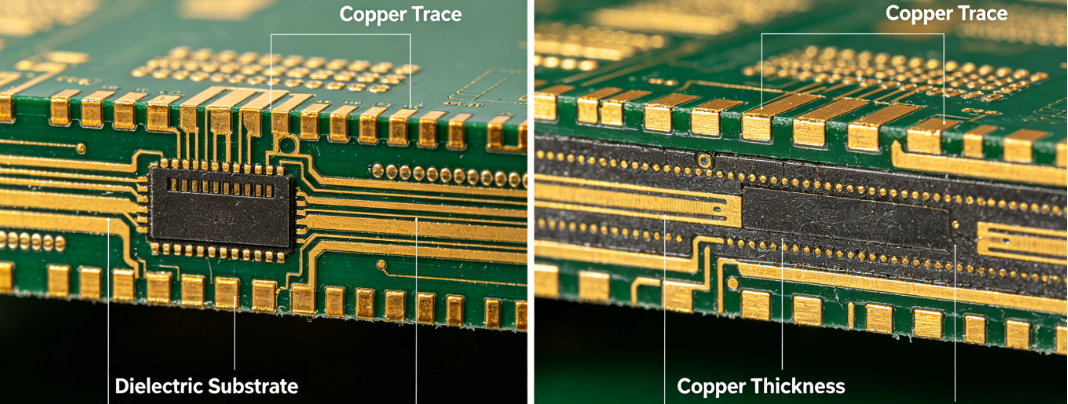
Solder Mask: This is a protective layer applied over the copper traces of a PCB. Typically green, though available in other colors like blue or red, it prevents unintended solder bridges during assembly and protects the copper from oxidation. It acts as an insulator, covering everything except the areas where soldering is needed, like pads and vias.
Paste Mask: Also known as the stencil layer, the paste mask defines where solder paste is applied during the assembly process for surface mount components. It ensures that solder paste is only placed on the pads where components will be mounted, helping with precise soldering.
Both layers are generated as part of the PCB design files and are crucial for manufacturing. However, there are scenarios where you might need to remove or adjust these masks from specific pads, such as for custom soldering needs or testing points.

Why Remove Solder Mask and Paste Mask from PCB Pads?
Removing solder mask or paste mask from PCB pads is not a common practice, but it can be necessary in certain situations. Here are a few reasons why you might need to do this:
- Exposing Copper for Custom Connections: You might need bare copper pads for direct wire soldering, testing probes, or creating a ground plane connection.
- Special Assembly Requirements: Some components or processes may require no solder paste on specific pads, so adjusting the paste mask is necessary.
- Design Errors or Modifications: If a pad was mistakenly covered by a mask in the design phase, you may need to remove it to correct the issue.
- Thermal Management: Exposed pads can help with heat dissipation in high-power applications by allowing direct contact with heatsinks or other cooling solutions.
Understanding your specific need for mask removal will help you apply the right settings in your design software and avoid manufacturing issues.
Key Concepts: Through-Hole vs. Surface Mount Pads
When dealing with mask removal, it's helpful to know the type of pads you're working with, as this can affect the process and settings.
Through-Hole Pads: These are used for components with leads that pass through holes in the PCB. The pads are typically larger and surround the drilled hole. Removing solder mask from through-hole pads often means exposing the entire pad area for soldering on both sides of the board.
Surface Mount Pads: These are flat pads on the PCB surface for components without leads, like resistors or ICs. Mask removal for surface mount pads usually focuses on precise areas to ensure proper solder paste application or exposure for other purposes.
The process of removing masks is similar for both types, but the pad properties and mask expansion settings might differ slightly based on the pad type.

Step-by-Step Guide to Remove Solder Mask and Paste Mask from PCB Pads
Now, let's get into the practical steps for removing solder mask and paste mask from PCB pads. This guide assumes you're using a popular PCB design tool. While specific steps may vary depending on the software, the general principles remain the same. We'll focus on adjusting pad properties and using features like the solder mask expansion section.
Step 1: Open Your PCB Design in the Editor
Start by loading your PCB layout in your design software. Ensure you're in the correct mode for editing the board layout, often referred to as "Draft Mode" or "Layout Editor" in many tools. This mode allows you to make changes to physical elements like pads and masks.
Step 2: Locate the Target Pad
Identify the specific pad or group of pads from which you want to remove the solder mask or paste mask. You can usually select pads by clicking on them directly in the layout view or by using a filter to select multiple pads with similar properties (e.g., all pads on a specific net).
Step 3: Access Pad Properties
Right-click on the selected pad or use the properties panel to access the pad's settings. Look for tabs or sections labeled "Pad Properties," "Attributes," or similar. This is where you'll find options related to masks.
Step 4: Adjust Solder Mask Settings
In the pad properties, locate the section for solder mask, often called "Solder Mask Expansion" or simply "Solder Mask." By default, this setting might be set to a small positive value (e.g., 0.1 mm or 4 mils), which creates a small opening around the pad. To remove the solder mask entirely from the pad:
- Set the solder mask expansion to "0" or uncheck the option if available. This ensures the mask does not cover the pad.
- Alternatively, some software allows you to disable the solder mask for individual pads by toggling a checkbox like "Remove Solder Mask."
Be cautious with this setting, as removing the mask exposes the copper, making it vulnerable to oxidation if not soldered or protected soon after manufacturing.
Step 5: Adjust Paste Mask Settings
Similarly, find the paste mask settings in the same properties panel, often labeled as "Paste Mask Expansion" or "Stencil Layer." To remove the paste mask:
- Set the paste mask expansion to "0" or disable it entirely if the software allows. This prevents solder paste from being applied to the pad during assembly.
- Some tools may require you to manually draw or delete paste mask shapes in a separate layer view if automatic settings aren't available.
Note: Removing the paste mask is critical if you don't want solder paste on the pad, especially for surface mount pads where components won't be placed.
Step 6: Verify Changes in Draft Mode or 3D View
After making these changes, switch to a 3D view or a draft mode preview (if available) to confirm that the solder mask and paste mask have been removed from the selected pads. You should see the bare copper of the pad exposed without any colored mask overlay.
Step 7: Generate Output Files and Review
Once you're satisfied with the changes, generate the manufacturing files (like Gerber files) for your PCB. Most design tools will include separate layers for solder mask and paste mask in these files. Open these layers in a Gerber viewer to double-check that the masks are indeed removed from the specified pads.
Suggested Image Placement: Place an image here showing a screenshot of pad properties in a PCB design tool with solder mask and paste mask settings highlighted. ALT Text:
Important Considerations When Removing Masks
While removing solder mask and paste mask from PCB pads can be straightforward, there are a few important factors to keep in mind to avoid issues during manufacturing or assembly:
- Check Manufacturer Guidelines: Some PCB manufacturers have specific requirements for mask settings. Ensure your design aligns with their capabilities, especially if you're exposing pads for special purposes.
- Protect Exposed Copper: Without a solder mask, copper pads can oxidize over time. Plan to apply solder or a protective coating soon after manufacturing if the pads will remain exposed.
- Impact on Assembly: Removing the paste mask affects how solder paste is applied. If you're hand-soldering or using a different assembly method, communicate this to your assembly team.
- Design Rule Checks (DRC): Run a DRC in your software after making changes. Some tools will flag exposed pads as potential errors if they violate default design rules.
Common Challenges and How to Overcome Them
As a beginner, you might encounter a few hurdles when adjusting mask settings. Here's how to handle them:
Challenge 1: Mask Settings Not Updating
If changes to solder mask or paste mask settings don't reflect in the layout, ensure you're editing the correct layer or pad. Some software requires you to refresh the view or regenerate the mask layers after changes.
Challenge 2: Bulk Editing Multiple Pads
Manually editing each pad can be time-consuming. Use the global editor or filter panel in your software to select multiple pads (e.g., all through-hole pads) and apply mask removal settings in bulk.
Challenge 3: Manufacturer Misinterpretation
Sometimes, manufacturing files might not clearly show mask removal due to layer misalignments. Always include a detailed fabrication note or readme file with your design files to explain any custom mask settings.
Tips for Beginners Working with Solder Mask Expansion and Pad Properties
If you're new to PCB design, managing solder mask and paste mask settings can feel overwhelming. Here are some practical tips to make the process easier:
- Start Small: Practice mask removal on a small test design before applying it to a complex board. This helps you understand how changes affect the final output.
- Use Default Settings as a Baseline: Most design tools have preset solder mask expansion values (e.g., 0.1 mm or 4 mils). Understand these defaults before modifying them.
- Document Changes: Keep a record of any custom mask settings in your project notes. This is helpful for future revisions or troubleshooting.
- Leverage Tutorials: Many PCB design tools offer built-in help or online tutorials specific to pad properties and mask settings. Use these resources to learn software-specific tricks.
Conclusion: Mastering Mask Removal for Better PCB Designs
Removing solder mask and paste mask from PCB pads is a valuable skill for any PCB designer, especially when working with through-hole or surface mount pads. By understanding pad properties and using features like the solder mask expansion section in your design software, you can customize your PCB to meet specific needs. Whether you're exposing copper for testing, adjusting for thermal requirements, or correcting a design oversight, the steps outlined in this guide will help you achieve the desired result.
Remember to verify your changes in draft mode or a 3D view, run design rule checks, and communicate any custom settings to your manufacturer. With practice, you'll gain confidence in handling these layers and ensure your PCB designs are both functional and reliable. Keep experimenting with small projects, and soon, managing solder mask and paste mask settings will become second nature.